
DataScience Workbook / 09. Project Management / 3. Resource Management / 3.4 Documentation Improvement Tools / 3.4.1 Introduction to Markdown
Why use Markdown?
Markdown ⤴ is a text-based mark-up language that is easily rendered into HTML and PDF. Markdown is widely used in various platforms, including GitHub, Jupyter Lab, Visual Studio Code (VSC), and Atom, making it an essential tool for developers, writers, and anyone who wants to create well-formatted and easily readable documents.
Reasons for using Markdown:
-
Simplicity: Markdown uses a straightforward syntax that is easy to learn and use. It employs a combination of plain text and simple formatting elements, such as headers, lists, emphasis, and links, allowing you to focus on your content without being overwhelmed by complex markup tags.
-
Portability: Markdown files are plain text files with a .md or .markdown extension, which means they can be opened and read in any text editor. This portability ensures that your documents can be easily accessed and edited across different platforms and devices without losing formatting.
-
Readability: Markdown’s syntax is designed to be highly readable, both in its raw form and rendered output. The syntax closely resembles plain text, making it intuitive to write and understand. Additionally, the rendered output maintains a clean and uncluttered appearance, making it ideal for presenting information in a clear and organized manner.
Some additional reasons for using Markdown:
- It has become a staple of reproducible science
- It can be rendered on GitHub ⤴ (also Bitbucket & GitLab) and makes online repositories more readable and accessible
- It is used as a notebook interface for R (Rmarkdown ⤴)
- It is used as the markup language for Jupyter notebooks ⤴, which provide a notebook interface for many languages, including Python and R
-
There are some freely available editors that make writing in Markdown pretty easy
- Windows and Linux: Github ATOM and REMARKABLE
- Mac OSX: MacDown
- Remark for markdown powerpoint like slides
Where to use Markdown?
Content that can be practically useful:
-
README.md: Markdown is commonly used to create README.md files in software repositories. A well-written README file can provide essential information about a project, including installation instructions, usage examples, and troubleshooting tips.
-
Documentation: Markdown is an excellent choice for creating technical documentation, tutorials, and user guides. This workbook is written using Markdown!
-
Blogging: Many platforms and content management systems support Markdown for writing blog posts. With Markdown, you can quickly draft and publish articles without dealing with the complexities of HTML formatting.
-
Note-taking: Markdown’s lightweight nature and portability make it an ideal format for taking notes. You can use Markdown in note-taking apps or plain text editors to create organized and easily searchable notes.
Markdown Cheatsheet
Headers
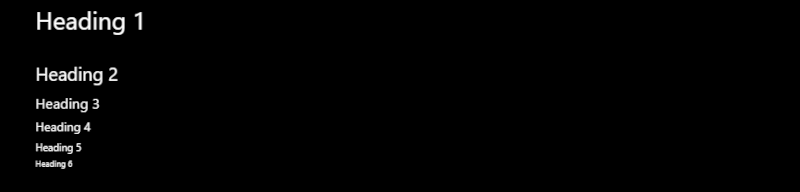
Headers are used to create different levels of headings in your document. You can create headers using the pound sign #. The number of pound signs indicates the level of the heading. For example:
# Heading 1
## Heading 2
### Heading 3
#### Heading 4
##### Heading 5
###### Heading 6
Generates:
Emphasis
You can emphasize your text using different styles.
- To create italic text, surround the text with asterisks
*or underscores_ - To create bold text, surround the text with double asterisks
**or double underscores__ - For bold and italic text, use triple asterisks
*** - To create
strikethrough text, use double tilde~~ - To format code or text
like thiswithin a line of text, surround it with single backticks ` - To create a separate code block, use triple backticks ```
Lists
Use asterisks * or hyphen - to make lists.
* list text 1
* list text 2
Generates:
- list text 1
- list text 2
Tables
Tables can be created using the pipe | and hyphen - characters.
| Header 1 | Header 2 |
|----------|----------|
| Cell 1   | Cell 2   |
| Cell 3   | Cell 4   |
Generates:
| Header 1 | Header 2 |
|---|---|
| Cell 1 | Cell 2 |
| Cell 3 | Cell 4 |
Step-by-step tutorial
In this tutorial, you will learn how to use Markdown in different environments, including GitHub docs, Jupyter Notebook, and VSCode.
Using Markdown on GitHub docs
GitHub ⤴ allows you to write and format documentation using Markdown. To use Markdown on GitHub Docs:
-
Create a new Markdown file with
.mdextension. -
Use the Markdown syntax ⤴ to format your document. You can use headers, emphasis, lists, links, images, code blocks, and more. Refer to the previous Markdown cheatsheet for a quick reference.
-
Preview your Markdown document to see how it will look once rendered. GitHub Docs provides a preview feature that allows you to view the rendered version of your Markdown file.
-
Commit and push your Markdown file to your GitHub repository. GitHub will automatically render the Markdown file, making it easy to share your documentation with others.
Using Markdown in Jupyter Notebook
Jupyter Notebook ⤴ is a popular interactive computing environment that supports Markdown for creating narrative content alongside code cells. Markdown cells in Jupyter Notebook allow you to document your code, explain your thought process, and present your results in a clear and organized manner.
Open a new Jupyter notebook and follow these steps to use Markdown in Jupyter Notebook:
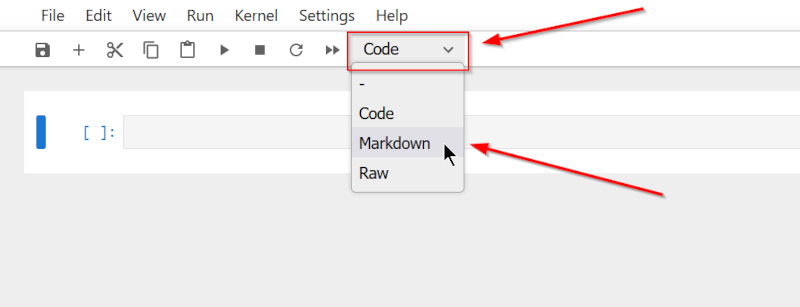
- Create a new Markdown cell by selecting “Markdown” from the cell type dropdown menu.
-
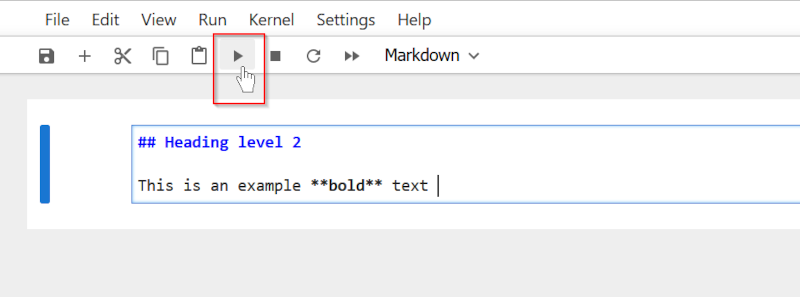
Use the Markdown syntax to format your text. You can include headers, emphasis, lists, links, images, code blocks, and more. Markdown cells support both plain Markdown and HTML tags, providing flexibility in styling and presentation.
-
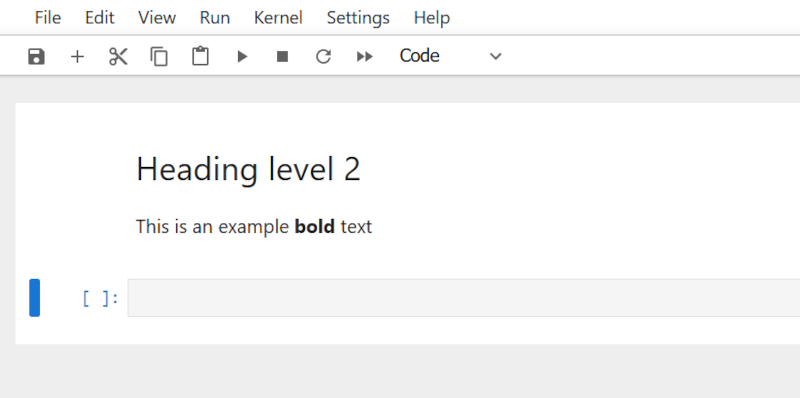
Preview the Markdown cell by running it. The Markdown content will be rendered as formatted text.
Note that the next cell type will switch to Code by default after you run the Markdown cell.
- Continue adding Markdown cells to document your code and analysis steps. You can intersperse Markdown cells with code cells to provide explanations and insights throughout your Jupyter Notebook.
Using Markdown in VSCode
Visual Studio Code ⤴ and Atom: Both VSCode and Atom have built-in support for Markdown. Both provide a seamless Markdown editing experience with features like syntax highlighting, live preview, and extensions for enhanced functionality.
To use Markdown in VSCode:
-
Open a Markdown file in VSCode or create a new one with a
.mdextension. -
Write your Markdown content using the appropriate syntax. As you type, VSCode will highlight the Markdown syntax elements, making it easier to spot any errors.
-
Use the built-in
Markdown: Previewfeature to see a side-by-side view of the Markdown file and the rendered output. You can toggle the preview usingCtrl+K, Vshortcut keys or searching for “Markdown: Open Preview to the side” from the Command Palette (Ctrl+shift+P). -
Customize your Markdown experience by installing extensions from the VSCode Marketplace. There are numerous Markdown extensions available that provide additional features like table generation, mathematical equation support, and more.
By following these steps, you can effectively use Markdown to create well-formatted and visually appealing documents, code explanations, and documentation in your preferred environment!