
DataScience Workbook / 09. Project Management / 3. Resource Management / 3.4 Documentation Improvement Tools / 3.4.3 Tools for Code Documentation
Introduction
The importance of detailed and comprehensible code documentation cannot be overstated. This guide seeks to familiarize you with a range of tools tailored for effective code documentation. Whether you’re commenting on intricate algorithms, creating API references, or offering user guidelines, the tools covered here cater to every facet of software description. Throughout this guide, we will explore the nuances of each tool, providing practical demonstrations and insights to enhance the readability and accessibility of your code for both your peers and your future self.
Empowering through code documentation
A well-documented codebase illuminates the underlying logic and design decisions, facilitating a smoother development lifecycle. It promotes understanding, ensures maintainability, and augments the trustworthiness of the software or algorithm at hand. More than a present-day utility, proper code documentation serves as a historical record, enabling developers to efficiently trace back evolutions, identify past solutions, and inform optimizations for future iterations. This legacy aspect not only streamlines debugging and enhancements but also becomes a foundation for boosting efficiency and sparking innovation in upcoming developments.
General Guidelines
Regardless of the scale or type of code, documentation plays a crucial role.
Here’s a guide to understanding when and how to document your code.
1. Document all scales of code
Documentation is essential for code of all scales, from simple scripts to complex systems, easing understanding its functionality, future modifications, and enhancing collaboration among developers with varying levels of familiarity with the code.
| small scale code | medium scale code | large scale code |
|---|---|---|
scripts, short programs |
modules, libraries |
entire systems, platforms |
| Even a simple script that’s a few lines long can benefit from a brief comment explaining its purpose. This helps future readers (or even the same developer) understand the purpose of the script after a long time. | Documentation should explain the purpose of modules, the functions they provide, any classes they contain, and how they can be used. | Comprehensive documentation is required, including high-level architecture diagrams, flow charts, module explanations, API references, and more. |
In essence, the scale or type of code does not negate the need for documentation. Instead, it dictates the depth and style of documentation required. Always aim for clarity, relevance, and accuracy in documentation.
2. Types of code to document
Different types of code necessitate varying documentation approaches to clarify their purpose and usage. Depending on the complexity and scale, it’s essential to explain not only functional aspects but also underlying data structures and code modifications, all of which contribute to a comprehensive understanding.
| type | comment |
|---|---|
| public APIs | These need thorough documentation since they are used by other developers. They should have explanations for every function, parameter, return type, and potential exception. |
| algorithms | Any code that is not straightforward should have accompanying comments explaining the logic and reasoning. |
| data structures | Especially custom ones that aren’t standard in the programming language being used. |
| workarounds | Temporary fixes (hacks) can be especially confusing to others if not properly commented. |
| configuration | These often need comments to explain the purpose of each setting. |
| dependencies | Any external systems, libraries, or tools that the code relies on should be documented. |
| deprecated code | If some part of the codebase is outdated or should not be used, it should be clearly documented. |
3. Types of documentation
Types of documentation encompass different solutions to provide varying levels of detail and guidance for code comprehension and usage. While all developments mandate in-code documentation to elucidate the purpose of specific code blocks, more complex projects further benefit from dedicated external documentation such as readme files or comprehensive guides that shed light on the broader usage and applications.
| type | description |
|---|---|
| in a code file: | |
inline comments |
Directly in the code to explain complex, tricky, or important code blocks. |
function/method comments |
Describe what a function/method does, its parameters, return value, and exceptions. |
module/class comments |
High-level overview of a module or class. |
error handling |
Describe how errors or exceptions are managed. |
| in separate files: | |
Readme files |
Explain the software, how to install, configure, and use it. |
user guides |
For end-users to understand how to use the software. |
developer guides |
In-depth explanation for developers who want to contribute to or modify the software. |
API documentation |
Auto-generated from code comments using tools like JavaDoc, Doxygen, or Sphinx. |
4. Good practices
Good practices for creating documentation prioritize clarity, relevance, regular updates, and alignment with the evolving code to ensure effective communication and long-term code maintainability.
| action | comment |
|---|---|
| general | |
stay updated |
Documentation should evolve with the code. Outdated documentation can be more harmful than no documentation. |
avoid redundancy |
If something is evident in the code, such as a getter or setter method, extensive comments might not be needed. |
maintain consistency |
Use a consistent style, format, and terminology throughout the documentation for easier readability and understanding. |
consider all readers |
Sometimes, non-developers and non-technical readers, like students or scientists outside the field, might need to understand the documentation. |
integrate feedback |
Actively seek and incorporate feedback from users and developers to continuously improve the documentation’s clarity and utility. |
| technical | |
use meaningful names |
Use meaningful variable and function names. This makes the code self-explanatory, reducing the need for comments. |
add table of contents |
For more extensive documentation, a well-organized table of contents helps users quickly navigate to relevant sections. |
add visuals |
Diagrams, flowcharts, and other visual aids can help explain complex systems or architectures more succinctly than text alone. |
include examples |
Practical code examples can help clarify complex points and show the intended usage of functions or classes. |
track issues |
Noting any known bugs, limitations, or areas of improvement can help developers and users anticipate challenges. |
Tools for Code Documentation
Tools for code documentation are crucial in ensuring the readability, maintainability, and scalability of software developments. These tools include commenting utilities, API documentation generators, version control systems, and code review platforms. By providing systematic documentation, they aid in creating comprehensive and user-friendly manuals and annotations, making complex code accessible to both the original authors and fellow developers. Additionally, these resources serve as knowledge bases, allowing seamless exploration and modification of the code segments, promoting consistent updates in development practices. Ultimately, having effective code documentation tools is essential for enhancing code quality, team collaboration, and the sustainability of software projects.
| tool type | when to use? |
|---|---|
in-code comments |
Manually annotate code blocks, functions, and classes in your developments. |
documentation generators |
Use tools like JavaDoc, Doxygen, or Sphinx to generate documentation automatically. |
version control |
Use platforms like Git and provide meaningful commit messages. |
code reviews |
They can help in identifying areas of the code that are not clear and need better documentation. |
In-code documentation
In-code documentation is the practice of embedding explanations and clarifications directly within the source code.
In-code documentation serves as a roadmap for developers, detailing the structure, purpose, behavior, and nuances of the codebase. It ensures that code remains understandable, maintainable, and approachable for current and future developers. While the exact components of in-code documentation might vary depending on the language, platform, or project, the below elements give a broader perspective of what it might encompass:
| comment type | description | examples |
|---|---|---|
| inline comments | Brief annotations within the code that explain specific lines or sections, making the logic or purpose clearer. | headers, setup instructions or code comments |
| block comments | Descriptions placed above or alongside blocks of code to describe functionality or important details. | docstrings or TODO lists |
| error logs & verbosity | Error logs are messages printed when an error occurs during the program’s execution. They help in diagnosing and tracing the issue. | runtime progress or location of error |
| usage message | A brief guide, usually outputted to the console, that describes how to use a program or command, including its available options and arguments. | explanations of options or parameters |
Tools for creating in-code documentation
All forms of in-code documentation can be crafted using the same tools as those for code development, ranging from basic text editors to sophisticated integrated development environments (IDEs).
| tool | type | supported languages | tutorial |
|---|---|---|---|
| Visual Studio Code | development environment with GUI | universal | tutorial ⤴ |
| Atom | development environment with GUI | universal | (obsolete) |
| Sublime Text | development environment with GUI | universal | |
| Eclipse | development environment with GUI | universal | |
| PyCharm | development environment with GUI | Python |
tutorial ⤴ |
| RStudio | development environment with GUI | R |
tutorial ⤴ |
| nano, vim, mc | CLI text editor, use in terminal | universal | tutorial ⤴ |
Remember to always exercise caution when downloading software; ensure that you're getting it from the official source or a trusted distributor.
On a cluster (HPC), text-based editors like nano and vim often come preinstalled, whereas GUI-based tools are usually not available, though it's worthwhile to check for Open OnDemand services. On your local machine, you'll typically need to manually install these tools.
Inline comments
Inline comments are essential tools in the developer’s arsenal, serving as in-the-moment annotations that provide context to the codebase.
Inline comments are annotations placed directly within the source code. They are used to describe the purpose and behavior of specific sections of the code, providing context and clarity to developers who might be reading or maintaining the code later.
How to add inline comment?
In practice, an inline comment is text that follows a special character, typically # or //, which distinguishes the comment from procedural code, making it non-executable and solely for human reading.
Inline comments can be added:
- directly above a code block to serve as a
headerproviding brief description# This is an inline comment in Bash echo "Hello, World!" - immediately after specific lines of code on the same line to elucidate that particular instruction/operation
echo "Hello, World!" # This comment is after the command
Examples of inline comments
- BASH, use
#for inline comments
# Display the results for all items in a loop
for item in world universe
do
    echo "Hello, $item!"                             # display the particular result
done
- R, use
#for inline comments
# Define a function to sum numbers
sum_values <- function(a, b) {
    return(a + b)                                    # compute the sum of two values
}
- PYTHON, use
#for inline comments
# Define a function to sum numbers
def add(a, b):
    return a + b                                     # add two numbers and returns the result
- C++, use
//for inline comments
#include<iostream>                                   // include the iostream library for input/output operations

// Define a function that returns integer
int main() {
    std::cout << "Hello, World!" << std::endl;       // print greeting to the console
    return 0;
}
^ NOTE: In C++, the # character is used to denote preprocessor directives, not inline comments.
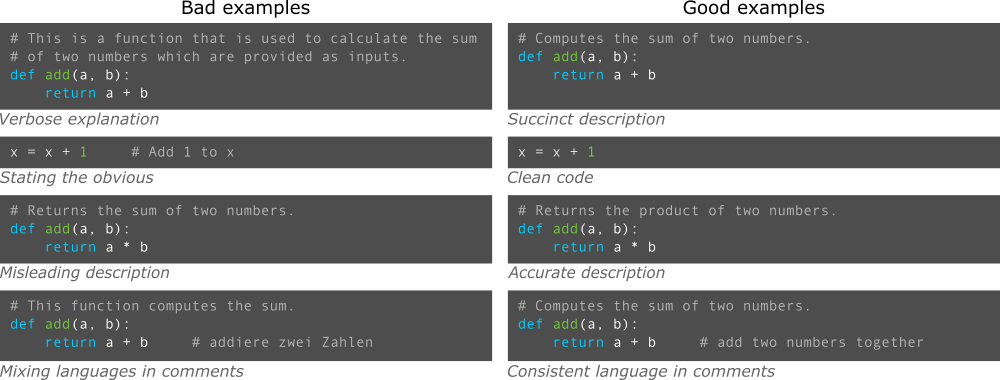
While the examples above are simplistic for illustrative purposes, it's crucial in real-world development not to over-comment by annotating every straightforward operation, as it can clutter the code and reduce readability.
When to use inline comments?
- Complex algorithms or logic that might not be immediately obvious.
- Workarounds or hacks, especially when the reason isn’t clear from the code itself.
- Important assumptions that the code is making or distinguishing major steps.
- When introducing potential performance issues.
- Sections of code that interact with external systems or APIs.
- Temporarily disabling sections of code (often referred to as “commenting out”).
Tips for good inline comments
-
be clear and concise
Comments should be easy to understand but avoid being overly verbose. -
avoid obvious comments
Don’t comment on things that are clear from the code itself (e.g.,i++ # Increment i). -
update comments as code changes
Outdated comments can be misleading. -
use a consistent style
If you’re working in a team, it helps if everyone follows a similar comment style.
Block comments
Block comments are another indispensable tool in a developer’s toolkit, acting as extended annotations that can span multiple lines and provide more comprehensive explanations compared to inline comments.
Block comments, unlike inline comments, are designed to describe larger sections of code, potentially spanning multiple lines. They offer a detailed context, often used for top-level documentation like function or module descriptions, or to annotate longer sections of code where a brief inline comment might be insufficient.
How to add block comment?
Block comments usually begin and end with specific delimiters that distinguish them from inline comments and the procedural code. They’re typically placed:
- at the beginning of a file or module to describe its overall purpose (see Bash example below)
- before a function or class definition to explain its functionality (see Python example below)
- anywhere within the codebase as TODOs to highlight areas that need future attention (see R example below)
TODOs are block comments in the codebase flagged with the keyword "TODO" to mark specific sections for further development. TODOs can be strategically placed anywhere in the code to provide developers with guidance on areas requiring attention, enhancement, or the addition of new features.
Examples of block comments
- BASH, use
#at the beginning of each line in a block comment
#!/bin/bash

# INFO:
# This script prints a greeting message followed by the current date.
# It supports both a default greeting and user-specified greeting.

GREETING="Hello, World!"                # default greeting message

# Check if a custom greeting is provided
if [ "$#" -ne 0 ]; then
    GREETING="$@"
fi

echo "$GREETING"
echo "Today is: $(date)"
- R, use
#at the beginning of each line in a block comment
# This script performs a linear regression on a dataset
# TODO:
# - Add data cleaning steps to handle missing values
# - Include code for data visualization (histograms, scatter plots)
# - Implement cross-validation for better model evaluation

# Load the necessary libraries
library(lm)

# Sample data
data <- data.frame(
  x = c(1, 2, 3, 4, 5),
  y = c(2, 4, 5, 4, 5)
)

# Perform linear regression
model <- lm(y ~ x, data=data)
summary(model)
- PYTHON, docstrings and block comments use
'''text'''or"""text"""
# Below you can see a docstring for a function

def add(a, b):
    """
    Adds two numbers together.

    Args:
        a (int or float): The first number.
        b (int or float): The second number.

    Returns:
        int or float: The sum of a and b.
    """
    return a + b
In Python, a docstring is a special string literal that occurs as the first statement in a module, function, class, or method definition, used for providing a concise explanation or documentation for that code segment. The tools like sphinx or pydoc can process this convention to automatically generate documentation.
- JAVA, use
/** text */syntax for (multi-line) block comments
/** Represents a basic calculator. */

public class Calculator {

    /**
     * Sums two integers.
     *
     * @param a the first integer
     * @param b the second integer
     * @return the sum of a and b
     */
    public int add(int a, int b) {
        return a + b;
    }
}
In Java, JavaDoc is a tool and documentation standard used to generate API documentation in HTML format from Java source code. The source code is annotated with special JavaDoc comments, which are distinct from regular comments. These JavaDoc comments start with
/** and end with */.
In Java, single-line comments are preceded by
// and are not processed by javadoc tool. Only comments starting with /** and ending with */ are recognized and processed by javadoc as JavaDoc comments. Even when the syntax /** text */ is on a single line, it is still a valid JavaDoc comment.
- C++, use
/* text */syntax for (multi-line) block comments
/*
This function computes the product of two numbers.
Takes in two integers and returns their multiplication.
*/
int multiply(int a, int b) {
    return a * b;
}
Just like with inline comments, avoid the temptation to overuse block comments. While they're useful for providing context, excessive or redundant comments can make code harder to read.
When to use block comments?
- Providing documentation at the beginning of a file or module.
- Describing the purpose and usage of functions, methods, classes, or modules (often in the form of docstrings).
- Explaining complex algorithms or logic spanning multiple lines.
- Notating developer’s TODOs or areas needing further attention.
Tips for good block comments
-
follow conventions
If a language or framework has a standard for block comments (e.g., JavaDoc or Python’s docstrings), use it to ensure consistency and potential tool integration. -
be thorough but concise
Block comments allow for more detail, but avoid excessive verbosity. -
group related comments
If commenting on a sequence of code lines, keep them together in a single block comment rather than multiple inline comments. -
stay updated
Ensure that block comments reflect code changes to prevent confusion.
Error logs and verbosity
By incorporating relevant information to log messages, developers create a vital component of code documentation, aiding in the identification, diagnosis, and resolution of issues. Logging tools manages messages during a program’s runtime, allowing users to adjust verbosity levels to meet specific needs.
Error logs are records generated by a program that capture error events or notable runtime incidents. These logs offer invaluable insights into problematic code blocks, making debugging and performance optimization more efficient.
What is verbosity?
Verbosity refers to the level of detail included in messages or logs, especially error logs, with higher verbosity levels providing more detailed and informative content about the system's status, processes or issues.
How are error logs generated?
Log messages, strategically placed by developers at critical points in the code, communicate various events — be it issues, progress, or the completion of specific steps during runtime. The depth and detail of these messages are governed by verbosity levels set by developers, categorizing the significance and granularity of each event. When a user selects a verbosity level during program execution and the code reaches a relevant logging point, the appropriate log message is displayed, offering insights into the ongoing process or potential issues.
As a developer, it's your responsibility to determine where and what log messages should be added to the codebase. Remember, the system can only report what you instruct it to. If you don't insert log messages to the code, no messages will be printed when an error occurs. Proactive logging will aid in better runtime insights and troubleshooting.
Error logs can contain sensitive information. Always ensure that logs do not expose confidential data or security-critical information, especially when deployed in production environments.
How to create a logging message?
Logging options range from utilizing dedicated logging tools, which offer advanced features like filtering and managing log verbosity, to simpler methods like printing messages directly to the console. While employing specialized logging tools is highly recommended, utilizing basic print statements (or echo in Bash scripting) can still be beneficial for getting insights about the issue.
Examples of error logging
Several programming languages provide built-in mechanisms or libraries to manage verbosity and capture detailed logs.
- BASH, use
1>&2for redirecting stdout to stderr
In Bash, logging options primarily revolve around redirecting standard output (stdout) and standard error (stderr) to various destinations.
# Redirecting stdout to a file:
command > file.txt

# Redirecting stderr to a file:
command 2> error.txt

# Redirecting both stdout and stderr to a file:
command &> file.txt

# Redirect standard output to standard error:
echo "This is an error" 1>&2
The last example, instead of displaying the message on the standard output (like it would by default with echo), it sends the message to the standard error stream.
For system-wide logging, Bash scripts can log messages to syslog using the
logger command, making the logs accessible through tools like journalctl or tail on the /var/log/syslog file.
# To log a message with a specific priority (for example, error) and under a specific tag:

logger t MYSCRIPT -p user.err "This is an error message from my script"

# To filter and view messages from a custom tag "MYSCRIPT":

journalctl -t MYSCRIPT

# To view the latest log messages and possibly spot yours:

tail -n 50 /var/log/syslog
- R, use the
futile.loggermodule
R language (commonly used for statistical computing and graphics) provides several logging options to keep track of events, messages, warnings, and errors.
- Built-in messaging functions:
message(): For general-purpose logging, such as informational messages.warning(): To generate warning messages.stop(): To generate an error message and terminate the execution.cat(): To write out results, generally used for simpler logging and console outputs.
- Logging packages:
futile.logger: This package provides a flexible logging framework,. It allows setting logging levels (DEBUG, INFO, WARN, etc.) and directing output to different locations.log4r: nother logging package for R.
# Example using futile.logger:

library(futile.logger)
flog.threshold(DEBUG)
flog.debug("This is a debug message")
flog.info("This is an info message")
- PYTHON, use the
loggingmodule
Python provides a variety of logging options to assist developers in generating and managing messages related to the execution and potential issues of their applications. In particular, Python includes a powerful built-in logging module which offers a flexible framework to produce and manage log messages. The module allows for different logging levels: DEBUG, INFO, WARNING, ERROR, and CRITICAL. Logs can be directed to various outputs and formatted in different ways. It also supports more advanced features like logging to multiple destinations, custom log record formats, and filtering logs.
# Example using the logging module:

import logging

logging.basicConfig(level=logging.DEBUG)
logging.debug("This is a debug message")
logging.info("This is an info message")

# Logging to files:
logging.basicConfig(filename='app.log', level=logging.DEBUG)
logging.error("This error will be written to 'app.log'")
For simpler scripts or applications, developers sometimes just use print() statements to log messages to the console. Using the
logging module or any dedicated logging library in Python is advantageous over simple print() statements because it provides granularity (via log levels), flexibility in log destinations (console, file, remote server, etc.), and precise control.
- C++, use
cerrfunctionality
In C++, logging doesn’t have a standardized built-in solution. However, various tools and libraries have been developed over the years to fulfill the logging requirements. The simplest solution is to use Standard Output and Error Streams:
#include <iostream>

std::cout << "Info: This is a log message." << std::endl;
std::cerr << "Error: This is an error message." << std::endl;
You can also redirect logs to a file:
#include <fstream>

std::ofstream log_file("logfile.txt");
log_file << "This is a log message written to a file." << std::endl;
log_file.close();
It's important to choose a logging approach based on the requirements of the project. While using standard streams might be adequate for simple applications, for larger projects or applications with specific logging needs, dedicated libraries like spdlog or Boost.Log would be more appropriate.
When to use logging tools?
- To capture regular progress, status updates, or the completion of specific tasks in a program.
- To detect warnings or potential issues which don’t halt program execution but may affect results.
- To trace the sequence of events leading up to a failure.
- When interacting with external systems, and a failure response is received.
- When an unexpected situation arises, which the system cannot handle.
Tips for effective error handling & program verbosity
-
be precise
Ensure that error messages provide specific details about the problem. -
ensure clarity
Make certain that logs are clear and comprehensible, even for someone unfamiliar with the codebase. -
manage verbosity
Use built-in tools or external libraries to filter and manage the level of detail in logs. -
update logs as code evolves
Ensure that log messages remain relevant and are updated alongside code changes. -
use a consistent style
Like comments, maintain a uniform logging style, especially when working in teams.
Usage message
Usage messages or help messages are important elements in the developer and user toolkit, acting as real-time guidance that outline how to use a specific tool, command, or software effectively. They are vital part in code documentation, especially for command-line interfaces or APIs.
Usage messages, also known as help messages, are concise, structured text descriptions displayed to the user, typically upon invoking a command with specific flags like -h or --help. They describe how to use a program, what arguments it accepts, and provide a brief explanation of each option.
Depending on the situation or tool, one’s role can shift between being a user (seeking guidance on software features), developer (responsible for creating it), or both (enhancing it based on personal experiences) when interacting with a usage (help) message. This dual perspective can be advantageous, as understanding the user experience can lead to the creation of more intuitive and effective help messages.
When to display a usage message? (being a software user)
- Display a usage message when first encountering a new software or tool to understand its basic functions.
- Pull up the usage message when uncertain about specific commands, syntax or options to preview usage examples.
- Seek the usage message when confronting unexpected software behavior to verify command correctness.
- Refer to the help message when wishing to delve into advanced features or lesser-known options.
How to display help message? (being a software user)
Usually, usage messages are displayed:
- when the user specifically requests help using flags like
-hor--help
$ myprogram --help

Usage: myprogram [OPTION]... [FILE]...
Description: Briefly explains what the program does.

Options:
  -h, --help          Display this help message and exit.
  -v, --version       Display the program's version.
  -f, --file <file>   Specify a file to operate on.
  -o, --output <dir>  Specify the output directory.
- when the user provides invalid input or arguments
$ myprogram --man

myprogram: unrecognized option `--man'

usage: myprogram [-f file] [-o file]
Most bash commands, standalone tools, and applications from GitHub repos typically offer a standardized approach, and you can view their usage syntax and options using '--help', provided the developer has set up a usage message.
Examples of usage message (being a software user)
In Bash, you can use command --help for a brief usage overview, while man command offers more comprehensive information and details about each command. Try these commands for commonly used Bash commands such as ls grep awk wget tar ssh git to see examples of well-crafted usage message.
grep --help

man  grep
Many standalone CLI tools and applications cloned from GitHub repositories often support the --help option (*if developers have included it) to provide usage syntax and options, so it’s beneficial to use it as a starting point for understanding the tool’s functionality.
Examples of useful standalone tools and GitHub-hosted applications for researchers:
| CLI_tool_ | description | tool_type_ | usage_message_ |
|---|---|---|---|
| Python | Python language is an essential tool for data science. Python can be run as an interpreter or invoked from the command line to execute scripts. | programming language | python --help |
| R | R language is an essential tool for statistics. You can run R scripts directly from the CLI. | programming language | Rscript --help |
| SQLite | A C-language library that implements an SQL database engine. | precompiled binary | sqlite3 --help |
| BLAST | BLAST is a standalone software suite (written in C and C++) including several binary tools used for comparing an input sequence against a reference database of sequences. | precompiled binary | blastn --help blastp --help |
| GATK | Genome Analysis Toolkit is used for variant discovery in high-throughput sequencing data. | Java archive (JAR file) | gatk --help |
| FastQC | FastQC is a tool for assessing the quality of raw sequence data from high-throughput sequencing experiments. [GitHub] |
Java archive (JAR file) | fastqc --help |
| Find-GCP | The small python utility dedicated to geospatial analysis. It automatically finds ArUco markers (ground control points) in digital photos. [GitHub] |
python script | python gcp_find.py --help |
As you cane see in this table, regardless of the programming language, implementation, or distribution type, many tools are designed to provide a standardized usage message with --help option for user guidance. Note that you typically need to install these tools first.
When to include a usage message in your code? (being a software developer)
- For every command-line tool or script, a usage message is essential to guide users on the arguments and options.
- For functions or APIs that have multiple configurable parameters.
- When the intended usage of the software isn’t immediately evident from the context.
When to trigger printing a usage message? (being a software developer)
- When the user explicitly requests it using flags like
-hor--help. - When the user provides invalid input, unrecognized option or incorrect number of arguments.
- When the application starts up for the first time, to guide a new user on the usage syntax.
- If the software requires some configuration before it can run correctly (e.g., API keys, configuration files).
- If there’s a major change or update to the software, you might consider displaying a “what’s new” guide.
A well-crafted usage message is invaluable to users of your software, providing them with concise information about how to interact with the program and its available options.
Many CLI libraries/frameworks (e.g., argparse in Python) automatically generate usage messages based on the defined options/commands. Leverage these to maintain consistency and accuracy.
Examples of crafting a usage message (being a software developer)
Different programming languages and platforms have varying libraries or mechanisms to handle and display usage messages. Create a concise, informative, and clear usage message that outlines the program’s purpose, input parameters, options, and examples, ensuring future you can quickly understand and utilize its functionality without revisiting the code or documentation.
Ensure that your usage message stays updated with the software's functionalities. An outdated or incorrect usage message can confuse or mislead users.
Overloading the usage message with too much information or presenting it in a non-structured manner can overwhelm users. Ensure the message is succinct and comprehensible.
- BASH
Even in simple Bash scripts, incorporating a usage message can be invaluable, aiding memory when revisiting the script in the future. In Bash, crafting the usage message involves creating a string of “echoed” text that clearly informs the user how to use the script. This message can be displayed conditionally when the user requests help (e.g., using a -h or --help flag as the first argument). You can also add different conditions for missing inputs or an incorrect command syntax.
if [ "$1" == "--help" ] || [ "$1" == "-h" ]; then
    echo "Usage: myscript [OPTIONS]..."
    echo "A script to demonstrate something."
    echo ""
    echo "Options:"
    echo "-h, --help    Show this help message"
    echo "-v, --verbose Enable verbose mode"
    exit 0
fi

# rest of the script...
Assuming your code was saved in my_script.sh script file, you can test a new help message feature like this:
. ./my_script.sh --help
- R
In an R script, a usage message can be crafted using the cat() function to display a descriptive message that informs the user about the correct way to utilize the script.
if(length(commandArgs(trailingOnly = TRUE)) < 1) {
    cat("Usage: Rscript myscript.R <input_file>\n")
    quit(save="no", status=1)
}
input_file <- commandArgs(trailingOnly = TRUE)[1]

# rest of the script...
In this example, the script expects at least one argument, for example an argument for input_file. If it’s not provided, the usage message will be displayed and the script will exit.
- PYTHON
In a simple Python script (with not many options), a usage message can be crafted using the print() function and the sys module to display a message that informs the user about the correct way to use the script.
import sys

if len(sys.argv) < 2:
    print("Usage: python myscript.py <input_file>")
    sys.exit(1)

input_file = sys.argv[1]

# rest of the script...
In this example, the script expects at least one argument, in this case an argument for input_file. If it’s not provided, the usage message will be displayed and the script will exit.
In most programming languages, the first argument (sometimes indexed as 0, e.g., in Python) is the name of the program itself; therefore, if you're checking the number of arguments to display a usage message when only the program name is executed, the condition should typically be set to <2, as the first user-provided option is always the second argument.
In Python, the argparse module provides a convenient way to define and handle command-line arguments, and it automatically generates a usage message based on the defined arguments. It is a recommended approach when your code expects numerous arguments or offers multiple options, ensuring clarity and efficient parsing.
Here’s a practical example to craft a usage message for a script that takes multiple arguments:
import argparse

# Initialize the parser
parser = argparse.ArgumentParser(description="A tool to demonstrate something.")

# Define arguments
parser.add_argument('-i', '--input', required=True, help='Input file path')
parser.add_argument('-o', '--output', required=True, help='Output file path')

# Parse the arguments
args = parser.parse_args()

# rest of the script...
In the parser.add_argument() method, apart from required and help, you can set several other parameters, including but not limited to:
Assuming your code was saved in my_script.py script file, when you run:
python script.py --help
the argparse module will automatically generate a usage message for your script. The message will be based on the arguments and descriptions you’ve added to your parser.
For the provided code, the usage message would look something like:
usage: script.py [-h] -i INPUT -o OUTPUT

Process some files.

optional arguments:
  -h, --help            show this help message and exit
  -i INPUT, --input INPUT
                        Input file path
  -o OUTPUT, --output OUTPUT
                        Output file path
NOTE: The -h or --help option is added by default by argparse, and it displays the help message for the script.
- C++
Here’s how you can craft and display a usage message:
- Identify the tool’s requirements: Clearly understand what arguments your tool requires.
For instance, let’s say your program requires two arguments: a filename and an operation.
- Craft the usage message: Based on the requirements, create a concise yet descriptive usage message.
- Check the input arguments: When your program starts (see the main(){} function), check the passed arguments to see if they fit the requirements. If not, display the usage message and exit.
#include <iostream>
#include <cstring>

void displayUsage(const char* programName) {
    std::cerr << "Usage: " << programName << " <filename> <operation>\n";
    std::cerr << "  <filename>: The name of the file to be processed.\n";
    std::cerr << "  <operation>: Either 'read' or 'write'.\n";
}

int main(int argc, char* argv[]) {
    if (argc != 3) {
        displayUsage(argv[0]);
        return 1;
    }

    // rest of your code...

    return 0;
}
In this example, if the number of arguments is not 3, then the condition if (argc != 3) will be true and the usage message is displayed. The argv[0] value (the first argument) is the program name, in this case, “my_program”. The displayUsage() function provides the general format of the syntax (usage) as well as detailed explanations for each argument.
Assuming the program is compiled and named my_program, you can run in by calling its name followed by the arguments. Here’s what the output will look like when run without arguments:
Usage: my_program <filename> <operation>
  <filename>: The name of the file to be processed.
  <operation>: Either 'read' or 'write'.
Tips for creating effective help messages
-
be clear but comprehensive
Detail all necessary options and parameters without overloading the user. -
organize systematically
If there are many options, group them logically to improve readability. -
use consistent terminology
If you refer to them as “options” in one place, avoid switching to “flags” elsewhere. -
provide defaults, differentiate optional and mandatory params
If some options have default values, clearly mention them.
Commonly, square brackets ([]) indicate optional elements, and angle brackets (<>) denote required elements. -
give examples
A practical example can clarify a tool’s functionality faster than a descriptive paragraph. -
update as necessary
Whenever the software’s functionality changes, update the usage message accordingly. -
consistency is key
If you’re creating multiple tools or utilities, maintain a consistent structure and style across all usage messages.
Remember, the key of usage message is to make it as easy as possible for a user, whether they're a newbie or an expert, to understand and use your software effectively. When crafting a usage message for your program, design it as if you're leaving instructions for your future self, detailing both its purpose and usage instructions.
External documenattion
External documentation refers to all documentation that isn’t embedded directly within the source code.
This documentation helps both developers and users understand and utilize the software. Proper external documentation can greatly reduce the learning curve and provide clear instructions on how to get the most out of a software product.
While the specific types of external documentation can differ based on the software’s audience, purpose, or development phase, the categories below offer a structured overview of the various forms it might encompass:
| documentation category | description | examples |
|---|---|---|
| Introductory Documentation | Initial info for getting acquainted with the software. | Readme Installation files |
| User-Centric Documentation | Documentation aimed primarily at end-users. | User Guides, Tutorials, FAQs |
| Developer-Centric Documentation | Info for developers who want to contribute or understand the code. | Developer Guides, Contribution Guidelines |
| Reference Materials | Detailed technical info that provides specific insights or clarifications. | API Documentation, Architecture Diagrams, Glossaries |
| Meta Documentation | Information about the documentation or process itself. | Release Notes, License Documentation |
Maintaining external documentation can be challenging. As software evolves, documentation needs to be updated to reflect those changes. Outdated or incorrect documentation can sometimes be worse than no documentation.
Using tools and practices like continuous integration to check documentation, or treating documentation as code (where changes to software and its documentation are done simultaneously) can help address these challenges.
Benefits of External Documentation:
- Maintainability
Over time, original developers might leave, and new ones join. Documentation ensures continuity in understanding.- Onboarding
New team members can quickly become productive if good documentation is available.
- Onboarding
- User satisfaction
External users or developers can get the most out of your software if they know how to use it effectively.- Productivity
Reduces the time spent on figuring out “how something works?” or “how to do something?”.
- Productivity
README file
README files offer a concise overview of the software, its purpose & functionality, and provide essential details about the installation steps, any dependencies required, and often, instructions for a preliminary test run. These files are typically the first point of contact for users or developers who’ve just accessed online, downloaded or cloned the software repository. While GitHub (a popular platform in today’s coding landscape) has popularized the use of README files, they are also prevalent in other version control and software sharing platforms, making them a universal tool for preliminary software documentation.
When to use README as a software user?
As a user, refer to the README when initially accessing a project to understand its purpose, installation steps, and basic usage.
How is README generated?
README files are typically hand-written by developers, though tools like readme-md-generator can assist in creating a structured document. For GitHub repositories, the README file is typically written in Markdown, a lightweight and easy-to-use syntax designed for formatting plain text. When you upload or commit a Markdown-based README to GitHub, the platform automatically renders it, displaying the formatted text and any embedded media on the repository’s main page. See real-life examples: data_wrangling ⤴, geo_utils ⤴, Find-GCP ⤴
For a deeper dive into Markdown syntax and its various capabilities, I’d recommend checking out the dedicated tutorial on Introduction to Markdown in this workbook.
What to include in the README as a developer?
^Note the README example showed below is artificial. It provides a concise overview and guidance for the fictional DataCleanMaster tool.
1. Project’s overview
Introduces the tool or project, providing a high-level understanding of its purpose and primary functionality.
# DataCleanMaster: Automated Data Cleaning

## 1. Project's Overview
**DataCleanMaster** is an innovative tool designed for data scientists and analysts.
It automatically detects missing or inconsistent data in datasets and offers
rectification methods, ensuring your data is clean and ready for analysis.
2. Dependencies
Lists external software or libraries that need to be installed or available for the tool to function correctly.
## 2. Dependencies

* Python >= 3.7
* pandas >= 1.2.0
* numpy >= 1.19.0
3. Installation instructions
Provides step-by-step guidance on how to get the tool or software up and running on one’s system.
## 3. Installation Instructions

### Clone from GitHub
If you wish to obtain the source code and work directly with it,
you can clone the datacleanmaster repository from GitHub:

`git clone https://github.com/username/datacleanmaster.git`
`cd datacleanmaster`

### Installation in a Conda Environment
If you're using a Conda environment, you can install `datacleanmaster` with `pip` by activating your environment and following the pip command:

`conda activate your_environment_name`
`pip install datacleanmaster`
4. Usage details
Explains how to effectively utilize the tool, often through examples or sample code snippets.
## 4. Usage Details
To clean your dataset using DataCleanMaster, simply run:

from datacleanmaster import clean

# Load your data
data = pd.read_csv('your_dataset.csv')

# Use DataCleanMaster
cleaned_data = clean(data)
5. Contribution guidelines
Outlines the process and best practices for developers or users who wish to enhance or fix parts of the project.
## 5. Contribution Guidelines
We welcome contributions! If you find any issues or have suggestions:

1. Fork the repository.
2. Create a new branch with a meaningful name.
3. Make your changes.
4. Open a pull request.

For major changes, please open an issue first to discuss.
6. Contact information
Gives users and contributors a way to reach out for further assistance, feedback, or inquiries about the tool or project.
## 6. Contact Information
For any queries or feedback, reach out to us at: datacleanmaster@example.com
Tips for effective README contents
- Start with a concise project description/overview.
- Use clear headings and subheadings.
- Incorporate visuals, like screenshots or GIFs, where helpful.
- Detail setup and installation steps.
- Provide examples of the software in use.
- List any dependencies or prerequisites.
- Highlight contribution guidelines for open-source projects.
- Update regularly as the project evolves.
INSTALL or configure file
In many software projects, especially those with more complex installation procedures, you might find a dedicated file named INSTALL or INSTALLATION in the main folder of the source code, which could be a plaintext (INSTALL.txt or just INSTALL). This file typically provides comprehensive instructions on installing and configuring the tool for your system. Depending on the software, it might contain distinct installation directions for various operating systems.
Example of read-only or copy-paste INSTALLATION file
This version provides straightforward, step-by-step instructions that users can directly copy and execute to install the software.
INSTALLATION GUIDE for DataProcessorTool
----------------------------------------

1. Prerequisites:
   - Ensure you have Python (version 3.7 or higher) installed.

2. Installation via pip:
   - Simply run the following command in your terminal or command prompt:
     ```
     pip install dataprocessortool
     ```

3. From Source:
   - Clone the repository from GitHub:
     ```
     git clone https://github.com/user/dataprocessortool.git
     ```
   - Navigate to the directory and install:
     ```
     cd dataprocessortool
     pip install .
     ```

Thank you for choosing DataProcessorTool!
See the real-tool example here: fastqc/INSTALL.txt ⤴
In some cases, this isn’t just a read-only file but might require users to modify specific lines with environment variables, such as paths to dependencies or datasets like databases the tool relies on. This manual intervention ensures the software seamlessly integrates with existing system configurations and resources.
Example of executable INSTALL.py
In this version, users adjust paths directly within the script. Comments guide them, but the actual commands are executed by the script itself. If users don’t adjust the path, the script provides an error prompt.
"""
INSTALLATION SCRIPT for AdvancedDataProcessor
----------------------------------------------

This script automates the installation process for AdvancedDataProcessor.

INSTRUCTIONS:
1. Prerequisites:
   - Ensure you have Python (version 3.8 or higher) installed.

2. Dependencies:
   - This tool requires an external database. Please download and set up MySampleDB from [https://link_here].
   - Adjust the database path below by replacing 'YOUR_PATH_HERE' with the actual path to your MySampleDB.

3. Save the adjustments and execute this script: python INSTALL.py

This will install AdvancedDataProcessor and configure it with the provided path.
"""

# Replace the path below with the appropriate path on your system.
DATABASE_PATH = "YOUR_PATH_HERE"

def main():
  if DATABASE_PATH == "YOUR_PATH_HERE":
    print("ERROR: Please set the DATABASE_PATH before executing.")
    return

  import os

  # Clone the repository
  os.system("git clone https://github.com/user/advanceddataprocessor.git")

  # Navigate to directory and install
  os.chdir("advanceddataprocessor")
  os.system("pip install .")

  # Update configuration with the set DATABASE_PATH
  with open("config.txt", "w") as config_file:
    config_file.write(f"DATABASE_PATH = {DATABASE_PATH}")

  print("AdvancedDataProcessor installed and configured!")

if __name__ == "__main__":
 main()
See the real-tool example here: tensorflow/configure.py [detailed “Configure the build” guide ]
TensorFlow has configure scripts in its root directory. This script is meant to be run before building TensorFlow from source. When executed, it will ask users a series of questions regarding their build (like which version of Python to use, whether to build with CUDA support, etc.) and generate a .tf_configure.bazelrc configuration file based on the responses.
The INSTALL file is an essential component of your software's documentation, serving as the foundational guide to ensure your tool is operable and accessible to others.
User-centric documentation
User-centric documentation is primarily aimed at end-users. This code-external documentation helps users navigate, utilize, and troubleshoot the software effectively.
User Guides
User guides provide comprehensive information on how the software operates, its features, and its functionalities. They often come with step-by-step instructions, ensuring users can get started quickly and utilize the tool’s full potential. User guides can be viewed as the most detailed form of software documentation, delving not only into how features function but also elucidating the methodologies or phenomena underpinning them.
Key elements might include:
- overview of the software
- meaningful table of contents
- detailed walkthroughs of core functionalities with usage examples
- descriptions of settings or configuration options
- glossary of terms specific to the software
See the real-tool example here: Pandas User Guide ⤴
One of the most widely recognized tools related to data processing in the Python ecosystem is pandas. It’s a powerful tool for data manipulation and analysis.
Tutorials
Tutorials focus on specific tasks, assembled pipelines or workflows and are usually more hands-on than user guides. They frequently detail data preprocessing steps or describe necessary inputs to ensure users have a comprehensive guide, leading them from stage A to stage Z. This encompasses starting with specific inputs and navigating through to the expected outputs. Sometimes, these tutorials necessitate the sequential use of various features offered by a tool, the values of optimized parameters, or even the integration of external tools or data, to accomplish a complete task or project.
Important aspects include:
- clear objectives outlining what the user will achieve by the end of the tutorial
- brief intro to the topic and meaningful table of contents
- step-by-step instructions with supporting visuals, like screenshots or diagrams
- practical examples that users can replicate to understand the tool’s functionality
See the real-tool example here: Georeferencing approaches for the ODM workflow ⤴
ODM (OpenDroneMap) is an open-source project that processes aerial drone imagery to create 3D models, georeferenced maps, and geospatial data. It requires imagery georeferencing as the separate pre-processing step. This tutorial offers a systematic approach that encompasses creating ground control point markers, land surveying techniques, georeferencing the imagery, and then integrating this as input for the ODM workflow.
FAQs
(Frequently Asked Questions)
FAQs provide quick answers to commonly encountered issues or questions users might have about the software. They might address questions like How do I perform task X? or How to set up Y feature?. Including FAQ can save both users and support teams time.
Key features of an FAQ section might be:
- grouping of questions by themes or categories
- concise answers with links to more detailed resources when necessary
- regular updates based on user feedback and emerging common issues
See the real-tool example here: Keras FAQ ⤴
Keras is an open-source software library that provides a Python interface for artificial neural networks. The Keras FAQ is a part of their documentation, providing a useful categories of questions such as General questions, Training-related questions, and Modeling-related questions.
Developer-centric documentation
Developer-centric documentation is primarily aimed at individuals who wish to delve deeper into the software’s architecture, perhaps to make modifications, contribute with new features, or understand its inner workings more intimately. As a project expands, encompassing multiple modules, dependencies, and contributors, a detailed developer guide becomes pivotal in ensuring consistent understanding, development practices, and smooth collaboration among team members.
The significance of developer-centric documentation grows proportionally with the complexity and scale of a software project. For smaller modules or simple collections of scripts, such in-depth documentation might be superfluous. It's often more beneficial to prioritize thorough in-code documentation, ensuring that the code itself is self-explanatory and easily understandable to anyone who might use or modify it.
Developer guides
Developer guides provide a deep dive into the software’s architecture, including its internal structures, modules, and interaction patterns. can help onboard new team members and offer a detailed view of how various components of the software interact and operate.
See the real-tool example here: Django internals (Developer Guide) ⤴
“Documentation for people hacking on Django itself. This is the place to go if you’d like to help improve Django or learn about how Django is managed.”
Contribution guidelines
Contribution guidelines are essential for open-source projects. They specify how external developers can contribute to the project, detailing processes for submitting pull requests, the coding standards to adhere to, and how to report bugs or suggest enhancements.
See the real-tool example here: Linux Kernel Contribution Guidelines ⤴
“For a person or company who wishes to submit a change to the Linux kernel.” Given the size and importance of the Linux kernel, its contribution guidelines are exhaustive, providing clear instructions and best practices.
You can help improve this workbook: Data Science Workbook Contribution Guidelines ⤴
“We are really glad you’re reading this! We need volunteer contributors to make our DataScience workbook a success!” It’s an open-source educational resource designed for professional researchers and science enthusiasts alike.
Reference materials
Reference Materials serve as the backbone of technical information for complex or multi-layer software, offering deep insights into its structure and functionalities. This includes API documentation which elucidates how software components interact, Testing documentation detailing test strategies and results, and Architecture diagrams visually representing the system’s overarching design. Together, these materials empower developers and users with a comprehensive understanding of the software’s inner workings.
• API Documentation
While it can also be useful for end-users, API (Application Programming Interface) documentation is crucial for developers. It details how different functions, methods, or classes of the software can be used, what inputs they expect, what outputs they return, and any side effects they might have.
See the real-tool example here: TensorFlow API Documentation ⤴
TensorFlow is one of the leading libraries for deep learning. Its API documentation, available in several languages, provides in-depth details about its classes, methods, and functions.
• Testing Documentation
This focuses on how developers can run tests, what the tests cover, and how to interpret test results. It ensures that quality and functionality are maintained as changes are made.
See the real-tool example here: Django Testing Documentation ⤴
Django is a high-level Python web framework. Its testing documentation covers how to write and run tests for Django applications.
• Architecture Diagrams
These provide visual and textual representations of the software’s overarching structure and design. They can be crucial for understanding how different parts of the system interrelate, especially in complex projects.
See the real-tool example here: GitLab Architecture Diagram ⤴
GitLab is an open-source platform that provides a range of tools for software development and collaboration, including version control, continuous integration, and issue tracking. Its architecture diagrams and associated documentation give insight into its components and how they interact.
Documentation for pipelines
Pipelines and workflows refer to a series of automated processes that allow code to move from development to production. This can encompass various stages, such as code compilation, testing, deployment, execution, and monitoring.
Pipelines and workflows represent automated sequences of tasks in software and data processing. They require detailed documentation to ensure clarity in their operations, dependencies, and error handling, ensuring smooth execution and maintenance. The documentation of computational pipelines is a critical aspect of modern data-intensive sciences and software development.
TOOLS:
- Interactive notebooks, such as Jupyter and Observable, offer a dynamic environment for step-by-step documentation, merging code execution with data visualizations, and narrative text to tell a comprehensive story of the data analysis process.
- In parallel, workflow managers & monitors such as Nextflow Tower provide robust, scalable, and reproducible computational framework for organizing and documenting complex bioinformatics and data analysis processes, ensuring consistency and scalability across platforms.
| tool | description | license | supported languages |
|---|---|---|---|
| Jupyter Notebook | Supports over 40 languages, with interactive computing and rich media integrations; popular in data science and research. |
Open Source | Python, R, Julia, and 40+ others |
| Nextflow Tower | Monitors and manages workflow pipelines; a choice tool for bioinformatics and genomics. |
Open Source (enterprise edition available) | N/A |
| R Markdown (RStudio) | Allows dynamic document creation with R, integrating prose, code, and output; popular among statisticians. |
Open Source | R |
| Bioconductor | Tools for analysis and comprehension of high-throughput genomic data; often paired with R Markdown in bioinformatics. | Open Source | R |
| Apache Zeppelin | Designed for data engineering, supports multiple backends like Spark, and offers built-in visualizations. | Open Source | Apache Spark, Python, SQL, and others |
| Observable | Focused on interactive visualizations with D3.js and other JS libraries; allows real-time collaboration. | Partially Free (with paid features) | JavaScript |
Interactive Notebooks
Interactive notebooks are web-based platforms that allow for the combination of live code, visualizations, and narrative text in a single document. They facilitate an exploratory approach to data analysis and are particularly popular in data science and machine learning fields. For code documentation, they offer an intuitive way to document and demonstrate code functionality in real-time, enhancing clarity and comprehensibility.
Interactive notebooks excel in documenting computational pipelines, where multiple steps and varied tools come into play, providing a cohesive and step-by-step demonstration of the entire process. Their format allows for real-time execution, visualization, and annotation, making them ideal for capturing complex workflows in detail. These platforms enhance the understandability and reproducibility of computational work, bridging the gap between code development and data storytelling. Interactive Notebooks deliver specialized collaborative environments that adapt to diverse programming and analytical needs.
For large-scale software documentation, where comprehensive architectural details, API references, and broader system interactions are crucial, traditional documentation tools might be more suitable.
For a comprehensive understanding and hands-on experience with interactive notebooks, I highly encourage you to delve into the tutorials presented in section 04. Development Environment / Jupyter: Interactive Web-Based Multi-Kernel DE, specifically tailored for the Jupyter interface.
Nextflow workflows
Combining tools or steps into a workflow, especially using platforms like Nextflow, is a form of documentation for the computing process. In essence, while traditional documentation (like README files, user manuals, or online guides) is critical for understanding and using a software or pipeline, the structured, explicit nature of workflow scripts, especially in platforms like Nextflow, provides a form of executable documentation. This not only describes the computing process but also enables and ensures its reproducibility across different scenarios and platforms.
Nextflow is a workflow management system designed for scalable and reproducible scientific workflows using software containers. It simplifies the process of writing, deploying, and sharing complex data analysis pipelines across different computing environments.
Nextflow is a workflow management system for writing and running scalable and reproducible scientific workflows. Nextflow Tower is an associated web-based application that provides a user interface for monitoring, managing, and scaling Nextflow workflows, offering enhanced visualization, logging, and collaboration capabilities for Nextflow runs.
Nextflow is NOT restricted to any particular discipline. It is a versatile workflow management system that can be used to script, organize, and execute workflows for a wide range of applications across various fields. While it has gained significant popularity in bioinformatics and genomics (due to the complex, multi-step computational analyses often required in these fields) it is fundamentally designed to be domain-agnostic.
Documentation Generators
Documentation generators are specialized tools designed to automate the process of creating documentation for software. They alleviate the burden of manual documentation, ensuring that the documentation remains in sync with the codebase while fostering consistency and accuracy. Overall, documentation generators are vital tools in the modern software development ecosystem, ensuring that as codebases evolve, their accompanying documentation remains accurate, comprehensive, and up-to-date.
Languages, Features, Output formats
Most popular programming languages have associated documentation generators. It’s essential to choose a documentation generator tailored to the specific language and needs of the project. Different generators can produce various output formats, including HTML, PDF, or even man pages for Unix systems. This versatility ensures the documentation is accessible in the most suitable medium for the target audience. Many documentation generators support plugins or extensions, allowing developers to customize the output or add features like automatic diagram generation or integration with continuous integration tools. Some documentation generators can integrate with version control systems, ensuring that the documentation updates with each commit or release.
| docs generator | programming language(s) | output format | features |
|---|---|---|---|
| Doxygen | C++, C, Java, and other languages | HTML, LaTeX (PDF), RTF, Man pages, XML, and more | class and collaboration diagrams, cross-referencing, automatic linking |
| Javadoc | Java | HTML | class hierarchy visualization, index generation, external linking |
| JSDoc | JavaScript | HTML | symbol tagging, tutorials, custom templating, cross-referencing |
| Sphinx | Python | HTML, LaTeX (PDF), ePub, Texinfo, manual pages | auto-generating code documentation, cross-referencing, extensible (with plugins), internationalization |
You can host generated documentation on various online platforms.
Most documentation generators produce static content, which means the output consists of static HTML files, stylesheets, and possibly some client-side JavaScript. Static documentation can be served by any web server and doesn’t require any server-side processing. Due to its simplicity, there are numerous hosting platforms tailored for static content, such as GitHub Pages.
On the other hand, “dynamic” documentation might involve server-side processing, database interactions, or other dynamic elements. This type of documentation is less common and would typically be hosted on platforms or services that support server-side scripting.
Here’s a table with documentation platforms, starting with the most popular ones:
| hosting platform | description | matching generators |
|---|---|---|
| Read the Docs ⤴ | Open-source platform, offers automatic building, versioning, and hosting of docs; integrates well with Sphinx and GitHub. | Sphinx, MkDocs, Doxygen (with some configurations) |
| GitHub Page | Versatile hosting from GitHub repositories; supports any static content. | Sphinx, MkDocs, Jekyll, Docusaurus, VuePress, Doxygen, Javadoc |
| GitBook | Modern interface with its own editor; integrates Markdown files from GitHub. | Markdown-based generators |
| Confluence | Collaborative wiki platform primarily for manual documentation with support for embedding static content. | Manual, Markdown import, Doxygen, Javadoc (via plugins or embedding) |
| Docusaurus | Open-source generator developed by Facebook for open-source documentation websites. | Docusaurus (itself) |
| VuePress | Vue-powered static site generator optimized for technical documentation. | VuePress (itself) |
| MkDocs | Simple static site generator designed specifically for project documentation. | MkDocs (itself) |
| Dozuki | Designed for step-by-step technical guides with visual breakdowns. | Specific to its own format |
| DocuWare | Enterprise document management system, more for storage than technical doc display. | Not optimized for doc generators |
Platforms like GitHub Pages, Netlify, Vercel, and even Read the Docs (with some configuration) can easily host documentation generated by Doxygen and Javadoc, as these tools produce static HTML files that these platforms are designed to serve.
How documentation generators work?
Documentation generators primarily rely on in-code comments and docstrings to produce documentation. The tool parses these non-executable text from files with the source code, extracting relevant information to create structured documentation. In some cases, they can also generate documentation directly from the code itself, especially for aspects like function signatures, classes, and module structures.
Jump to section In-code documenattion ⤴ to learn how to add in-code comments and docstrings.
• SPHINX for Python docs
Getting Started with Sphinx for Python Documentation
1. Installation:
Start by installing Sphinx. It’s typically done via pip:
pip install sphinx
2. Set Up a New Sphinx Project:
Create a directory where you want your documentation to reside, navigate to it, and run:
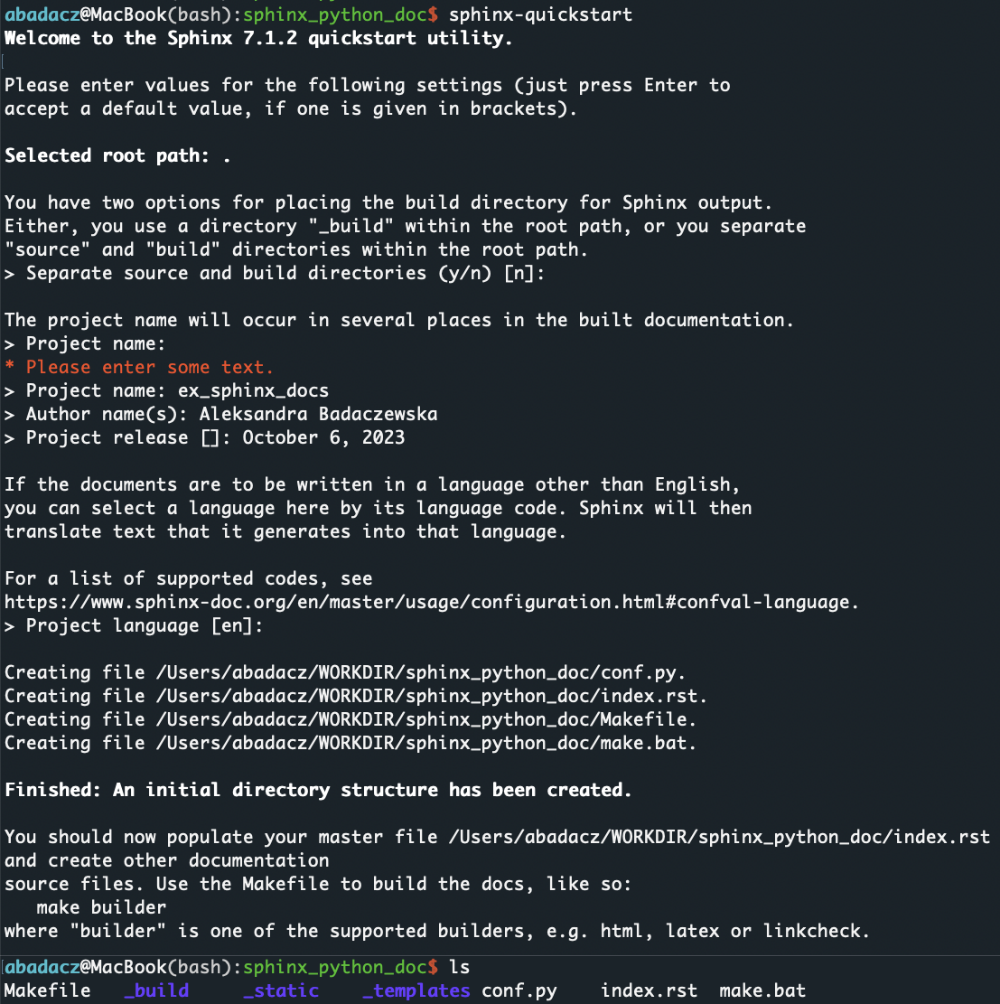
sphinx-quickstart
This command will guide you through the initial configuration.
Answer the questions as prompted. For most users, the default values will be sufficient.
3.Choose a Theme:
Sphinx uses themes to style the documentation. The default is called alabaster, but there are many others available. One popular choice is Read the Docs. To use it, first install the theme:
pip install sphinx_rtd_theme
Then, in your conf.py file (created during the sphinx-quickstart step), find the html_theme setting and change its value to:
html_theme = "sphinx_rtd_theme"
4. Writing Documentation:
Sphinx uses reStructuredText as its markup language, which is similar to Markdown but more powerful. You can start by editing the index.rst file, which is the root of your documentation.
The index.rst file acts as the homepage or table of contents for your documentation.
The .. toctree:: directive in this file is crucial. It defines the "table of contents tree", which is a hierarchical listing of the other "reStructuredText" files that should be included in the generated documentation.
The .. automodule:: directive is used to automatically pull in the docstrings from a Python module and include them in the documentation. The :members: option tells Sphinx to generate documentation for each of the public members (functions, classes, etc.) of the module. Without this option, Sphinx would only include the module's docstring.
- To document a Python module, use the
automoduledirective withinindex.rst. Specify the module you want to include.Welcome to ex_sphinx_docs's documentation! ========================================== .. toctree:: :maxdepth: 2 :caption: Contents: ### add automodule syntax below: .. automodule:: your_module_name :members:NOTE: In Python terminology, a module is essentially a script with a .py extension. It’s a file containing Python definitions, functions, and classes that you can use in another Python script by importing it.
5. Generate the Documentation:
Once you’ve written your documentation, you can generate the HTML files with:
make html
This will produce the documentation in the _build/html directory.
6. View the Documentation:
Navigate to the _build/html directory and open the index.html file in your web browser.
7. Keeping Documentation Updated:
As you update your Python code and its docstrings, re-run the make html command to regenerate the documentation.
Sphinx is highly customizable and extensible. You can use extensions ⤴ to add functionalities like automatic function/method signature inclusion, link code references, etc.
8. Publishing Documentation:
If you want to share your documentation with others, consider using a platform like Read the Docs ⤴.
It can automatically build and host your Sphinx documentation.
Remember to write comprehensive docstrings in your Python code using the reStructuredText format, so Sphinx can pick up and format them appropriately. As long as your code is well-documented with meaningful docstrings, you can automatically create detailed and accurate documentation without excessive manual effort. Refer to the Sphinx documentation ⤴ for advanced topics and configurations.
Version control platforms with documentation
Version control platforms, such as Git and Mercurial, enable developers to track and manage changes to software projects over time while simultaneously providing features for detailed documentation. These platforms enable users to maintain a history of code modifications, branch and merge projects. They also often come integrated with documentation tools that facilitate the creation, management, and sharing of documentation related to the project in the form of internal wikis or README files to guide users and collaborators. As a result, they provide a unified environment where both the code and its accompanying documentation evolve in tandem, ensuring consistency and clarity for all contributors.
I highly recommend checking out the section in the workbook dedicated to Storage & Version Control ⤴.
It offers practical tutorials that will equip you with hands-on skills, ensuring you can effectively utilize version control in your projects. This knowledge is invaluable for any modern software development endeavor.