Sharing Jupyter Notebooks via MyBinder
Learn how to publish Jupyter Notebooks on MyBinder. Launch an example of a shared Jupyter Notebook in binder here:
Introduction
Analysis pipelines written in Python can be shared in an interactive document called a Jupyter Notebook. Notebook sections are usually one of two types:
- Markdown - text/documentation of your analysis
- Code - Python code chunks that run the analysis
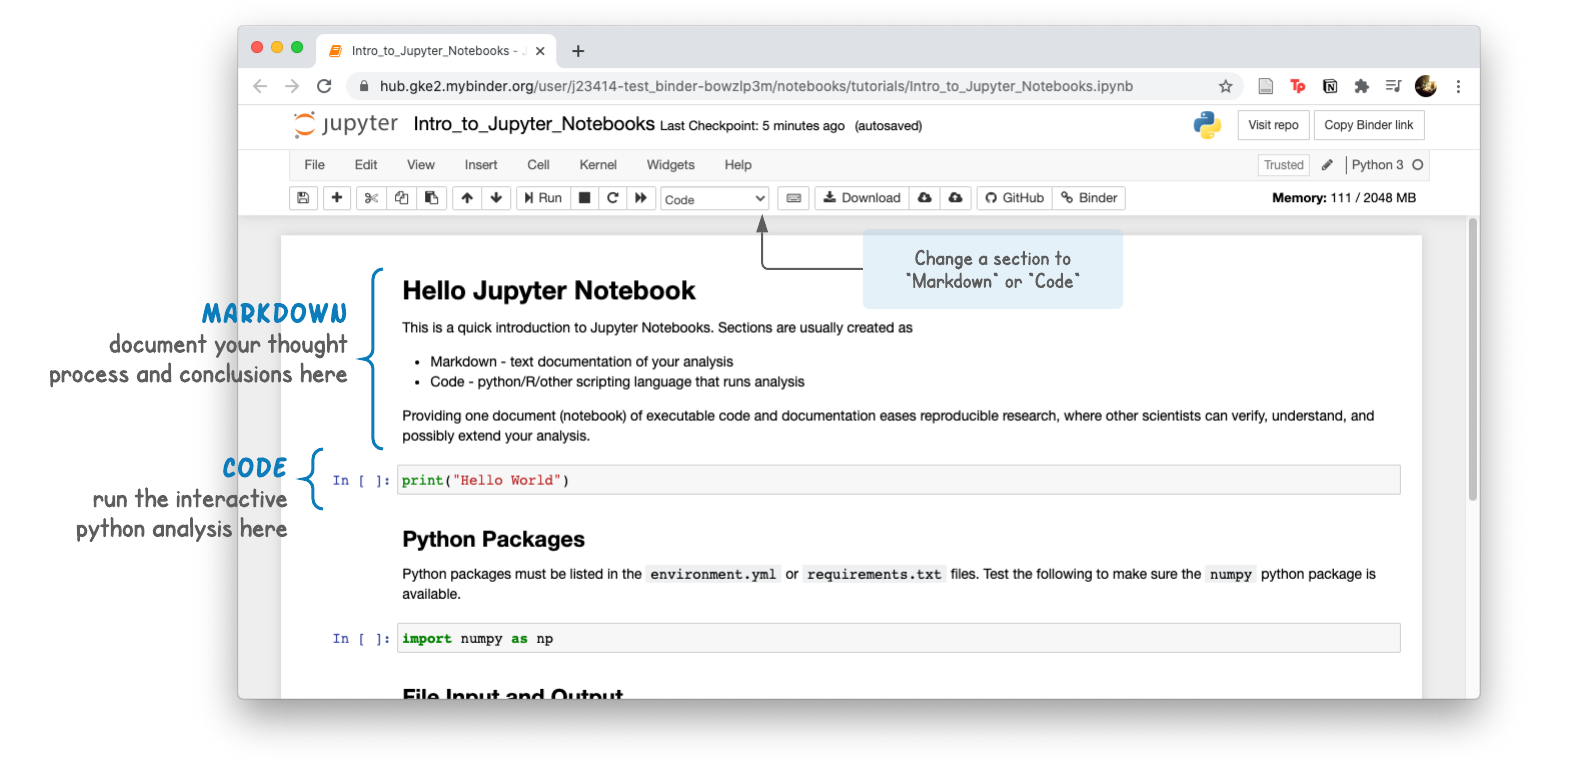
Providing one document (notebook) of executable code and documentation eases reproducible research, where other scientists can verify, understand, and possibly extend your analysis.
To demonstrate these benefits, this tutorial will walk you through:
- creating a minimal Jupyter Notebook
- pushing it to a public github
- and linking the notebook to a mybinder.org to be shared
We will assume you have a GitHub account and are using conda to manage python environments.
More Information
Step 1: GitHub
We will assume you have a GitHub account. If not, please register a free account.
- Sign in to Github - https://github.com/
- Create a
jupyter_binderrepository
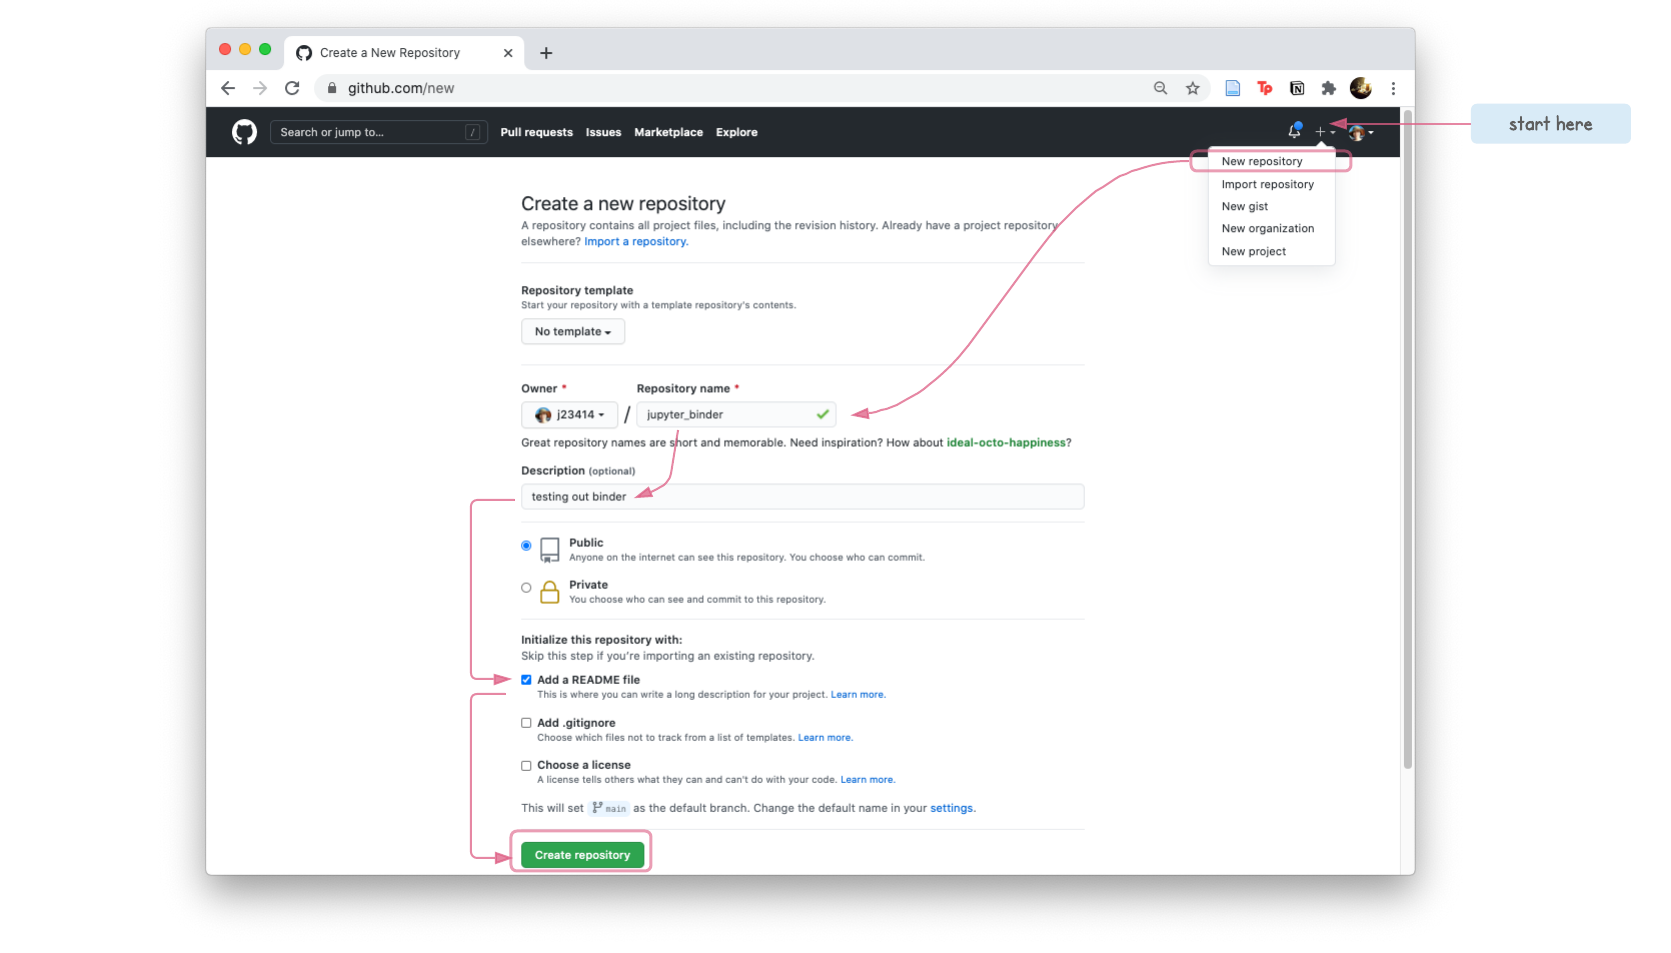
- Clone the repo, to create a copy on your local compuer.
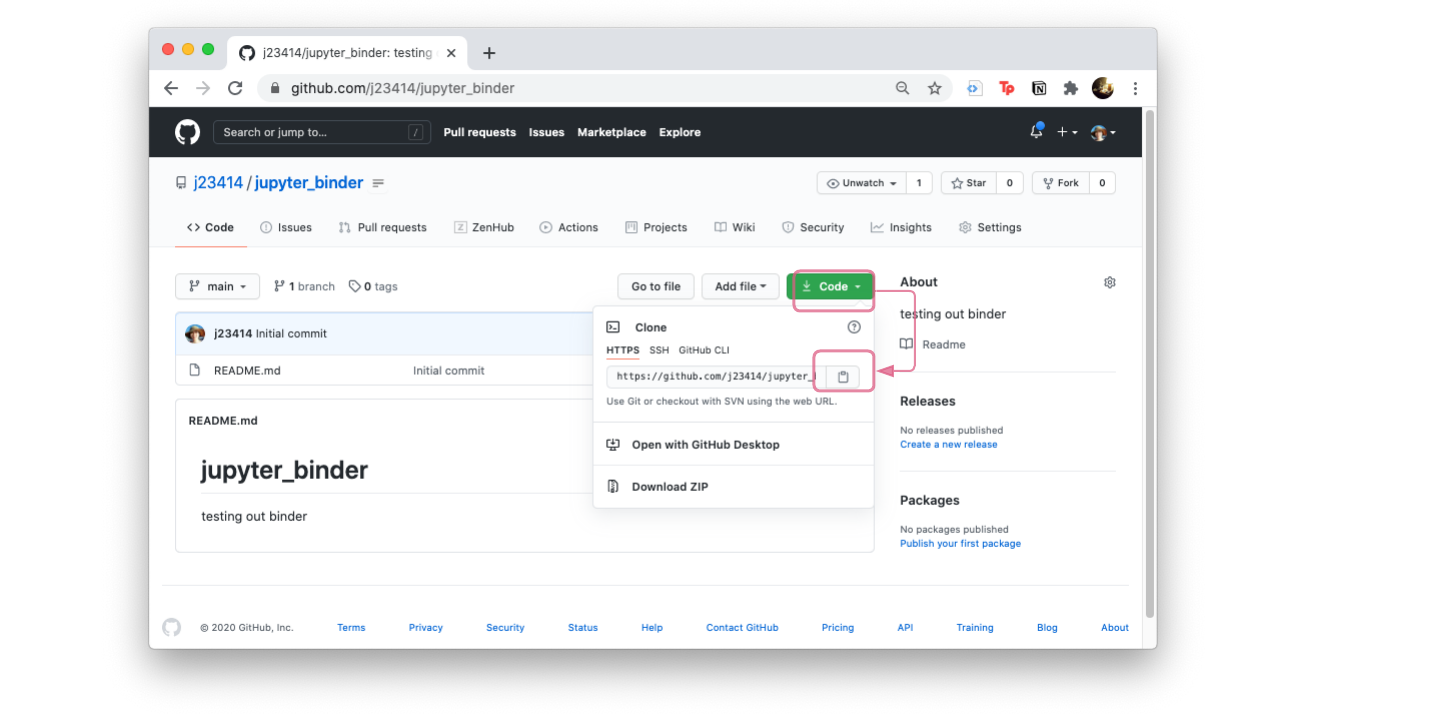
Click on Code and the clipboard icon, to copy the git repo path. That way you can type git clone and paste the git repo path.
  git clone https://github.com/YOUR_USER_NAME/jupyter_binder.git
  cd jupyter_binder
We will be adding a basic notebook to this folder, and pushing (publishing) it to GitHub.
Step 2: Create a minimal Jupyter Notebook
Creating and hosting a local Jupyter Notebook requires the jupyter package.
-
Use your favorite Text Editor and copy the following file, saving it as a environment.yml file. Notice how we’ve named the environment
ntbk_env.name: ntbk_env channels: - conda-forge - bioconda - defaults dependencies: - python=3.8 #<= python version - jupyter #<= list any python packages here -
Create the python environment. From terminal, we can use
conda env createto create a python environment. The-fflag means we are reading in dependencies from a fileenvironment.yml. Creating an environment may take several minutes.conda env create -f environment.yml -
Activate the environment.
conda env list # List all created environments #> conda environments: #> ntbk_env /Users/User_Name/miniconda/envs/ntbk_env conda activate ntbk_env # Start the ntbk_env conda deactivate # Stop the ntbk_env -
Start the local Jupyter Notebook
cd jupyter_binder/ # Navigate to git repo mkdir tutorials # Create a folder conda activate ntbk_env # Start ntbk_env jupyter notebook # Starts notebook, should open a browser window -
Create a Jupyter Notebook via
New/Python 3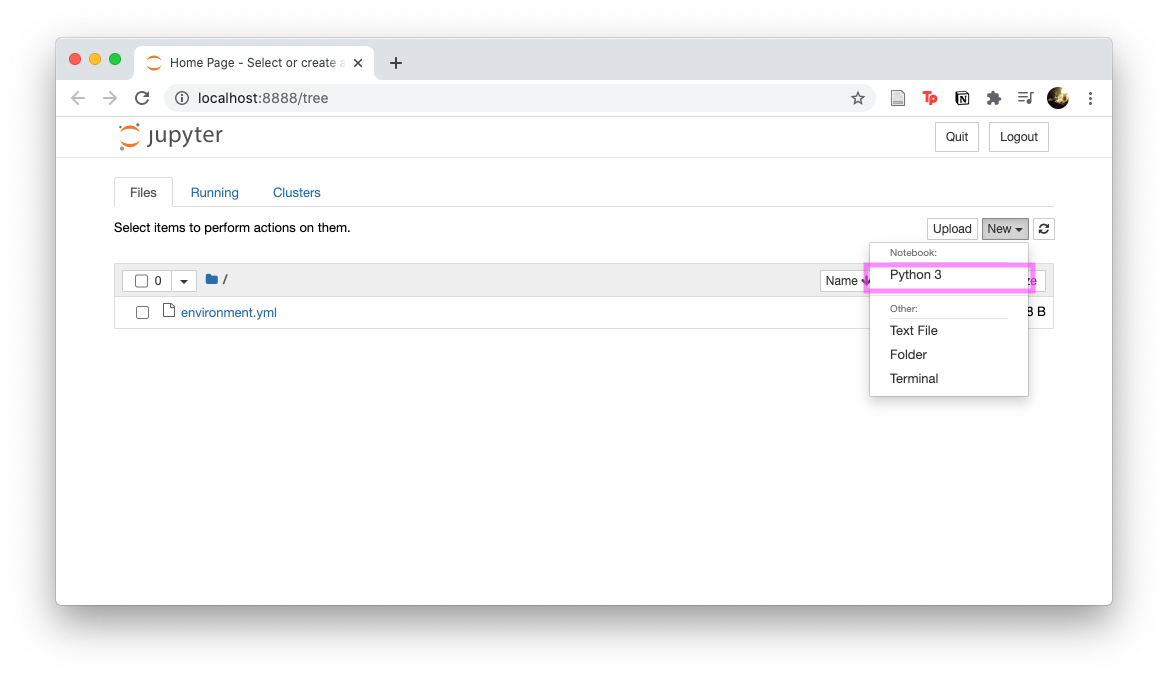
-
We will try to recreate the Jupyter Notebook shown in the figure.

For the moment, create one Markdown section and paste the following. It doesn’t matter what it says right now since we are testing the system out.
## Hello Jupyter Notebook

This is a quick introduction to Jupyter Notebooks.

* Markdown
* Code
Hit the
Runbutton to render the markdown.Now let’s create a Code section and paste the following.
print("Hello World")Hit the
Runbutton and the words “Hello World” should show up under the Code section. Now save this Notebook (ipynb file) by going toFile/Save As. Put the notebook in atutorialsfolder.At this point, your
jupyter_binderfolder should look similar to:jupyter_binder/ |_ tutorials/ | |_ Intro_to_Jupyter_Notebooks.ipynb |_ environment.yml |_ README.md -
Save and commit to GitHub
git add tutorials/Intro_to_Jupyter_Notebooks.ipynb
git add environment.yml
git commit -m "minimal notebook" tutorials/Intro_to_Jupyter_Notebooks.ipynb environment.yml
git push origin main
Check GitHub to make sure the new files are online.
Link to binder
- Visit https://mybinder.org/
- Input the github name and any subfolder if ipynb files are in a subfolder. Note: Instead of
test_binder, your repo will be calledjupyter_binder.
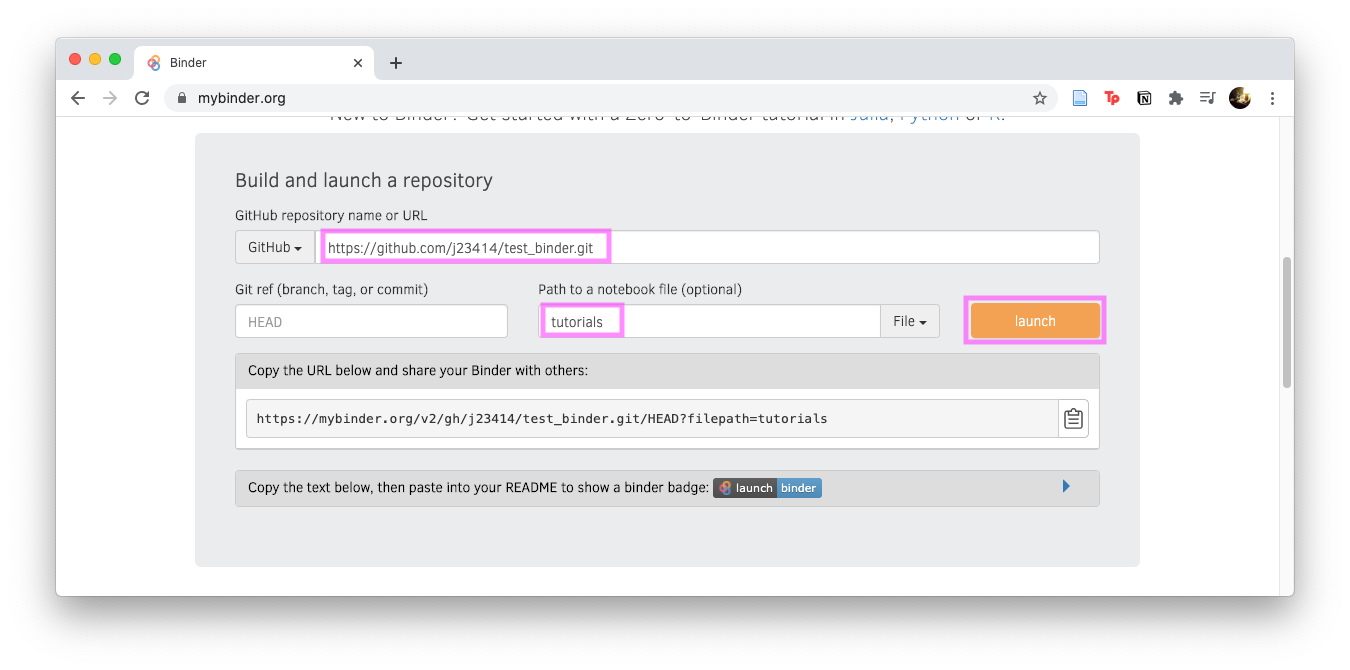
Click Launch and you should see your jupyter notebook in the browser. Congratulations, your binder is published!
Add the “Launch Binder” badge
The last thing is to add a badge that launches the binder. Notice in the above image, before you hit launch, there’s a “Copy the text, then paste into your README…”, expand that section and copy the badge code…which will look similar to:
[](https://mybinder.org/v2/gh/j23414/test_binder.git/HEAD?filepath=tutorials)
Replace j23414 with your GitHub username, and test_binder with jupyter_binder. Then when you add it to the README.md, you should have a working binder launch badge.
Congratulations! You have completed the Jupyter Notebook + Binder Tutorial.
Your Turn to Explore
From here on you are free to explore modifying the jupyter notebook. We recommend looking at some tutorials in Markdown and Python.
Note: About Python Module Dependencies
Remember that environment.yml file we used earlier? MyBinder will look for an environment.yml or a requirements.txt to find a list of python modules to install and make available in the notebook. This file needs to be at the base of the github repo (can’t find it inside of subfolder tutorials).
For example, if you want to use the Python package numpy then the environment.yml should look like:
  name: ntbk_env
  channels:
    - conda-forge
    - bioconda
    - defaults
  dependencies:
    - python=3.8
    - jupyter
    - numpy        #<= new numpy package
This installs numpy into the docker container, and you’ll be able to load the numpy package in a Code section:
import numpy as np
Together, the Jupyter Notebook + MyBinder + environment.yml provides a way to sharing a reproducible Python analysis pipeline.
Further Reading
Python programming environment(s)Online Console: simple Python code in a browser (without installation)
Online Notebook: interactive Python on Try-jupyter and Colab (no installation)
Local Python setup on your computing machine (installation needed)
Shell & IDLE: Python code in a terminal or simple IDE (beginner)
Text editors: create Python code in terminal text files (intermediate)
Jupyter Lab: create an interactive Python notebook (advanced)
PyCharm: IDE for professional Python developers (professional)
R programming environment(s)
MODULE 05: Introduction to Programming
