
DataScience Workbook / 04. Development Environment / 2. Python programming environment(s) / 2.3.2 Text editors: create Python code in terminal text files
Introduction
Once a beginner Python user has familiarized themselves with the Python shell and IDLE (see the tutorial ⤴) and has explored the Python syntax and simple operations (see the tutorial ⤴), they may realize they want to save the code in a text file for future reuse. These text files, which contain relatively simple code, are called scripts and are saved with the .py extension. Saving code in a script is useful for:
- easy editing (make changes and updates to your code in one place)
- portability (transfer between machines)
- reusability (you can reuse the same code repeatedly)
- reproducibility (keep the record of the exact steps in your analysis)
- project documentation (make it easier for others to understand your analytic pipeline)
For simple programming tasks, it is good to use text editors available directly in the terminal. This way, users can create, edit and reuse Python scripts on a computing machine, including HPC. Text editors such as nano, vim, emacs, and mcedit are common options for creating and editing scripts in the terminal.
Once the script is saved, it can be run from the terminal using the python command followed by the name of the script.
python my_script.py
in-shell coding vs. scripting
When writing a script in a file, the technical process is different from using Python in the interactive shell. In the shell, you can write a line of code and execute it immediately to see the results. However, when writing a script, you need to write the complete piece of a task, save the changes, and then execute the script in a terminal to get the results.
In other words, when using the interactive shell, you can experiment with single operations and test them immediately, while when writing a script, it is better to plan out the larger snippet of code and ensure that it works as expected before executing it.
When writing a script, testing the code after adding each line of code is possible but can be both annoying and inefficient. This is because writing a complete program requires a series of steps that often depend on each other, so it's difficult to test individual parts of the program before it's complete.
When scripting, it's expected that the developer has a clear idea of the program as a whole and is fluent in basics of Python syntax in order to assemble the code for the task with a reasonable structure. This involves breaking down the task into smaller, manageable steps and writing code to accomplish each step, using available components (operators, built-in functions, imports) whenever possible.
With a script, you have the ability to save and reuse the code for later use, whereas in the interactive shell, you can only reuse code that you have written and executed in that particular session.
good scripting practices
By having a clear understanding of the task, being fluent in Python syntax, and using good coding practices, developers can create scripts that are efficient, maintainable, and robust.
It’s often better to write the entire program first, and then test it as a whole. This approach allows you to focus on the overall functionality of the program, and to test all of the steps together to ensure that they work properly.
Once you’ve tested the program and ensured that it works correctly, you can then make any necessary changes or improvements to the code. This approach is typically more efficient and can save you a significant amount of time and effort when writing complex programs.
Create a Python script
Creating Python code in text files (scripts) is a common way to write and save Python programs. This is useful in situations where you need to write a longer program, reuse code across multiple sessions, automate a task such as running a simulation, or share code with others.
To create a Python script in a terminal, you can use a text editor such as:
nano(easy)vim(moderate)mcedit(advanced)
To learn more about text editors available in the terminal (command-line interface) and their options, see tutorials in section 02. Introduction to the Command Line ⤴, for example Command Line Text Files Editors: nano, vim ⤴.
Script Example 1 in nano
calculate the average
Here’s how you can create a new Python script using nano, a simple text editor that is typically available in the command line without installation.
1. Open the terminal and navigate to the directory where you want to create the script.
cd </file_system/location>
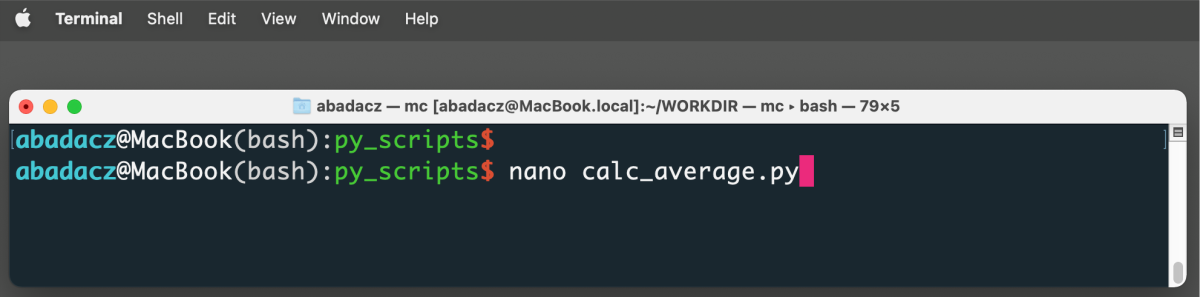
2. Type the following command to open a new file in nano:
nano calc_average.py
This will create a new file called “calc_average.py” and open it in the nano text editor.
3. Type or paste Python code from the snippet below into the file.
Note that lines starting with the # sign are not executed. It is how we introduce commenting into the code, which contains a description of individual code fragments. From the comments in the following code snippet, you will learn the role of the code in the next line.
#1 Get a list of numbers from user (typed in a terminal)
num_string = input("Enter a list of numbers separated by spaces: ")

#2 Split the input string into a list of numbers
num_list = num_string.split()

#3 Convert each element of the list to a float
num_list = [float(x) for x in num_list]

#4 Calculate the average of the numbers
avg = sum(num_list) / len(num_list)

#5 Print the result
print("The average is:", avg)
What the script does?
#1 Get a list of numbers from user
num_list = input("Enter a list of numbers separated by spaces: ")
In this code line, we create the list called "num_list" which is filled up with numbers by using the Python built-in function input(). This function prompts the user to type the input numbers in the command line once the script is executed. The default format of entered numbers requires separating them by spaces.
#2 Split the input string into a list of numbers
num_list = num_list.split()
When the user approves with Enter the completeness of the list of numbers, the script will proceed to the task in the next line of code. In this case, it will use the built-in split() function that separate the inputed string of numbers on spaces and create a list of words.
#3 Convert each element of the list to a float
num_list = [float(x) for x in num_list]
Since the input function automatically converts the loaded information into a string variable (text) and mathematical operations work on numeric variables of type int (integer) or float (floating point), it is necessary to convert the list of words into a list of numbers. It can be done using the built-in float() function. The function takes a single variable as an argument, so you need to use a loop iterating through the list to convert all its elements into floating-point numbers.
#4 Calculate the average of the numbers
avg = sum(num_list) / len(num_list)
In this step we use the next two built-in Python functions: #5 Print the result
print("The average is:", avg)
Finally, we use a Python built-in function print() to display the message for the user on the screen with the calculated average of the inputted list of numbers.
Learn more about Python built-in functions such as input(), split(), float(), sum(), len(), print(), and more from tutorials provided in section 05. Introduction to Programming ⤴ :
- Introduction to Python Programming ⤴
- Python syntax and simple operations ⤴
- Python built-in functions ⤴
4. Save and exit the file by pressing Ctrl+X, then Y, and then Enter.
This will save your changes and exit the nano text editor.
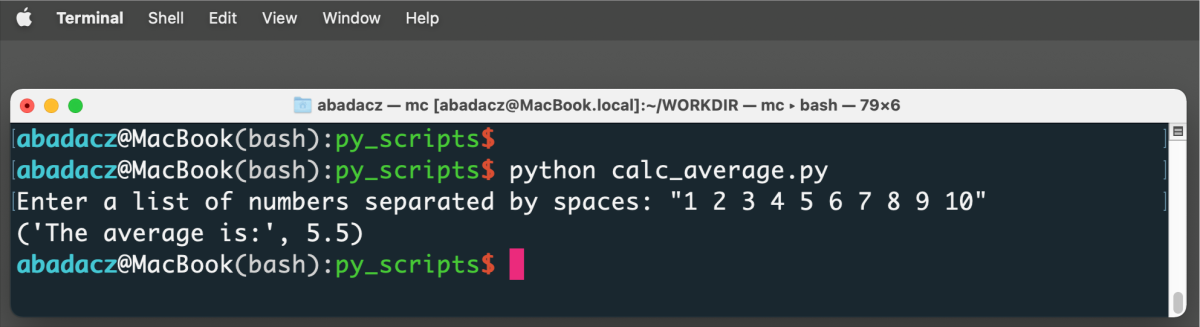
5. You can now run your Python script from the terminal by typing:
python calc_average.py
This will execute your script and print to the console the average of user-provided numbers.
Script Example 2 in vim
script for word counts
In this example, we create a script to count the number of occurrences of each word in a text.
Here’s how you can create a new Python script using vim, an advanced text editor that is typically available on the HPC systems.
1. Open the terminal and navigate to the directory where you want to create the script.
In this example, we use input data loaded from a text file instead of inputs interactively provided by a user. You can copy-paste the content of the sample input.txt file from the text box below.
This is a sample text file.
It contains some text for counting the number of occurrences of each word.
This is just a sample, but it can be used for testing the script.
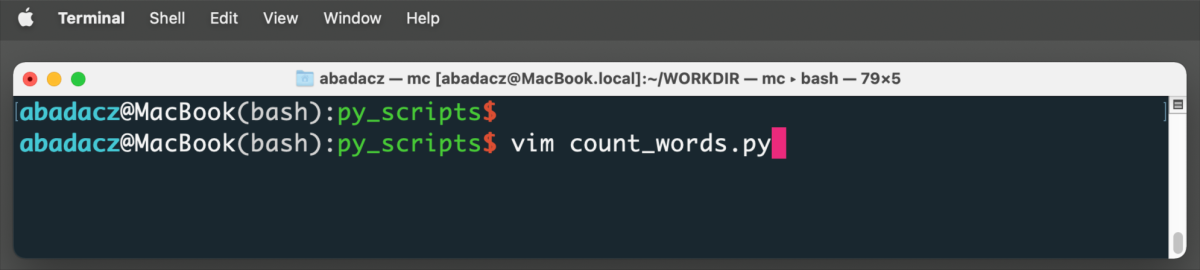
2. Type the following command to open a new file in vim:
vim count_words.py
This will create a new file called “count_words.py” and open it in the vim text editor.
3. Once the vim editor is activated, press the i key to enter insert mode and start typing your code or copy-paste it from the snippet below.
Select the text below, right-click on your mouse abd select Copy from the pop-up menu. Go to the vim editor in your terminal and use the right-click again, this time select the Paste option.
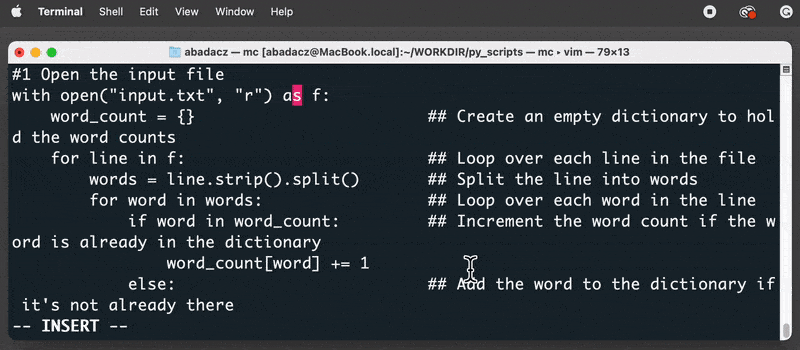
#1 Open the input file
with open("input.txt", "r") as f:
    word_count = {}                        ## Create an empty dictionary to hold the word counts
    for line in f:                         ## Loop over each line in the file
        words = line.strip().split()       ## Split the line into words
        for word in words:                 ## Loop over each word in the line
            if word in word_count:         ## Increment the word count if the word is already in the dictionary
                word_count[word] += 1
            else:                          ## Add the word to the dictionary if it's not already there
                word_count[word] = 1


#2 Print the word counts
for word, count in word_count.items():
    if count > 1 and len(word) > 1:        ## skip 1-letter words aand those with counts less than 2
        print(f"{word}: {count}")
What the script does?
#1 Open the input file
with open("input.txt", "r") as f:
In this code line, we open text a file called "input.txt", which contains sample text that serves as input for the script processing task. To do so, we use the Python built-in function open(), which takes 2 arguments here, 1) the path and filename of the input file, and 2) a processing mode "r" that is a shortcut for "reading".
The file is processed line by line in the for loop:
for line in f:
where the string of words is separated to the list of words called "words":
words = line.strip().split()
The "words" list is overwritten in each iteration, i.e., for each line in the file.
The inner for loop:
for word in words:
is used to browse the "words" list in each external iteration to increment the counts for previously registered words:
if word in word_count:

      word_count[word] += 1
and, add a new unique word to the "word_count" dictionary:
else:

     word_count[word] = 1
The "word_count" is a dictionary, i.e., a type of Python object declared by {} and composed of key:value pairs separated by commas, for example:
word_count = {'This' : 2, 'is' : 2, 'text' : 2, 'for' : 3, 'example' : 1}
#2 Print the word counts
The dictionary is filled with key:value pairs by the script's algorithm and stored in the memory as long as the script is active. This way, the extracted and structured information can be passed on to the next task in the script. For example, once the input file "input.txt" is processed to the end, the next task can be to filter out words shorter than 2 letters and further print only these counted more then once.
Note that in this case, we used a different syntax for the built-in print() function:
print(f"{variable} text {variable}")
It allows for easier way of merging text-like with non-text {variables}.
It is a good practice to separate blocks of code for different tasks in the script and provide comments for better readability and understanding of the code. This can be done by using comments # at the top of each code block to explain its general purpose. Additionally, comments ## can be added to the end of specific lines that may not be immediately obvious what their purpose is.
Learn more about Python built-in functions such as open(), strip(), split(), items(), len(), print(f””), Python loops and built-in objects from tutorials provided in section 05. Introduction to Programming ⤴ :
- Introduction to Python Programming ⤴
- Python syntax and simple operations ⤴
- Python built-in functions ⤴
4. Once you are done editing, press the Esc key to exit insert mode.
- To save the changes, type
:wand pressEnter. This will save the file. - To exit Vim, type
:qand pressEnter.
If you have unsaved changes, Vim will warn you and you can type:q!to force quit without saving, or:wqto save and quit.
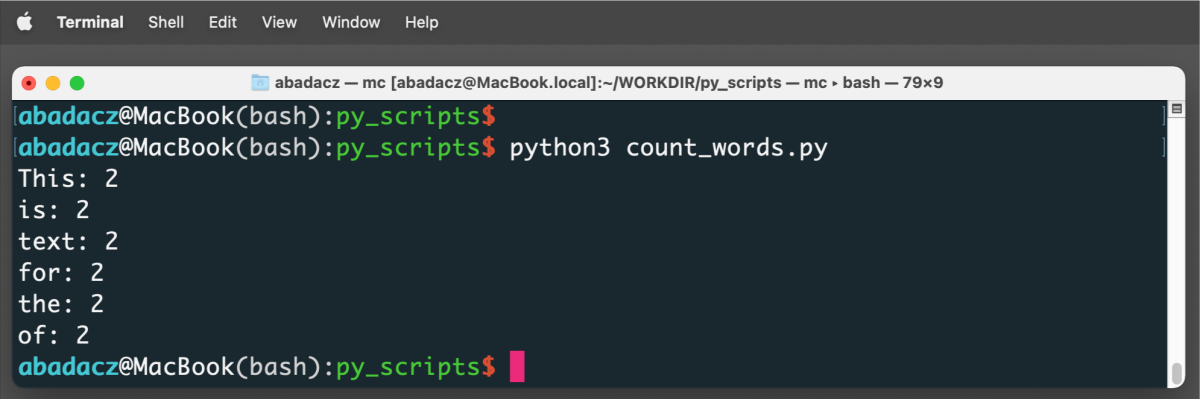
5. Once you’re done editing and saving the file, you can run it in the terminal by typing:
python3 count_words.py
This time we execute the script with the keyword python3 to emphasize that the print() function with argument syntax f"{variable}" is available in the python3 variant only. If you have Python in version 2, see the syntax for the print() function in Example 1.
Remember that the script configuration (in this case) requires the input file (called "input.txt") to be in the same location as the script.
This will execute your script and print to the console the words with at least 2 counts and at least 2-letter long.
Script Example 3 in mcedit
password generator
This script can be used to generate strong and random passwords for users. It uses the string and random modules to generate the text strings that can serve as passwords.
Here’s how you can create a new Python script using mcedit, an advanced text editor (in terminal and GUI-like) that typically requires installation, but its utility is worth it!
MCedit has a graphical user interface in the terminal and a built-in file manager. This means that `mcedit` is generally easier to use for beginners (for basic tasks) since it provides a familiar point-and-click interface besides the keyboard navigation.
0. If you haven’t already done so, install the midnight commander package that provides you with the editor mcedit.
Windows:
1. To install MC on Windows, you need to download the Windows version of MC from the official website https://midnight-commander.org/downloads/ ⤴.2. Once downloaded, run the executable file and follow the installation instructions to complete the installation.
3. You may need to add the path to the MC executable to your system's environment variables to use it from the command line.
macOS:
To install MC on macOS, you can use Homebrew, a package manager for macOS.If you haven't done this already, install Homebrew by following the instructions on its website https://brew.sh/ ⤴ 1. Once Homebrew is installed, open Terminal and run the following command:
brew install midnight-commander
This will download and install MC and all its dependencies.
LINUX: Ubuntu/Debian:
Open Terminal and run the following command:
sudo apt-get update

sudo apt-get install mc
If MC is not available in your distribution's official repositories, you can download the source code from the official website and compile it yourself. The instructions for doing so are provided on the website https://midnight-commander.org/ ⤴.
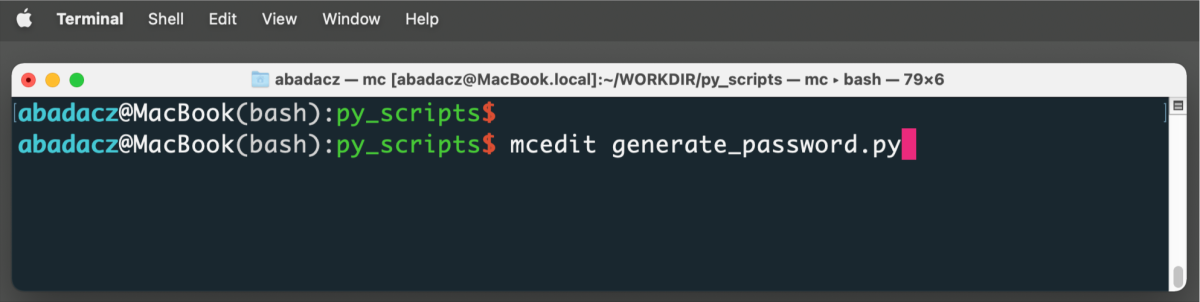
1. Open the terminal and navigate to the directory where you want to create the script.
2. Type the following command to open a new file in mcedit:
mcedit generate_password.py
This will create a new file called “generate_password.py” and open it in the mcedit text editor.
3. Type or paste Python code from the snippet below into the file.
#0 Import external modules to bring in their functionality into the script
import string
import random

#1 Create a function that generates randomized password
def generate_password(length):
    chars = string.ascii_letters + string.digits + string.punctuation    ## Define the base of characters
    password = ''.join(random.choice(chars) for i in range(length))      ## Generate the password
    return password


#2 Call the function to generate a password with selected length
generate_password(input("Enter a lenth of the password:"))               ## password of user-provided length
#password = generate_password(10)                                        ## password with length 10
print(password)
What the script does?
#0 Import external modulesIn Python, import statements are used to bring in external modules or libraries into the current script, making their functionality available for use. For example, the string module contains a collection of useful string manipulation functions. The random module contains functions to generate random numbers, such as random().
#1 Create a function that generates randomized password
By defining a function, we can execute the code encapsulated within the function body multiple times within the same script by calling the function name. If the function takes arguments, e.g., a "length" in our function, the result returned by a function will depend on the value of the input argument.
Defining functions can significantly reduce the amount of code duplication and make it easier to modify or update the code in the future.
First, within the function body, we define the base of characters used to generate a password. We Create a string of characters imported from the string module as a combination of ASCII letters, digits, and punctuation characters:
chars = string.ascii_letters + string.digits + string.punctuation
Next, we use a for loop to draw N=length times a single character from the pool of all chars. The list of selected characters is converted to a string (single word) using the ''.join(list) function syntax.
password = ''.join(random.choice(chars) for i in range(length))
Finally, the function uses the special keyword return followed by a variable passed on as the expected result.
#2 Call the function to generate a password
In this code block, you can decide with what argument value to call the function. In particular, you can pass the value of an argument directly or as the result of another operation, or use the input() function to take a value entered interactively by the final user of the code.
Defining a function for a repetitive task can save you time and effort. If you have a task that needs to be done several times with only the input parameters changing, consider defining a function that can take those parameters as arguments. This will not only make your code more readable and maintainable, but it will also save you from writing the same code multiple times.
def function_name(argument1, argument2):

    # function body

    return "result"
Learn more about Python built-in functions such as join(), range(), input(), Python imports, and a function definition from tutorials provided in section 05. Introduction to Programming:
- Introduction to Python Programming ⤴
- Python syntax and simple operations ⤴
- Python built-in functions ⤴
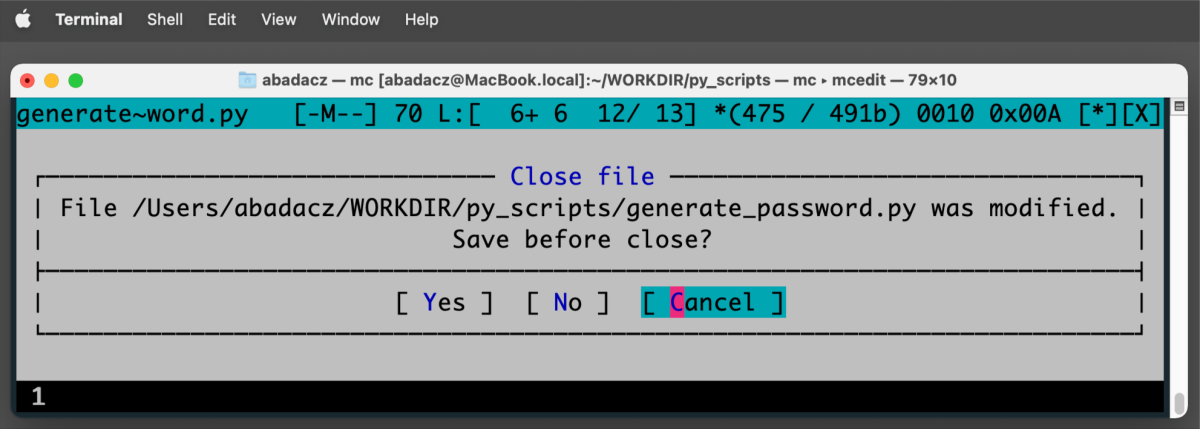
4. Once you are done editing, press the F2 key to save changes. (Note: fn and F2 together on macOS)
- To exit MCedit, press
Esc, then0.
If you have unsaved changes, MCedit will pop-up the “Close file” dialog menu with options to save changes (Yes), discard changes (No), or abandon file closing (Cancel).
5. Once you’re done editing and saving the file, you can run it in the terminal by typing:
python generate_password.py
This will execute your script, prompt user to select password length, and print the generated random string of characters.
