
DataScience Workbook / 05. Introduction to Programming / 3. Introduction to Python Programming
Introduction
Python ⤴ is a high-level programming language that is widely used for scientific computing, data analysis, artificial intelligence algorithms implementation, web development, and visualization. It has a simple and easy-to-learn syntax, a large standard library, and a wide community making it a popular choice for beginners and experienced programmers alike.

Python was created by Guido van Rossum, who is a Dutch computer programmer and software engineer. He based Python on several other programming languages, including ABC, Modula-3, and C. He released the first version of Python in December 1989, and has continued to develop and maintain the language ever since.
Python features
Python is known for its simplicity, readability, and versatility. It has a number of features that make it a powerful programming language and popular choice for a wide range of applications. These are just a few of the many features of Python:
⦿ Easy to learn and use
Python has a simple and straightforward syntax, which makes it easy to read and understand. This can make it a good choice for projects where code readability and maintainability are important.
⦿ Interpreted (not compiled)
Python is an interpreted language, which means that it is not transformed into machine code before it is executed. Instead, the Python interpreter reads and executes the source code directly, line by line. This makes it easier to write and test code, because you don’t need to wait for the code to be compiled before you can run it. However, it also means that Python programs may run slower than programs written in a compiled language.
⦿ Object-oriented
Python supports object-oriented programming, which means that you can define classes and create objects to represent real-world entities in your code. This can make it easier to design and organize your code, and to reuse and extend existing code.
⦿ Dynamically-typed
Python is a dynamically-typed language, which means that you do NOT need to specify the data type of a variable when you declare it. This can make it easier to write code quickly, but it can also make it more difficult to catch type-related errors at runtime.
⦿ High-level data types
Python has a number of built-in data types that are designed to be easy to use and manipulate. These include lists, dictionaries, and tuples, which can be used to store and manipulate data in a more intuitive way.
⦿ Extensive standard library
Python has a large and comprehensive standard library, which includes a wide range of modules and functions for tasks such as connecting to web servers, reading and writing files, and working with data. This can make it easier to perform many common programming tasks without the need to install additional libraries.
⦿ Support for third-party libraries
Python has a large ecosystem of third-party libraries that can be used to extend the capabilities of the language. These libraries cover a wide range of topics, including scientific computing, data analysis, machine learning, web development, and more.
⦿ Support for modular coding & large-scale projects
Python is a scalable language that is well-suited for large-scale projects. It has a number of features, such as modules and packages, which allow you to organize your code into logical units and reuse it across different projects. This can make it easier to maintain and update your code over time.
⦿ Support for cross-platform use
Python is a cross-platform language, which means that it can be run on a variety of operating systems, including Windows, macOS, Linux, and others. This makes it a good choice for projects that need to run on multiple platforms.
⦿ Exception handling
Python includes a robust exception handling system that allows you to handle errors and exceptions in your code in a controlled way. This can make it easier to write code that is more reliable and robust.
⦿ Automatic indentation
Python uses indentation to indicate blocks of code, rather than curly braces or other symbols. This can make Python code easier to read and understand, as the indentation helps to visually group related code together.
⦿ Automatic memory management
Python has an automatic garbage collection system that frees up memory that is no longer being used. This means that you don’t need to worry about manually allocating and deallocating memory, which can make your code more reliable and easier to write.
⦿ Interactive mode & interactive shell
Python includes an interactive mode that allows you to enter and execute code one line at a time. It also provides an interactive shell, called the Python interpreter, which allows you to enter and execute code in a terminal or command prompt. This can be a useful way to test small pieces of code and see their output immediately.
⦿ Strong community support
Python has a large and active user community, which means that you can find a wealth of resources and support online. There are many online forums, mailing lists, and other resources where you can ask questions and get help with Python-related issues.
Python online support
Here are a few URL addresses for online forums and Python-related issues:
- Python Forum: https://python-forum.io/ ⤴
- Python subreddit: https://www.reddit.com/r/Python/ ⤴
- Stack Overflow: https://stackoverflow.com/questions/tagged/python ⤴
- Python mailing lists: https://mail.python.org/mailman/listinfo ⤴
These are just a few examples of the many online resources that are available for Python developers. You can also find many other resources by searching online for terms such as “Python community forums” or “Python support”.
Getting started with Python programming
If you are starting your Python adventure from scratch, it is worthwhile to develop your skills gradually strengthening them over time. In that case, it’s best to follow this tutorial in order.
1. Learn Python basics using online platform
Using an online platform for Python programming can be a convenient and accessible way to write and run Python code, especially if you are just starting out with the language or don’t want to install anything on your local computer.
Starting your Python learning journey with online platform provides you with:
- convenience & accessibility, write and run Python code from any device with an internet connection, without the need to install any software (including Python)
- no setup required, you can start writing and running code right away; this can be especially useful if you are just starting out with Python and don’t want to spend time setting up a development environment.
- collaboration, useful even for advanced users, e.g., if you are working on a team or sharing your code with others
There are many online platforms that allow you to write and run Python code directly in your web browser. Several examples are described in the section 2. Online coding platforms ⤴ of the Python programming environment ⤴ tutorial. For this hands-on exercise I select the Python Console ⤴ web platform [by Python], to start right away without creating any account.
If you want to keep your projects online for future reuse, open the PythonAnywhere ⤴ online platform and create the account (using its basic plan) to get started with Python coding for free.
Follow the step-by-step guide in the tutorial Online Console: simple Python code in a browser ⤴ to create the free account and get started with Python.
You can also stay here and enhance your experience by following the step-by-step guide while coding in the default online Python Console.
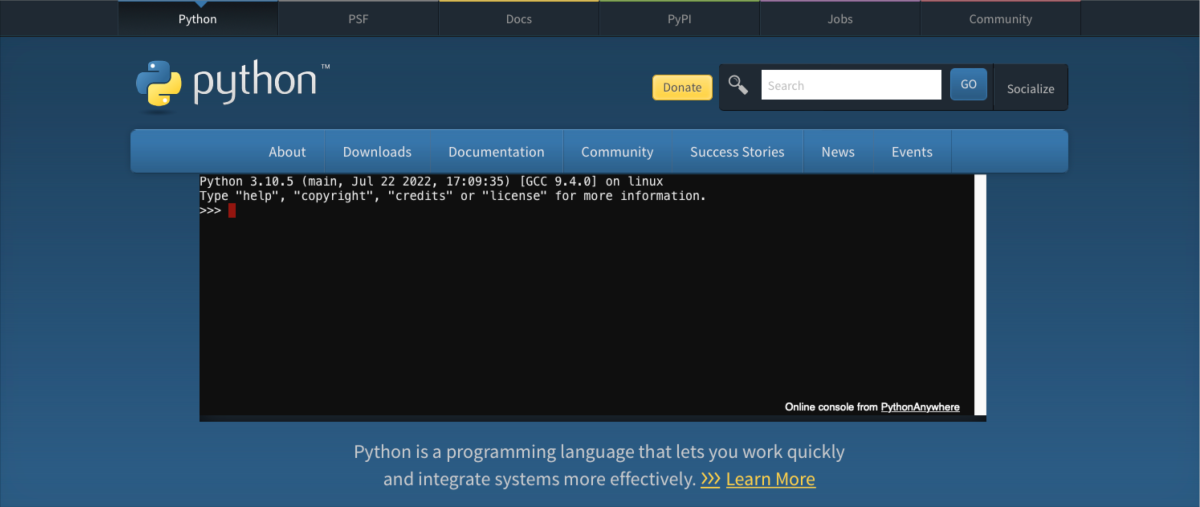
Open a new tab in your browser and paste the URL: https://www.python.org/shell/ ⤴ (or simply click-on the link)
- You will see the webpage interface, shown on the screenshoot below
- You can start typing directly in this online console to try your Python skills
Basic Concepts
- Variables and Data Types
In Python, you can assign values to variables using the = operator.
Python has several data types, including integers, floats, strings, and booleans. - Operators
Python has several operators, including:
- arithmetic operators (+, -, *, /),
- comparison operators (>, <, ==), and
- logical operators (and, or, not). - Control Flow
Control flow statements allow you to control the flow of your program. Some common control flow statements in Python include: if/else statements, for and while loops. - Functions
Functions are reusable blocks of code that perform a specific task. You can define your own functions in Python using the def keyword. - Classes
A class is a blueprint for creating objects of specific type defined using the class keyword.
Variables
Variables are used to store data in memory so that it can be accessed and manipulated later. In Python, you can create a variable by simply assigning a value to a name:
x = 42
In this example, we create a variable called “x” and assign it the value 42. The value of this variable is stored in the memory of the program so you can ask for this value anytime.
You can create variables of various data types.
- Regardless of the type of data, always assign the value of a variable with the use of the
=character. - In Python, you don’t have to declare the type of a variable when you create it
Data Types
Python has several built-in data types, including:
- integers, e.g., 42
- floating-point numbers, e.g., 3.14
- strings, e.g., “Hello, world!”
- booleans, e.g., True or False
You can check the data type of a variable using the type() function:
x = 42
print(type(x))           # Output: <class 'int'>
Operators
Python has several built-in operators that you can use to perform operations on variables.
Arithmetic
| Operator | Description |
|---|---|
| + | Adds two numbers together |
| - | Subtracts the second number from the first |
| * | Multiplies two numbers together |
| / | Divides the first number by the second |
| // | Performs integer division |
| % | Returns the remainder of the division |
| ** | Raises the first number to the power of the second |
Comparison
| Operator | Description |
|---|---|
| == | Checks if two values are equal |
| != | Checks if two values are not equal |
| < | Checks if the first value is less than the second |
| > | Checks if the first value is greater than the second |
| <= | Checks if the first value is less than or equal to the second |
| >= | Checks if the first value is greater than or equal to the second |
Logical
| Operator | Description |
|---|---|
| and | Returns True if both conditions are True |
| or | Returns True if at least one condition is True |
| not | Returns the opposite boolean value |
Membership
| Operator | Description |
|---|---|
| in | Checks if a value exists in a sequence |
| not in | Checks if a value does not exist in a sequence |
Identity
| Operator | Description |
|---|---|
| is | Checks if two variables refer to the same object |
| is not | Checks if two variables do not refer to the same object |
Bitwise
Bitwise operators are used to manipulate the individual bits of binary numbers. In computing, binary numbers are numbers expressed in the base-2 numeral system, which uses only two digits (0 and 1) to represent all values.Bitwise operators operate on these binary representations of numbers at the bit level, which means they manipulate the individual bits that make up the binary representation of a number.
| Operator | Description |
|---|---|
| & | Performs a bitwise AND operation |
| ^ | Performs a bitwise XOR operation |
| ~ | Performs a bitwise NOT operation |
| << | Shifts bits to the left |
| >> | Shifts bits to the right |
For example, you can use the + operator to add two numbers together:
x = 1
y = 2
z = x + y
print(z)                 # Output: 3
Control Flow
Python has several control flow statements, including:
if,elif,elsestatementsfor,while, andwhile notloopstry-except-finallyerror handlingpass,continue,breakchange the flow
• IF-ELIF-ELSE conditional
Here’s an example of a simple if/else statement:
x = 42
if x < 10:
    print("x is lower than 10")
elif x > 10 and x < 50:
    print("x is greater than 10")                 # x is > 10, so this will be printed
else:
    print("x is less than or equal to 10")
• FOR-WHILE loop
In Python, the for, while, and until loops are used to execute a block of code repeatedly based on a specified condition.
- The
forloop is used to iterate over a sequence, such as a list or a string. - The
whileloop is used to execute a block of code repeatedly as long as a specified condition is true. - The
while notloop is used to execute a block of code repeatedly as long as a specified condition is false.
The until loop is NOT a built-in loop in Python. Instead, it is often used in other programming languages such as Ruby. In Python, a similar behavior can be achieved using a while loop with a negated condition (while not).
FOR
Here’s an example of using a for loop to iterate over a list of numbers and print each number:
numbers = [1, 2, 3, 4, 5]

for num in numbers:
    print(num)
In this example, we create a list of numbers and use a for loop to iterate over each number in the list. The num variable takes on the value of each number in the list in turn, and the print() function is called to output each number to the console.
WHILE
Here’s an example of using a while loop to print the numbers from 1 to 5:
num = 1

while num <= 5:
    print(num)
    num += 1
In this example, we use a while loop to execute the block of code as long as the value of the num variable is less than or equal to 5. Inside the loop, we print the value of num to the console and then increment its value by 1.
WHILE NOT (equivalent to until loop)
Here’s an example of using a while loop to print the numbers from 1 to 5 using a negated condition:
num = 1

while not (num > 5):
    print(num)
    num += 1
In this example, we use a while loop with a negated condition to execute the block of code as long as the value of the num variable is not greater than 5. Inside the loop, we print the value of num to the console and then increment its value by 1.
• TRY-EXCEPT-FINALLY
In Python, try-except-finally is a powerful mechanism for handling errors and exceptions in Python code that may occur during program execution. By catching and handling errors gracefully, you can ensure that your program does not crash or behave unpredictably in the face of unexpected errors.
- The
tryblock contains the code that may raise an exception. - The
exceptblock contains the code to handle the exception if it occurs. - The
finallyis an optional block hat is executed regardless of whether an exception is raised or not.
EXAMPLE 1: Here’s an example of using try-except to handle a division by zero error:
numerator = 10
denominator = 0

try:
    result = numerator / denominator
except ZeroDivisionError:
    print("Error: division by zero")
In this example, we attempt to divide the ‘numerator’ variable by the ‘denominator’ variable inside a try block. However, since denominator is zero, this will raise a ‘ZeroDivisionError’. To handle this error, we use an except block that specifies the type of exception to catch (ZeroDivisionError) and the code to execute when the exception is caught (print(“Error: division by zero”)).
EXAMPLE 2: Here’s an example of using try-except-finally to handle a file I/O error:
try:
    file = open("myfile.txt", "r")
    # do something with the file
except IOError:
    print("Error: file not found or could not be read")
finally:
    file.close()
In this example, we attempt to open a file named “myfile.txt” in read mode inside a try block. However, if the file is not found or could not be read, this will raise an ‘IOError’. To handle this error, we use an except block that prints an error message. We also include a finally block that closes the file, regardless of whether an error occurred or not.
• PASS-CONTINUE-BREAK
In Python, pass, continue, and break are control statements used to change the flow of a program’s execution in a loop or conditional statement.
PASS
The pass keyword is used as a placeholder for an empty block of code. It does nothing and can be used when you need to have a statement syntactically but do not want to execute any code.
For example:
for i in range(5):
    if i == 2:
        pass
    print(i)           # output: 0 1 2 3 4
Here, when i is equal to 2, the pass statement is executed, but it doesn’t do anything. The loop continues to execute, and the output shows that the value 2 was still printed.
See a tip for pass in try-except block
In Python, pass is often used in try-except error handlers as a placeholder for an empty block of code when no action is required in the event of an exception.When an error occurs in a try block, Python searches for an appropriate except block to handle the error. In some cases, you may want to catch the error but not take any action when it occurs. In such situations, you can use pass as a placeholder in the except block. This will tell Python to do nothing when the exception occurs, allowing the program to continue executing without interruption.
Here is an example that demonstrates the use of pass in a try-except block:
try:

        x = int(input("Enter a number: "))

        result = 10 / x

        print("The result is:", result)

except ValueError:

        print("Invalid input. Please enter a valid number.")

        pass

except ZeroDivisionError:

        print("Cannot divide by zero.")

        pass
In this example, the try block attempts to get user input and perform a division operation. If the user enters an invalid input or a zero, a "ValueError" or "ZeroDivisionError" will occur, respectively. In each case, the corresponding except block handles the error by printing a message and using pass as a placeholder for an empty block of code.
CONTINUE
The continue keyword is used to skip the current iteration of a loop and move on to the next one.
For example:
for i in range(5):
    if i == 2:
        continue
    print(i)           # output: 0 1 3 4  ; 2 is skipped
Here, when i is equal to 2, the continue statement is executed, and the loop skips the rest of the code in that iteration and moves on to the next one. So, the value 2 is not printed.
BREAK
The break keyword is used to exit a loop prematurely. When break is executed, the loop terminates immediately, and the program continues executing the code that comes after the loop.
For example:
for i in range(5):
    if i == 2:
        break
    print(i)           # output: 0 1  ; all iterations since i = 2 are skipped
Here, when i is equal to 2, the break statement is executed, and the loop terminates immediately. The program moves on to execute the code that comes after the loop. So, the value 2, as well as 3 and 4, are not printed.
Functions
Functions are a way to encapsulate a piece of code so that it can be reused later by calling just a function name and customized arguments. Functions help to make code more modular, easier to read, and reusable.
A. Built-in functions
Python comes with a number of built-in functions that can be used directly without the need for any import statements. A comprehensive list of built-in Python functions can be found in the official Python documentation at the following URL: https://docs.python.org/3/library/functions.html ⤴ (This page lists all the built-in functions available in Python 3, along with their descriptions and examples of how to use them.)
Examples of built-in functions include:
| function | example | description |
|---|---|---|
| print() | print("Hello, world!") # output: Hello, world! |
used to output text and variables to the console |
| input() | input("Provide a number:") # output: Provide a number: |
used to accept user input from the console |
| len() | my_string = "Hello, world!" print(len(my_string)) # output: 13 |
used to return the length of an object (e.g. string, list, etc.) |
| type() | my_list = [1, 2, 3] print(type(my_list)) # output: <class ‘list’> |
used to return the type of an object (e.g. int, str, list, etc.) |
| range() | for i in range(1, 6): print(i) # output: 1 2 3 4 5 |
used to generate a sequence of numbers within a specified range |
| sum() | my_list = [1, 2, 3, 4, 5] print(sum(my_list)) # output: 15 |
used to return the sum of a sequence of numbers |
| sorted() | my_list = [3, 1, 4, 2, 5] print(sorted(my_list)) # output: [1, 2, 3, 4, 5] |
used to sort the elements of an iterable in ascending or descending order |
B. User-defined functions
In addition to built-in functions, Python also allows for the definition of custom functions using the def keyword.
Here’s an example of a custom function that takes two arguments and returns their sum:
# Define a function that calculates the sum of two numbers
def add_numbers(x, y):
    return x + y

# Call the function and print the result
result = add_numbers(1, 2)
print(result)                 # Output: 3
In this program, we define a function called “add_numbers” that takes two parameters (x and y) and returns their sum. We then call the function with the parameter values 3 and 5, and print the result to the console.
Custom functions can also have default parameter values, variable-length argument lists, and keyword arguments.
Here’s an example of a custom function that takes a default parameter value and a variable-length argument list:
def print_numbers(num1, num2=0, *args):
    print(num1)
    print(num2)
    for num in args:
        print(num)

print_numbers(1)                           # output: 1 0        ; the second number has a default value
print_numbers(1, 2, 3, 4, 5)               # output: 1 2 3 4 5  ; the default value of the second parameter is overwritten
In this example, we define a function “print_numbers()” that takes two parameters num1 and num2, with num2 having a default value of 0. The function also takes a variable-length argument list *args, which allows for an arbitrary number of additional arguments to be passed to the function. Inside the function, we print the values of num1, num2, and all the additional arguments in args.
We then call the print_numbers function with two different sets of arguments:
• with the value 1 only - in this call, num1 is 1, num2 is 2, and args contains the values 3, 4, and 5
• with the values 1, 2, 3, 4, and 5 - in this call, num1 is 1 and num2 is default so equal 0, and list of args is empty
C. Imported functions
In addition to built-in functions and user-defined functions, Python also allows the importation of functions from external modules or libraries. These imported functions can be used in the same way as built-in or user-defined functions.
Python provides several ways to import functions from external modules. The most common way is to use the import statement, which allows you to import an entire module or just specific functions from that module.
A module is a file containing Python definitions and statements that can be used in other Python code.
A package is a collection of related modules that can be organized hierarchically.
To use multiple functions from a package, you can import the entire package using the import statement and then call the functions using the dot . notation.
Example 1: Let’s say we want to use the sqrt() function from the math module to calculate the square root of a number:
import math

result = math.sqrt(25)
print(result)                             # output: 5.0
In this example, we import the math module using the import statement and then call the sqrt() function from the math module using the syntax math.sqrt(). This allows us to calculate the square root of the number 25 and store the result in a variable result.
If the name of the package is long or inconvenient you can use a cutomized shortcut with the as keyword:
import pandas as pd
Then, use a shortcut instead of the full name in your code:
my_dataframe = pd.DataFrame({'col1': [1, 2], 'col2': [3, 4]})

print(my_dataframe)
# output:
col1 col2
0 1 3
1 2 4
Instead of importing an entire module, you can import only a specific function from the module using the from keyword.
Example 2: Let’s say we only want to use the sqrt() function from the math module:
from math import sqrt

result = sqrt(25)
print(result)                             # output: 5.0
In this example, we use the from keyword to import only the sqrt() function from the math module. This allows us to call the sqrt() function directly without having to use the math prefix.
Classes
In Python, a class is a blueprint for creating objects, which are instances of the class. Classes are defined using the class keyword, followed by the class name and a colon, and then the body of the class, which contains its attributes (variables) and methods (functions).
Here’s an example of creating a simple Person class in Python:
class Person:
    def __init__(self, name, age):
        self.name = name
        self.age = age

    def get_name(self):
        return self.name

    def get_age(self):
        return self.age

    def set_age(self, new_age):
        self.age = new_age
In this example, we define a Person class with four methods:
__init__, a special method that is called when a new instance of the class is created
It takes two parameters, “name” and “age”, and initializes the instance attributes self.name and </b>self.age</b> with these values.get_name, a simple getter method that return the value of the “name”get_age, a simple getter method that return the value of the “age”set_age, a setter method that takes a new age value and sets the self.age instance attribute to this new value.
With this Person class defined, we can **create instances of it (objects), like so:
person1 = Person("Alice", 25)
person2 = Person("Bob", 30)
We just created two instances of the Person class, person1 and person2, with different name and age values.
We can now call the methods of these instances to get and set their attributes:
print(person1.get_name())                 # output: Alice
print(person1.get_age())                  # output: 25

person1.set_age(30)
print(person1.get_age())                  # output: 30
Writing Your First Python Program (EXAMPLES)
Now that you have a basic understanding of Python, it’s time to try your Python skills!
Here are a few simple examples of Python code that you can try out:
Example 1: Printing a message to the console:
print("Hello, world!")
This code will print the message “Hello, world!” to the console. It uses a built-in Python function print(). The argument of this function is a text string enclosed in the single or double quotation marks, "" or ''.

Example 2: Storing and manipulating data in variables:
x = 10
y = 5

print(x, y)
This code defines two variables, x and y, and assigns them the values 10 and 5, respectively. The current value assigned to the variable can be displayed on the console screen using print() function with a variable as an argument (e.g., print(x)).

Example 3: Perform some basic arithmetic operations:
z = x + y
print(z)

z = x * y
print(z)
This code uses previously defined variables x and y to perform some basic arithmetic operations like summing or multiplying. The result of the calculations is assigned to a new variable z. It stores the most recent assigned value, which can be previewed using a built-in print() function.

Example 4: Calling a built-in function:
name = input("What is your name? ")
print("Hello, " + name + "!")
This code prompts the user for their name using a built-in input() function and then greets them. The input() function prints the message on the console and wait antil user type the input data.
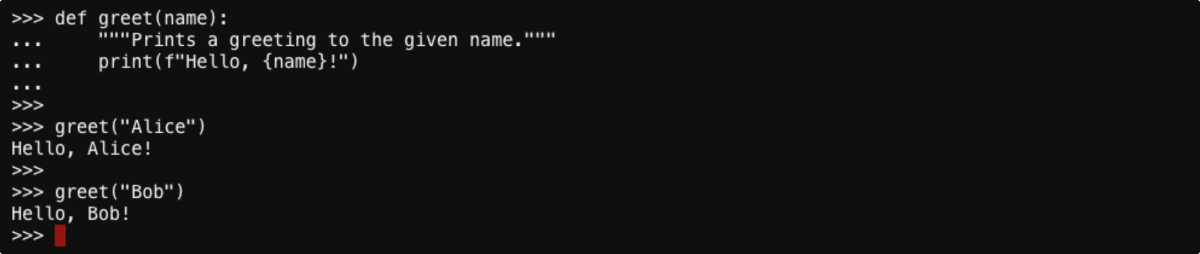
Example 5: Defining and calling a custom function:
def greet(name):
    """Prints a greeting to the given name."""
    print(f"Hello, {name}!")
This code defines a function called greet() that takes a single argument, name, and prints a greeting to the console. You can substitute any text as a name argument to print a greeting for it. Let’s try it!
greet("Alice")
greet("Bob")
The function is called with two different names, “Alice” and “Bob”, to demonstrate how it can be used.
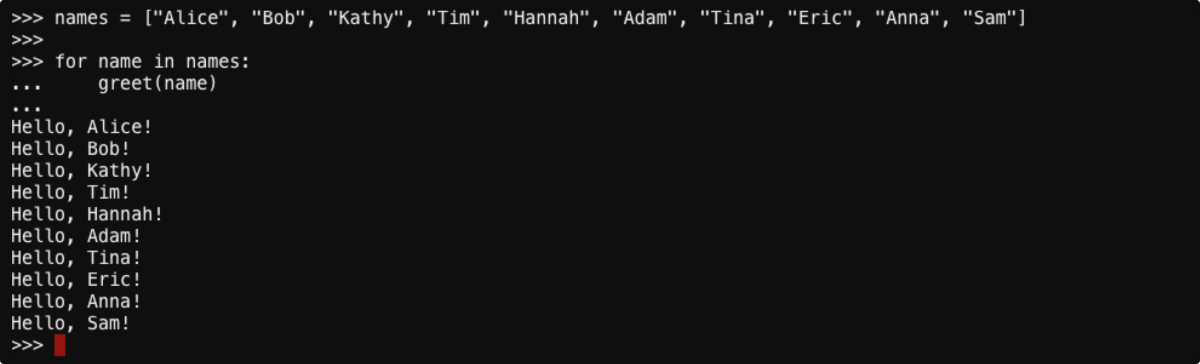
Example 6: Call function in a loop:
names = ["Alice", "Bob", "Kathy", "Tim", "Hannah", "Adam", "Tina", "Eric", "Anna", "Sam"]

for name in names:
    greet(name)
This code defines a list composed of 10 names and call a greet() function in a loop for each name in the list. Note that such a solution is much more concise than calling the function for each name separately. The code snippet iterating through the list of names will look the same regardless of the length of the list.
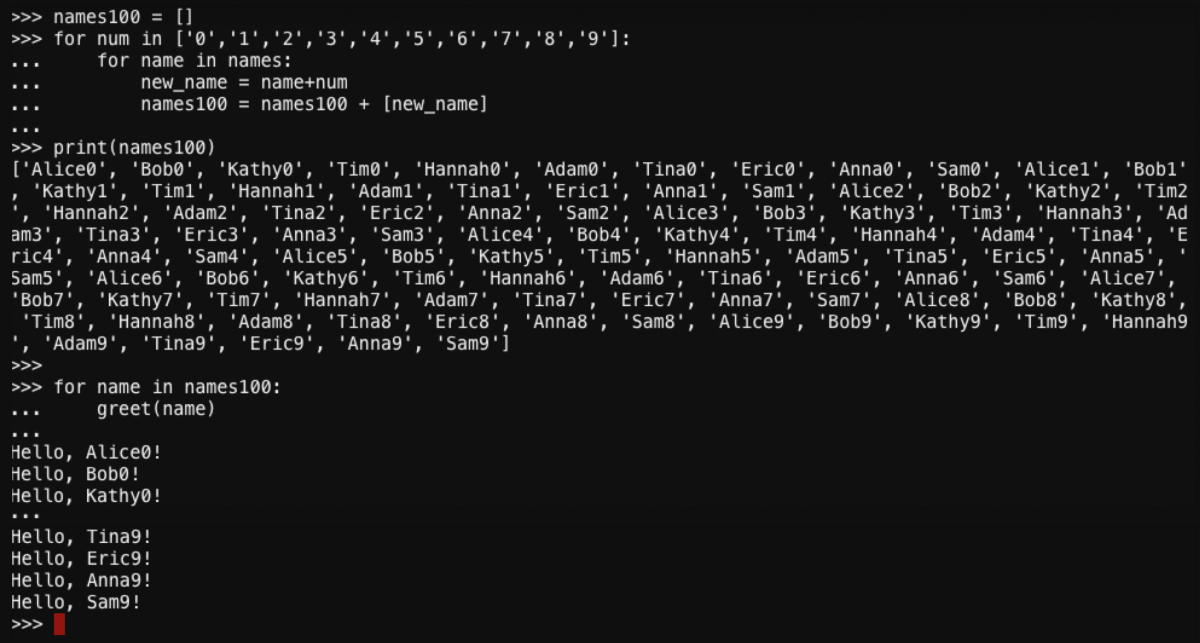
Example 7: Task for you!
- Using a for loop, create a list of 100 names by adding a digit from 0 to 9 to each name.
- Using a for loop, print greeting for each name.
Do it yourself! Then, check the solution below.
names100 = []
for num in ['0','1','2','3','4','5','6','7','8','9']:
    for name in names:
        new_name = name+num
        names100 = names100 + [new_name]

for name in names100:
    greet(name)
First, we defined the empty list for a hundred new names, names100. Then, we used a nested loop composed of external loop over 10 digits, and internal loop over 10 names. In this case, it’s an everyone-with-everyone loop, which means that the number of iterations is equal to the multiply of the lengths of both lists (i.e., digits x names = 100). For each pair name-digit we assigned a new value for the new_name variable and added it to the end of the list names100. Once the new list of names is created, we could use the same code snippet to call a greet() function for every name on the list.
PRO solution for example 7
Python definitely has more built-in functions than print(). Knowing that others exist can make code development very easy. Why reinvent the wheel?
So, let’s learn about the availability of a few more built-in functions:
range(), generate a sequence of integersstr(), converts a value to a string
Knowing these functions can significantly simplify the solution in example 5:
names100 = [name+str(num) for num in range(10) for name in names]

for name in names100:
    greet(name)
In this solution, we used a single line syntax for nested loops that returns a list, i.e., the content of name100 list. The range() function generates a list of integers. We want 10 digits. In Python numbering starts from 0, so the first integer is 0, and the tenth is 9 when incrementing by 1. So, the elements in the list are numbers [0,1,2,3,4,5,6,7,8,9] and we can NOT simply add the number to the name string. It is where the str() function comes in. By applying this function to the number 0 we get the string '0'. And, we can do that on the fly. To sum up, in the external loop we generate integers, which are converted to string representation and pasted with every name in the inner loop.
range() functionThe range() function in Python is a built-in function that allows you to generate a sequence of integers. It takes three arguments: start, stop, and step, and returns a sequence of integers that starts at the start value, and ends at the stop value, incrementing by the step value. The range() function is often used in Python in conjunction with a for loop to iterate over a sequence of integers. It can also be used to create lists of integers, or to generate values for other purposes.
For example, the following code generates a sequence of integers from 0 to 9, incrementing by 1:
for i in range(10):
    print(i)                      # Output: 0 1 2 3 4 5 6 7 8 9
You can also specify different values for the start, stop, and step arguments to generate different sequences of integers. For example, the following code generates a sequence of integers from 10 to 15, incrementing by 2:
for i in range(10, 16, 2):
    print(i)                      # Output: 10 12 14
str() functionThe str() function in Python is a built-in function that converts a value to a string. It takes a single argument, which can be of any data type, and returns a string representation of that value. The str() function is often used to convert values to strings for display or printing purposes, or to convert values from one data type to another.
For example, the following code converts an integer to a string:
x = 123
y = str(x)
print(y)              # Output: "123"
The str() function can be used to convert other data types to strings as well. For example, the following code converts a float to a string:
x = 3.14159
y = str(x)
print(y)              # Output: "3.14159"
If you have completed all the examples provided and successfully solved the assignment task, you should now be ready to start coding in Python on your own computer, which means you will need to download and set up Python locally.
2. Get Python locally and start coding in the IDE
Before you start programming in Python, you need to install Python and set up the development environment on your computing machine. Expolore sections provided below to select the best option for you!
Get Python locally
First, you need to download and install Python on your computer. You can download the latest version of Python from the official website: https://www.python.org/downloads/ ⤴
Follow the practical guide in the tutorial Local Python setup on your computing machine (installation needed) ⤴ to get and set up Python.
Set up Development Environment (DE)
To start programming in Python on your local machine, you need the development environment, where you will create and test your code. There are several ways to set up a Python programming environment, depending on your needs and preferences.
You can learn the details from the comprehensive introduction to Python programming environment ⤴, provided in the section 04. Development Environment ⤴ of this workbook ⤴.
A. Use Python interactive shell - beginner
In the simplest scenario, you need a command line interface, which can be opened in the terminal (Linux, macOS) or Command Prompt (Windows).
If you are a beginner in command line, it may be beneficial for you to start with the tutorials provided in section 02. Introduction to Command Line ⤴. This tutorial will guide you through the process of setting up your command line and familiarizing yourself with the fundamental concepts of Unix.
You can learn the details from the comprehensive introduction to Shell & IDLE: create Python code in a terminal or simple IDE (beginner) ⤴, provided in the section 04. Development Environment ⤴ of this workbook ⤴.
B. Use simple text editor: nano, vim, mcedit - intermediate
Once you familiarize yourself with Python basics in the interactive shell, you can try to develop a simple Python script in any text editor. When working on a remote machine, it may not always be convenient or feasible to use a graphical user interface (GUI) text editor (e.g., PyCharm). In such cases, using a built-in text editor in the terminal can be a quick and easy way to make changes to a Python script.
You can learn the details from the comprehensive introduction to Text editors: create Python code in terminal text files (intermediate) ⤴, provided in the section 04. Development Environment ⤴ of this workbook ⤴.
C. Use Interactive Development Environment: Jupyter Lab - advanced
Using Jupyter Notebook and Jupyter Lab, you can perform interactive data analysis with visualization by creating Python notebooks that combine code, visualizations, and narrative text. You can use popular Python libraries such as NumPy, Pandas, Matplotlib, and Seaborn to import, manipulate, analyze, and visualize data.
You can learn the details from the comprehensive introduction to Jupyter Lab: create an interactive Python notebook (advanced) ⤴, provided in the section 04. Development Environment ⤴ of this workbook ⤴.
D. Use Integrated Development Environment: VSC or PyCharm - professional
If you’re developing a more complex Python project that includes multiple modules or a web application, then using a professional Integrated Development Environment (IDE) such as PyCharm can be the best choice. PyCharm is a powerful IDE that provides a range of advanced features and tools for Python development, including code analysis, debugging, testing, and refactoring.
Beginners may want to start with a simpler text editor until they feel comfortable with the basics of Python programming.
You can learn the details from the comprehensive introduction to PyCharm: IDE for Professional Python Developers (professional) ⤴, provided in the section 04. Development Environment ⤴ of this workbook ⤴.
Further Reading
- 3.2 Read and Write Data Files
- 3.3 JSON Module - Encoding & Decoding JSON Data
- 3.4 Math Module - Various Mathematical Functions
- 3.5 Pandas Library - Data Structure Manipulation Tool
- 3.6 Numpy Library - Multi-Dimensional Arrays Parser
- 4. Introduction to R programming