Introduction
The merge_data.py ⤴ application is written in Python3 and employs an efficient pandas library for operating on a column-like data structure. The application enables the merging of two files by matching columns with filling in the missing data by customized error values.
Merging files by a common column facilitates:
creating a robust dataset from different source files
complementing the features for observables
finding the common part of two data sets
detecting missing data in results
App Features
- merging files of the same or different format, i.e., with different column headers or different column order
- merging files separated by different delimiters (including
.xlsxfiles) - merging multiple files all at once
- keeping only selected columns during the merge (the same or different columns from files)
Algorithm
| Schema | Notes |
|---|---|
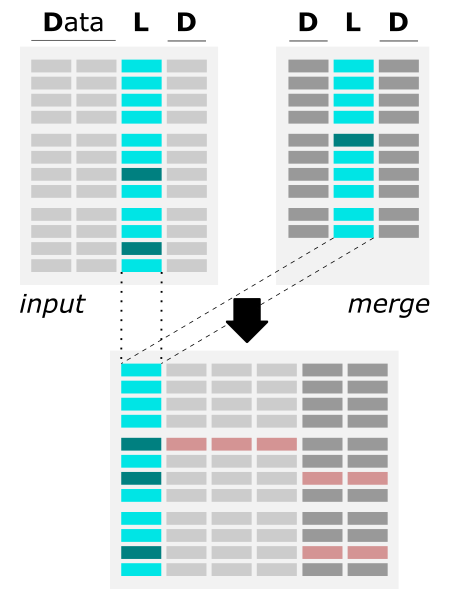
 The figure shows the algorithm of merging two files by common column. |
input & merge) should be a column-like text file (including Excel .xlsx and CSV separated with unified delimiter); various delimiters are accepted merge) is added to the first file (i.e., input) and automatically saved in the output file output file merge file, the corresponding fields are filled with the missing_value (-9999.99 by default, user can customize it) |
python3pandasopenpyxl
Options
help & info arguments:
-h, --help # show full help message and exit
required arguments:
-i file1,     --data-file-1 file1          # [string] input multi-col file
-m file2,     --data-file-2 file2          # [string] merge multi-col file
-c cols,      --matching-columns cols      # list of the same column of two files, e.g., 0,5 or label1,label2
optional arguments:
-e missing, --error-value missing          # [any] provide custom value for missing data
-o outfile, --output-datafile outfile      # [string] provide custom name for the output data_file
-f format,  --output-format format         # [int] select format for output file: 0 - original, 1 - csv, 2 - xlsx
defaults for optional arguments:
-e -9999.99            # means: all missing data will be replaced with -9999.99
-o 'data_output'       # means: the output will be saved as 'output_data' file
-f 0                   # means: the output will be saved in the original format
Usage (generic)
syntax:
python3 merge_data.py -i file1 -m file2 -c cols
                     [-e missing] [-o outfile] [-f format]
                     [-h]
arguments provided in square brackets [] are optional
example usage with minimal required options:
python3 merge_data.py -i input_file -m merge_file -c 1,5
The example parses two column-like files (input_file and merge_file), where the common column has index = 1 in the first file, and index = 5 in the second file. The missing data will be replaced with the default error value = -9999.99. The merged results will be saved into the default “data_output-$date” file.
Explore more usage examples in the documentation for this app in the data_wranglig repo: merge_data: Example usage ⤴.
Hands-on tutorial
Environment setup
The application is developed in Python3 programming language and requires importing several useful libraries. Thus, to manage dependencies, first you have to set up the Conda environment on your (local or remote) machine. data_wrangling virtual environment using install Conda ⤴.
Once you have Conda and the data_wrangling environment follow further steps below.
Activate existing Conda environment
You do NOT need to create the new environment each time you want to use it. Once created, the env is added to the list of all virtual instances managed by Conda. You can display them with the command:
conda info -e

The selected environment can be activated with the conda activate command, followed by the name of the env:
conda activate data_wrangling

Once the environment is active, you can see its name preceding the prompt.
Install new dependencies within environment
Once environment of your choice is activated, you can install new dependencies required by the merge_data ⤴ application:
| pandas ⤴ | to create and manage data structure |
|---|---|
| openpyxl ⤴ | to read/write Excel 2010 xlsx/xlsm files |
If you use Conda environment management system and followed the instructions provided above in section Environment setup then you are ready to get started with Data Wrangling Apps (because the requirements were installed as basic dependencies in this virtual environment).
Alternatively, if you want to use this app in system-wide mode (without creating a virtual environment), then install the neccessary requirements using the commands:
pip3 install pandas
pip3 install openpyxl
Inputs
Before using the application, make sure your inputs has been properly prepared. First of all, the data in the input file must be organized into columns. The number of columns and rows is arbitrary, including Big Data support (text file size reaching GBs).
data structure in the example CSV input: input0.txt
fruit,size(in),weight(oz)
apple,4,6.8
blueberry,5/8,0.02
orange,4,4.6
lemon,3,3.5
strawberry,3/8,0.4
...
data structure in the example Excel input: data_CN.xlsx

File format
The format of the input file does NOT matter as long as it is a columns-like text file. Text (.txt) files with columns separated by a uniform white character (single space, tabulator), comma-delimited CSV files, or Excel files are preferred, though.
Data delimiter
The data delimiter used does NOT matter, as it will be automatically detected by application. However, it is essential that the column separator is consistent, for example, that it is always a fixed number of spaces ` ` or always a tab, \t.
If the separator is a comma, make sure not to use commas within any data cell. For example, if you have a list of items within a cell, such as [0,1,1] the commas will be interpreted as column separators and will disrupt the data structure. Instead, consider using a different separator, such as a dash [0-1-1] or pipe [0|1|1] or encapsulate the entire list within quotes "[0,1,1]".

Column names
The header is usually the first line of the file and contains the column labels. Naming the columns brings great informational value to the analyzed data. However, the application does NOT require the input file to have a header. If it is in the file it will be detected automatically. Otherwise, you should use the column indexes to indicate the matching columns and columns to be kept.
Remeber that in Python, indexing starts from 0.
         label  position  val-2  val-3  val-4  val-5  val-6  val-7  val-8  val-9
HiC_scaffold_1       982      0      0      0      0      0      0      0      0
HiC_scaffold_1       983      0      0      0      0      0      0      0      0
HiC_scaffold_1       984      0      0      0      0      0      0      0      0
File content
Running the application requires that you specify the names of input files and indexes (or names) of matching (shared) columns:
Input files
You can specify inputs as a comma-separated list of filenames or a column-like file containing paths & filenames of all inputs.
For example:
-i input0.txt,input1.txt
or
-i inputs_list
where the input_list is a one-column file with contents like this:
input0.txt
input1.txt
input2.txt
Shared column
The mereg_data app provides -c mcols option which is the required argument for the program. The user should specify the list of matching columns in the input files. In these columns, the values should be identical and unique, while the order can differ to correctly merge data from multiple files.
For example:
- if merging files have the same data structure, i.e., the matching column has the same index, you can specify it as follows:
-c 0 # it means that in all inputs, the matching column has index 0 (i.e., it's the first column in the file)

- if merging files have different data structure, i.e., the matching column has different index, you can specify it as follows:
-c 0,1 # specify indexes of matching columns in the inputs
or
-c USDA#,ARS_Label # specify column labels (headers) of matching columns

Usage variations
Besides the required options (-i, -c) for simple merging of multiple files by a shared column, the app provides extensive customization through optional arguments. This allows you to:
- select columns to be kept (
-k) individually from each input file - provide custom value for missing data (
-e) - provide custom name for the merged output (
-o) - select format for output file (
-f) - select app verbosity level (
-v)
The Example usage ⤴ section in the documentation of the app in the data_wrangling ⤴ repo provides practical examples of using these options in various configurations. Please explore the ready-made examples to learn more about specific options.
Case study
In this section of the tutorial, we use the data_merge app to address a real-life problem faced by collaborators who needed to merge their complementary datasets that were labeled differently.
Matching datasets manually can be a time-consuming and error-prone process. It is not a reliable approach due to the risk of human error and the possibility of missing data or overlooking important information. Mistakes can lead to data inconsistencies, inaccuracies, and negatively impact research outcomes.
Software solutions like Python-based data_merge app can be a better approach for matching datasets because they can automate the process, reducing the likelihood of human error and increasing efficiency. It can also ensure consistency and accuracy, identify discrepancies, and be customized to meet specific needs and requirements.
In this Case Study we use the inputs in the Excel format (.xlsx).
Usage examples for different input formats (CSV, TXT) are available in the Example usage ⤴ section in the documentation of the app in the data_wrangling ⤴ repo.
Background story
Two labs, Lab A and Lab B, were collaborating on a research project regarding quality of grains. As part of the project, they used the same experimental samples and conducted different measurements to obtain some numerical data. However, each lab labeled the samples differently, resulting in confusion when it came time to analyze the data. Luckily, the file containing the corresponding pairs of labels to each sample is available.
The general task
ISSUE: Each lab had collected two different kinds of experimental measurements in relation to the different set of labels.
TASK: Match the data and measurements from each lab based on the corresponding labels and create a robust merged dataset.
METHOD: Use a Python-based data_merge app as an automated and flexible approach that saves users time and reduced the risk of human error.
Inputs
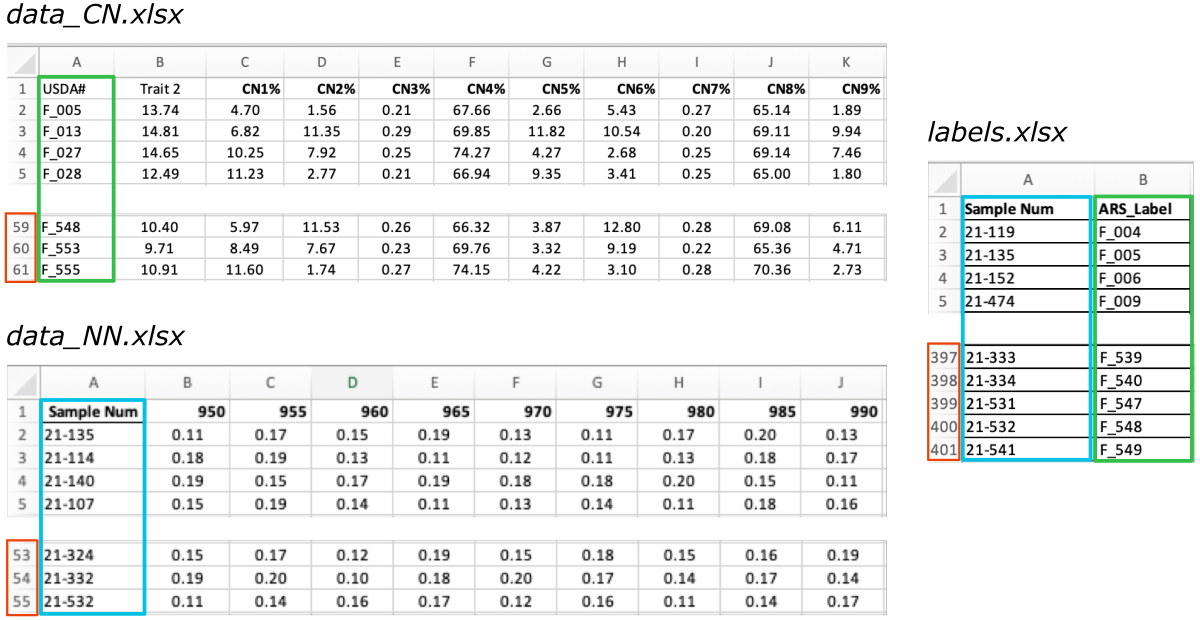
Below is the preview of the required data and labels input files.
-
The
data_CN.xlsxandlabels.xlsxshare the same column with ARS labels, even though in both files this column has a different name (i.e.,USDA#andARS_Label, marked with the green frames on the screenshot below).
-
The
labelsfile contains an additional column withSample Numpaired with theARS labelsand together they provide a set of matching pairs of labels for the experimental samples.
-
The other
datafile:data_NN.xlsxcontains measurements collected by the second lab and labeled with theSample Numidentifiers (marked with the blue frames).
As you can see, the number of rows in the labels file is significantly higher than in the data files (marked with the red frames).

Approach
There are two tasks to perform:
-
Adding matching
Sample Numfrom the labels.xlsx file into the data_CN.xlsx file using matchingARS_Label-USDA#columns. -
Transfering data from the data_NN.xlsx file into the data_CN.xlsx file using matching
Sample Numcolumn (now available in both files).
Both tasks can be realized using the same data_merge app but in two separate steps.
Solution
STEP 1
Adding matching Sample Num from the labels.xlsx file into the data_CN.xlsx file using matching ARS_Label-USDA# columns.
python3 merge_data.py -i data_CN.xlsx,labels.xlsx -c 0,1 -o output_step1 -f 2 -v 1
OUTPUT: output_step1.xlsx

STEP 2
Transfering data from the data_NN.xlsx file into the data_CN.xlsx file using matching Sample Num column (now available in both files).
python3 merge_data.py -i output_step1.xlsx,data_NN.xlsx -c 11,0 -o output_step2 -f 2 -v 1
OUTPUT: output_step2.xlsx

Further Reading
Aggregate data over slicing variations (python)Split data or create data chunks (python)
MODULE 08: Data Visualization
