
Introduction
This tutorial has been upgraded to incorporate Python-based automation approach, suplementing the foundational guide on Excel macros originally created by Arun Seetharam.
TASK or CHALLENGE:
If you have a large number of worksheets (tabs) in your Excel file that you need to export as separate text files, this tutorial will guide you through automating the process, making it quicker and reducing the risk of errors.
Export multiple worksheets as separate text files in Excel
Handling and distributing data spread across multiple worksheets in an Excel workbook can be a challenging and time-consuming task, especially when each worksheet needs to be exported as a separate text file.
Manually saving each worksheet individually is not only laborious but also prone to errors.
This tutorial offers a detailed guide to automate the export process.
By the end of this tutorial, you will be able to export a large number of worksheets from Excel efficiently, with each worksheet saved as a separate text file and labeled as the worksheet name.
A. Create macro in Excel (Windows and macOS)
-
Microsoft Excel: Before you begin, ensure you have
macrosenabled in your Excel tool.Windows:
- Open Excel: Start Excel and open a new, empty workbook.
- Access Excel Options:
- Click on the File tab in the top-left corner.
- From the menu, select Options. This will open the Excel Options dialog box.
- Customize Ribbon:
- In the Excel Options dialog box, click on Customize Ribbon from the list on the left.
- On the right side, you’ll see a list of the main tabs. Look for the Developer checkbox.
- Check the box next to Developer.
- Apply and Close: Click
OKto apply the changes and close the Excel Options dialog box.
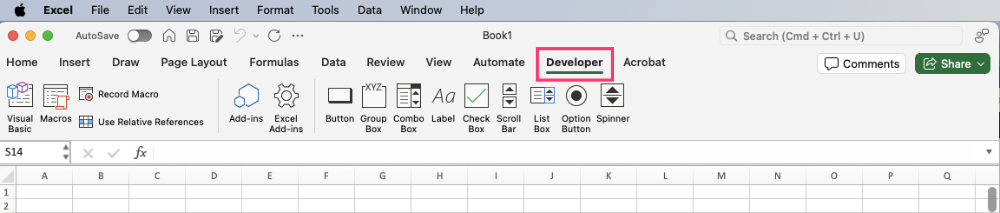
The Developer tab should now be visible in the Excel ribbon.
macOS:
- Open Excel: Start Excel and open a new, empty workbook.
- Access Preferences:
- Click on Excel in the menu bar at the top of the screen.
- Select Preferences from the dropdown menu.
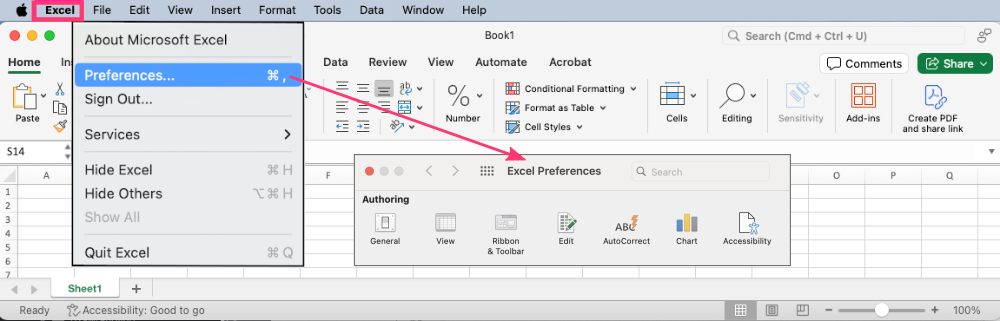
- Ribbon & Toolbar:
- In the Excel Preferences dialog box, click on Ribbon & Toolbar. (see an image in the next step)
- Customize Ribbon:
- In the Customize Ribbon section, you’ll see a list of tabs. Look for the Developer checkbox.
- Check the box next to Developer.

- Apply and Close: Close the Ribbon & Toolbar preferences dialog box.
- Enable Full Disk Access for Excel To ensure that Excel macros work correctly and can manage inputs and outputs on macOS, you need to grant Excel full disk access.
- Open
System Preferences. - Go to
Security & Privacy. - Click the
Privacytab. - In the left sidebar, select
Full Disk Access. - Click the lock icon in the bottom left corner and enter your password to make changes.
- Click the
+button and add the Microsoft Excel application to the list.
- Open
-
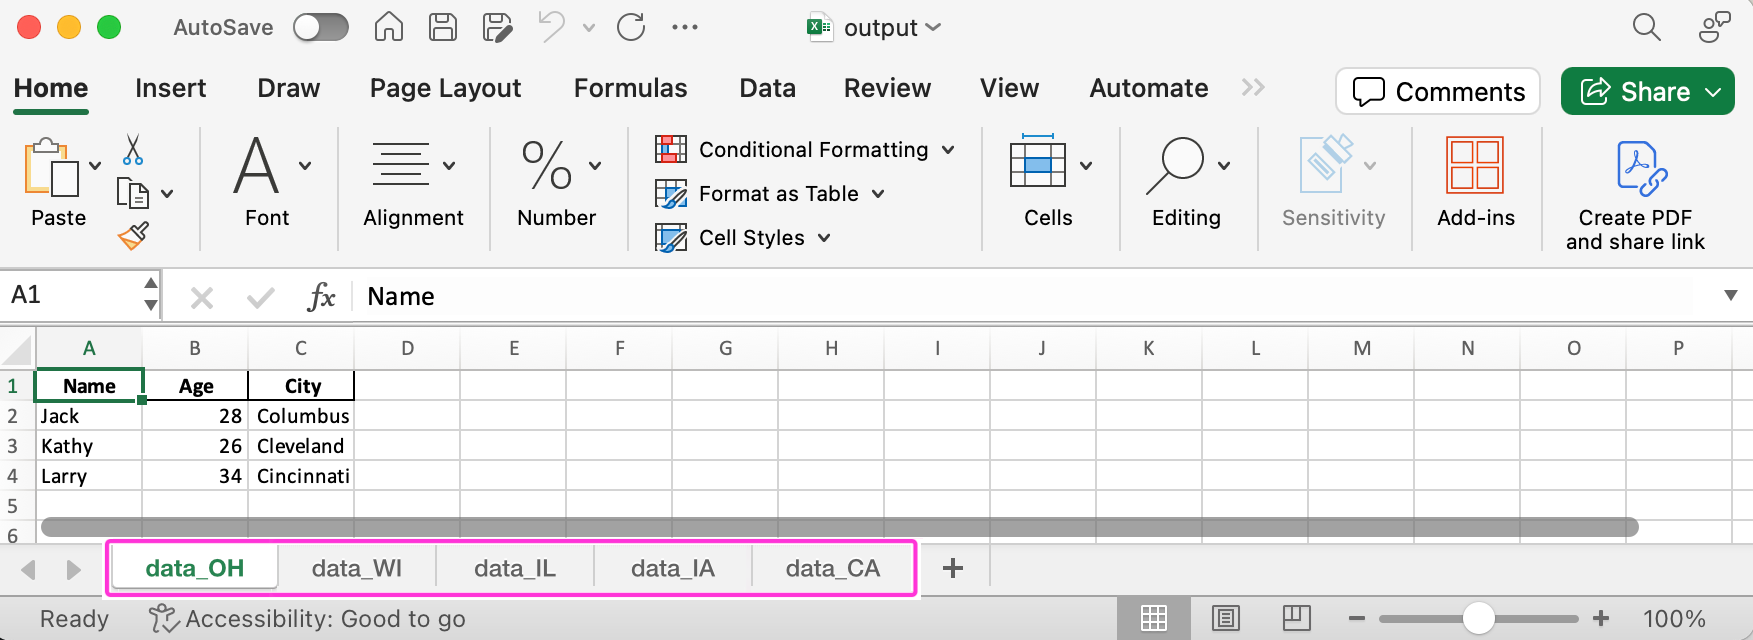
Excel Spreadsheets: An Excel workbook containing multiple worksheets (tabs) that you want to export.
Each worksheet should contain structured data in a consistent format. The VBA code for the macro can be adjusted to handle different data formats appropriately.
1. Prepare your Excel spreadsheets
You can use any Excel file that contains at least 2 spreadsheets to complete this exercise. If you followed the tutorial, you can use the final output.xlsx file or you can simply . You should get an Excel file with 5 worksheets.
2. Add VBA code of the macro
- Open Excel app (graphical user interface).
- Click on
Developertab in the Excel wirndow and thenMacrosbutton. - In the pop-up window, type in some name for a new macro (e.g.,
export_text) and clickcreateor+(on macOS). The new pop-up window withMicrosoft Visual Basicwill appear.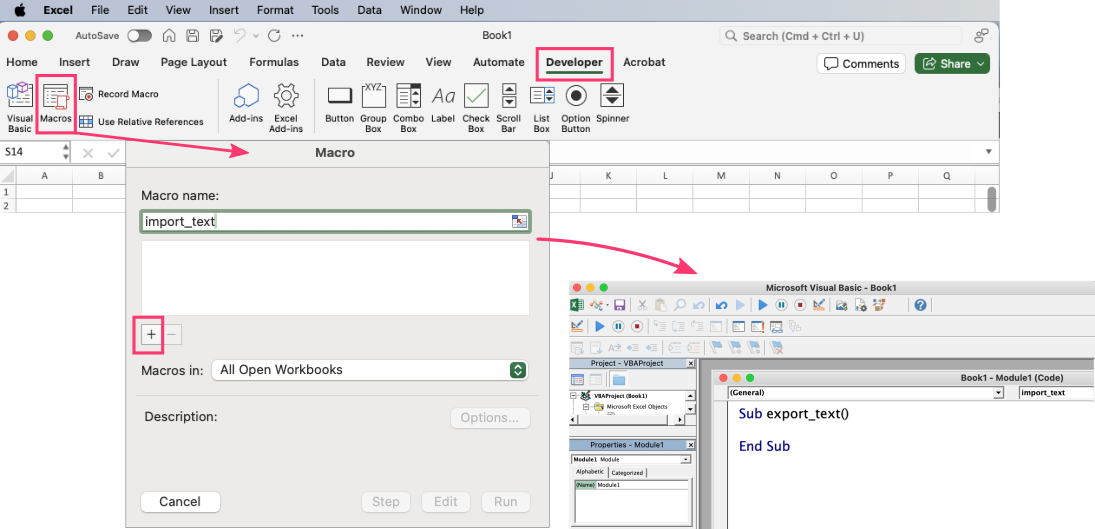
- MS Visual Basic window: Paste the below code in the
Codepanel on the right: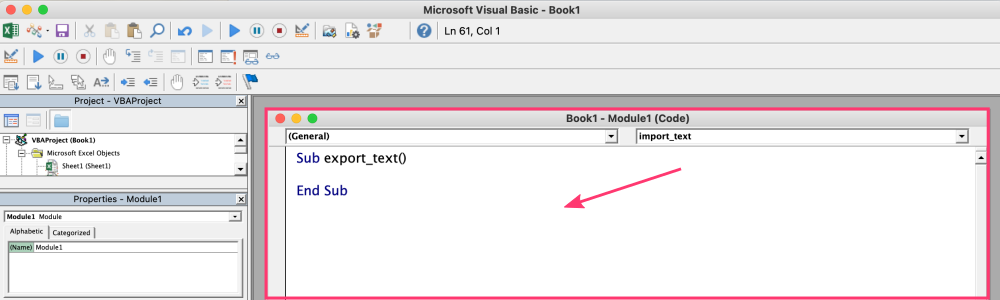
The VBA code for this macro differs between the requirements for Excel on Windows and macOS. Please ensure you select the version that matches your operating system.
VBA code for Windows:
 ' ---------------------- Directory Choosing Helper Functions -----------------------
 Private Type BROWSEINFO ' used by the function GetFolderName
     hOwner As LongPtr
     pidlRoot As LongPtr
     pszDisplayName As String
     lpszTitle As String
     ulFlags As Long
     lpfn As LongPtr
     lParam As LongPtr
     iImage As Long
 End Type

 Private Declare PtrSafe Function SHGetPathFromIDList Lib "shell32.dll" _
     Alias "SHGetPathFromIDListA" (ByVal pidl As LongPtr, ByVal pszPath As String) As Long

 Private Declare PtrSafe Function SHBrowseForFolder Lib "shell32.dll" _
     Alias "SHBrowseForFolderA" (lpBrowseInfo As BROWSEINFO) As LongPtr

 Function GetFolderName(Msg As String) As String
 ' returns the name of the folder selected by the user
 Dim bInfo As BROWSEINFO, path As String, r As Long
 Dim X As LongPtr, pos As Integer
     bInfo.pidlRoot = 0& ' Root folder = Desktop
     If IsMissing(Msg) Then
         bInfo.lpszTitle = "Select a folder."
         ' the dialog title
     Else
         bInfo.lpszTitle = Msg ' the dialog title
     End If
     bInfo.ulFlags = &H1 ' Type of directory to return
     X = SHBrowseForFolder(bInfo) ' display the dialog
     ' Parse the result
     path = Space$(512)
     r = SHGetPathFromIDList(ByVal X, ByVal path)
     If r Then
         pos = InStr(path, Chr$(0))
         GetFolderName = Left(path, pos - 1)
     Else
         GetFolderName = ""
     End If
 End Function
 '---------------------- END Directory Chooser Helper Functions ----------------------

 Public Sub DoTheExport()
 Dim FName As Variant
 Dim Sep As String
 Dim wsSheet As Worksheet
 Dim nFileNum As Integer
 Dim csvPath As String

 Sep = InputBox("Enter a single delimiter character (e.g., comma or semi-colon)", "Export To Text File")

 csvPath = GetFolderName("Choose the folder to export CSV files to:")
 If csvPath = "" Then
     MsgBox ("You didn't choose an export directory. Nothing will be exported.")
     Exit Sub
 End If

 For Each wsSheet In Worksheets
     wsSheet.Activate
     nFileNum = FreeFile
     Open csvPath & "\" & wsSheet.Name & ".csv" For Output As #nFileNum
     ExportToTextFile CStr(nFileNum), Sep, False
     Close nFileNum
 Next wsSheet

 End Sub

 Public Sub ExportToTextFile(nFileNum As Integer, Sep As String, SelectionOnly As Boolean)

 Dim WholeLine As String
 Dim RowNdx As Long
 Dim ColNdx As Integer
 Dim StartRow As Long
 Dim EndRow As Long
 Dim StartCol As Integer
 Dim EndCol As Integer
 Dim CellValue As String

 Application.ScreenUpdating = False
 On Error GoTo EndMacro:

 If SelectionOnly = True Then
     With Selection
         StartRow = .Cells(1).Row
         StartCol = .Cells(1).Column
         EndRow = .Cells(.Cells.Count).Row
         EndCol = .Cells(.Cells.Count).Column
     End With
 Else
     With ActiveSheet.UsedRange
         StartRow = .Cells(1).Row
         StartCol = .Cells(1).Column
         EndRow = .Cells(.Cells.Count).Row
         EndCol = .Cells(.Cells.Count).Column
     End With
 End If

 For RowNdx = StartRow To EndRow
     WholeLine = ""
     For ColNdx = StartCol To EndCol
         If Cells(RowNdx, ColNdx).Value = "" Then
             CellValue = ""
         Else
             CellValue = Cells(RowNdx, ColNdx).Value
         End If
         WholeLine = WholeLine & CellValue & Sep
     Next ColNdx
     WholeLine = Left(WholeLine, Len(WholeLine) - Len(Sep))
     Print #nFileNum, WholeLine
 Next RowNdx

 EndMacro:
 On Error GoTo 0
 Application.ScreenUpdating = True

 End Sub
VBA code for macOS:
 Function GetFolderName(Msg As String) As String
     Dim FolderPath As String
     On Error Resume Next
     FolderPath = MacScript("(choose folder with prompt """ & Msg & """) as string")
     On Error GoTo 0
     If FolderPath = "" Then
         GetFolderName = ""
     Else
         ' Remove the trailing colon
         If Right(FolderPath, 1) = ":" Then
             FolderPath = Left(FolderPath, Len(FolderPath) - 1)
         End If
         ' Replace colons with slashes
         FolderPath = Replace(FolderPath, ":", "/")
         ' Correct the path by removing "Macintosh HD" if present
         If Left(FolderPath, 12) = "Macintosh HD" Then
             FolderPath = Mid(FolderPath, 13)
         End If
         GetFolderName = FolderPath
     End If
 End Function

 Public Sub DoTheExport()
     Dim FName As Variant
     Dim Sep As String
     Dim wsSheet As Worksheet
     Dim nFileNum As Integer
     Dim csvPath As String

     Sep = InputBox("Enter a single delimiter character (e.g., comma or semi-colon)", "Export To Text File")

     csvPath = GetFolderName("Choose the folder to export CSV files to:")
     If csvPath = "" Then
         MsgBox ("You didn't choose an export directory. Nothing will be exported.")
         Exit Sub
     End If

     For Each wsSheet In Worksheets
         wsSheet.Activate
         nFileNum = FreeFile
         Dim sanitizedSheetName As String
         sanitizedSheetName = SanitizeFileName(wsSheet.Name)
         On Error Resume Next
         Open csvPath & "/" & sanitizedSheetName & ".csv" For Output As #nFileNum
         If Err.Number <> 0 Then
             MsgBox "Error opening file: " & Err.Description
             Err.Clear
         Else
             ExportToTextFile CStr(nFileNum), Sep, False
             Close nFileNum
         End If
         On Error GoTo 0
     Next wsSheet

 End Sub

 Public Sub ExportToTextFile(nFileNum As Integer, Sep As String, SelectionOnly As Boolean)

     Dim WholeLine As String
     Dim RowNdx As Long
     Dim ColNdx As Integer
     Dim StartRow As Long
     Dim EndRow As Long
     Dim StartCol As Integer
     Dim EndCol As Integer
     Dim CellValue As String

     Application.ScreenUpdating = False
     On Error GoTo EndMacro:

     If SelectionOnly = True Then
         With Selection
             StartRow = .Cells(1).Row
             StartCol = .Cells(1).Column
             EndRow = .Cells(.Cells.Count).Row
             EndCol = .Cells(.Cells.Count).Column
         End With
     Else
         With ActiveSheet.UsedRange
             StartRow = .Cells(1).Row
             StartCol = .Cells(1).Column
             EndRow = .Cells(.Cells.Count).Row
             EndCol = .Cells(.Cells.Count).Column
         End With
     End If

     For RowNdx = StartRow To EndRow
         WholeLine = ""
         For ColNdx = StartCol To EndCol
             If Cells(RowNdx, ColNdx).Value = "" Then
                 CellValue = ""
             Else
                 CellValue = Cells(RowNdx, ColNdx).Value
             End If
             WholeLine = WholeLine & CellValue & Sep
         Next ColNdx
         WholeLine = Left(WholeLine, Len(WholeLine) - Len(Sep))
         Print #nFileNum, WholeLine
     Next RowNdx

 EndMacro:
     On Error GoTo 0
     Application.ScreenUpdating = True

 End Sub

 Function SanitizeFileName(fileName As String) As String
     ' Remove any invalid characters from the file name
     Dim invalidChars As String
     Dim i As Integer

     invalidChars = "/\[]:?*""<>|"
     For i = 1 To Len(invalidChars)
         fileName = Replace(fileName, Mid(invalidChars, i, 1), "")
     Next i

     SanitizeFileName = fileName
 End Function
3. Run the macro
Excel spreadsheet: Go back to your Excel spreadsheet window.
Click on Macros again. This time, the pop-up Macro window (1) has a list of your added macros. Select the one you’ve just created. Then, click the Run button.
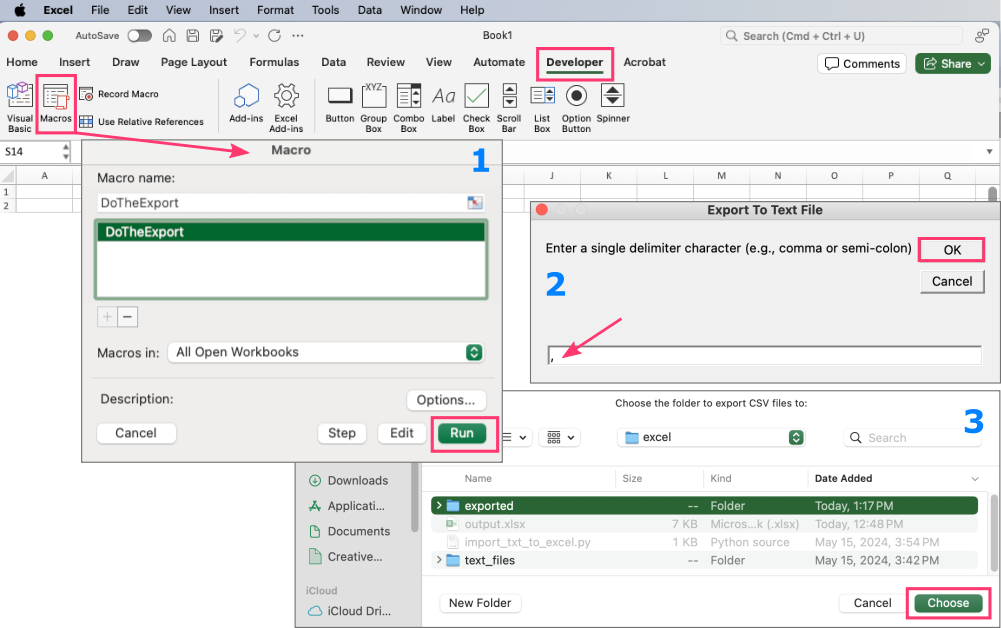 (2) A window should pop up asking the preffered delimiter. In the next one (3) you should select the location to save exported files.
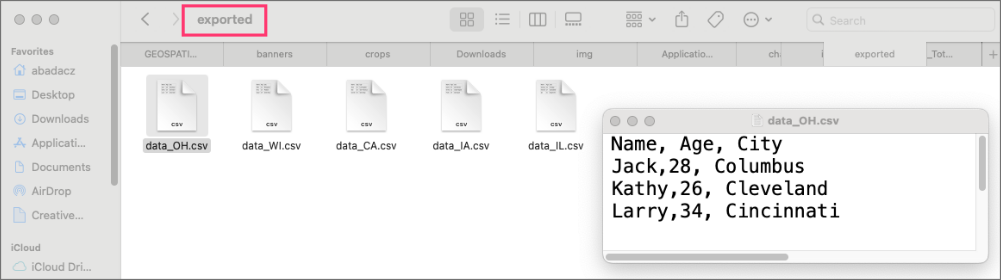
B. Python-based automation
This section will walk you through the process of using Python to automate the export of multiple Excel spreadsheets into separate files.
This approach will save you time and reduce the risk of errors compared to manual data entry.
It is a universal, cross-platform solution (Windows, macOS, Linux).
It is a command-line solution (Python script executed in the terminal window).
Before you begin, ensure you have the following:
- Microsoft Excel: It is not required for you to have MS Excel installed; you only need the
.xlsxspreadsheet file. - Python: This tutorial uses
Pythonto automate the process.
Ensure you have Python installed. You can download it from python.org.
If you are starting your Python adventure from scratch, it is worthwhile to develop your skills gradually strengthening them over time. In that case, it’s best to follow this tutorial in order. - Libraries: You will need the following Python libraries:
pandas: For data manipulation and analysis. …from the tutorial in this workbookopenpyxl: For Excel file operations. …from the documentation
You can install these libraries using
pip(once you have Python installed):pip install pandas openpyxl - Output Text Files: Select a folder where you want to save the exported text files.
The files can be in any text format such as.txt,.tsv,.csv, etc., and you can select any character as a unified delimiter. Common options include:,, ` ` ,;,|. The Python script can be adjusted to handle these different file formats and delimeters.
1. Write the Python script
Create a new Python script (e.g., export_worksheets_to_files.py). In terminal you can use the following command:
touch export_worksheets_to_files.py
Open this script in your preferred development environment (e.g., VSC or Atom) or simple code editor in terminal (e.g., nano or vim).
nano import_txt_to_excel.py
Then, follow the steps below to write all sections of the script.
- Import Necessary Libraries
First, import the necessary libraries:import os from openpyxl import load_workbook - Set the variables (paths and output delimiter)
Set the path to the directory containing your text files and the expected location for outputs:input_file = 'path_to_your_excel_file.xlsx' # Adjust path for the input Excel file output_path = 'path_to_output_directory' # Adjust output directory pathSet the delimiter used in your input files:
sep= ',' # Change this to the desired delimiterDelimiter: Adjust the
sepparameter to separate data in your output text files (e.g., comma, tab, semicolon). It is used in the next part of the script in thef.write()method.Set the extension of your text files:
ext = '.txt' # Adjust extension of output text files - Create Function: Sanitize Filename Function
This function removes any invalid characters from the sheet names to ensure valid filenames.def sanitize_filename(filename): invalid_chars = '<>:"/\\|?*' for char in invalid_chars: filename = filename.replace(char, '') return filename - Create Function: Export Sheets to Text Files
This function loads the Excel workbook, iterates through each worksheet, and writes the content to a text file using the specified delimiter. The output directory is created if it does not exist.def export_sheets_to_text(excel_path, output_dir, delimiter=',', format='.txt'): workbook = load_workbook(excel_path, data_only=True) if not os.path.exists(output_dir): os.makedirs(output_dir) for sheet in workbook.sheetnames: ws = workbook[sheet] output_file = os.path.join(output_dir, sanitize_filename(sheet) + format) with open(output_file, 'w', encoding='utf-8') as f: for row in ws.iter_rows(values_only=True): row_data = [str(cell) if cell is not None else '' for cell in row] f.write(delimiter.join(row_data) + '\n') print(f'Sheet "{sheet}" has been exported to {output_file}') - Main Script Execution
This section runs theexport_sheets_to_textfunction with the specified inputs when the script is executed.if __name__ == "__main__": export_sheets_to_text(input_file, output_path, sep, ext)
2. Run the script
Here is the complete script:
filename: export_worksheets_to_files.py
code by @Alex
import os
from openpyxl import load_workbook
# Set variables: paths (Excel input file and output directory paths) and output delimiter
input_file = 'path_to_your_excel_file.xlsx'   # Adjust path for the input Excel file
output_path = 'path_to_output_directory'      # Adjust output directory path
sep = ',' # Change this to the desired delimiter
ext = '.txt' # Adjust extension of output text files
#------ AUTOMATICALLY BELOW ------#
def sanitize_filename(filename):
 invalid_chars = '<>:"/\\|?*'
 for char in invalid_chars:
     filename = filename.replace(char, '')
 return filename
def export_sheets_to_text(excel_path, output_dir, delimiter=',', format='.txt'):
# Load the workbook
workbook = load_workbook(excel_path, data_only=True)
# Ensure the output directory exists
if not os.path.exists(output_dir):
os.makedirs(output_dir)
# Iterate through each worksheet in the workbook
for sheet in workbook.sheetnames:
ws = workbook[sheet]
output_file = os.path.join(output_dir, sanitize_filename(sheet) + format)
with open(output_file, 'w', encoding='utf-8') as f:
for row in ws.iter_rows(values_only=True):
row_data = [str(cell) if cell is not None else '' for cell in row]
f.write(delimiter.join(row_data) + '\n')
print(f'Sheet "{sheet}" has been exported to {output_file}')
if __name__ == "__main__":
 export_sheets_to_text(input_file, output_path, sep, ext)
- Open Command Prompt or Terminal
Navigate to the directory where you savedexport_worksheets_to_files.pyusing the command prompt or terminal.Before running the script, adjust the variables section by providing the paths, input file name, expected delimiter, and extension for the output files.
You can use any Excel file that contains at least 2 spreadsheets to complete this exercise. If you followed the tutorial, you can use the final output.xlsx file or you can simply .
- Run the Script
Execute the script by typing the following command and pressing Enter:python export_worksheets_to_files.py - Locate and check the output files
After the script finishes running, navigate to the directory specified inoutput_path. <brYou should see an individual file for each worksheet from the Excel file, labeled with the corresponding name. Open any of the generated.txtfiles in text editor to verify the content.
Further Reading
Create index for all worksheetsMerge two spreadsheets using a common column
Manipulating text files with Python
Read, write, split, select data
Data wrangling: use ready-made apps
Merge files by common column (python)
Aggregate data over slicing variations (python)
Split data or create data chunks (python)
MODULE 08: Data Visualization