
Introduction
This tutorial has been upgraded to incorporate Apptainer and the latest versions of CyVerse and iRODS, building on the foundational guide originally created by Arun Seetharam.
CyVerse (previously known as iPlant Collaborative) is a cloud-based infrastructure for life sciences research, providing computational resources to store, share, and analyze large data sets. It supports collaborative science and aims to enable data-driven discoveries through the use of advanced computing infrastructure.
iRODS (Integrated Rule-Oriented Data System) is an open-source data management software used to organize, share, and protect large sets of data across distributed locations. It allows users to automate data management tasks through a set of predefined rules and policies.
Apptainer (formerly Singularity) is an open-source container platform designed to securely execute applications in a reproducible and portable manner, particularly in high-performance computing (HPC) and scientific computing environments. It allows users to build containers that can run across different computational systems.
This quick tutorial explains how to download data from CyVerse ⤴ (formerly known as iPlant) onto HPC clusters using iRODS ⤴.
Getting started with iRODS
iRODS is an adaptable and robust system ideal for managing complex data workflows in scientific research, offering practical solutions for data transfer and management across a wide range of platforms and services.
Types of transfers allowed by iRODS
| Data Replication | iRODS allows for the replication of data across different storage devices or geographical locations, ensuring data redundancy and reliability for disaster recovery and high availability. |
|---|---|
| Data Synchronization | Users can synchronize data across various systems, ensuring that copies of datasets in different locations are kept up-to-date. |
| Data Movement | iRODS supports moving large datasets seamlessly between different storage systems or computational facilities, a common requirement in large-scale scientific projects. |
| Automated Data Workflows | iRODS can automate data management tasks through its rule engine, which can automatically transfer, archive, or transform data based on predefined policies. |
Types of platforms connected by iRODS
| Cloud Storage Platforms | iRODS allows for the replication of data across different storage devices or geographical locations, ensuring data redundancy and reliability for disaster recovery and high availability. |
|---|---|
| High-Performance Computing (HPC) | iRODS excels in environments where large computational and data storage resources are networked, facilitating data transfers between HPC clusters and other storage systems. |
| Research Institution Servers | Many academic and research institutions use iRODS to manage and transfer data between different institutional servers, supporting collaborative research projects across different domains. |
| Personal Machines | iRODS can be set up to transfer data between personal workstations and larger, more secure data repositories, aiding researchers in managing their data from initial creation through to publication and archiving. |
iRODS commands
You can use any of the standard UNIX command by adding i as prefix (eg., icp to copy, imv to move, ipwd to print working directory etc.).
A full list of irods commands can be found here.
What you need to use iRODS?
To use iRODS for transferring data, you need:
- an iRODS client installed on your computer,
- access to an iRODS server where your data will be stored or retrieved,
- and an internet connection.
Essentially, iRODS organizes your data transfers by following predefined rules and policies, automating the process to ensure your data is where you need it, when you need it, securely and efficiently.
iRODS Client
You need to load irods module (on HPC) or install (on your local machine) and configure an iRODS client, using the details provided by your iRODS server adminss to set up and confirm your connection.
iRODS might not be available as a module on your cluster. If it is available, you can load the module to use irods commands without installation.
To check if the irods module is accessible on your HPC system, you can use the commands module avail or module spider.
module spider irods
# or
module spider icommands
These commands will list available modules, including irods, if it is installed.
--------------------------- /software/el9/modulefiles ---------------------------
   irods/4.2.8    irods/4.2.10 (D)

  Where:
   D:  Default Module
You can load the selected module like this:
module load {module name} # e.g., module load irods/4.2.10
When iRODS is loaded as a module on a system, such as on an HPC cluster, you typically gain access to all the iRODS commands directly from the command line.
ils
This command lists the directories and files in your iRODS data space. If your environment is correctly configured, you should see the contents listed. If not, you may be prompted to run iinit to set up your connection settings (see instructions in the Set up iRODS environment section).
If the irods module is unavailable…
irods module is unavailable…module avail irods No module(s) or extension(s) found!
You can either install it yourself following the guidelines here or skip installation by using the apptainer (singularity) container (and run irods commands within the container).
To pull (download) the irods container from the (archival) Singularity Hub:
1. First, load the apptainer (or singularity) module:
module load apptainer
2. Then, pull the irods image:
apptainer pull --name irods.sif shub://mjstealey/singularity-irods-icommands
INFO:    Environment variable SINGULARITY_CACHEDIR is set, but APPTAINER_CACHEDIR is preferred
INFO:    Downloading shub image
166.4MiB / 166.4MiB [=============================================================================] 100 % 61.0 MiB/s 0s

ls
irods.sif
This will download the container to your current location in the file system.
3. Start by checking if the container itself is operational.
You can do this by running a simple command that executes within the container:
apptainer exec irods.sif ls /
This command will list the contents of the root directory inside the container. If the container is working, you should see output listing directories like /bin, /home, /usr, etc.
Next, you can test specific iRODS functionality to make sure the iRODS commands work:
apptainer exec irods.sif ils
This command should output the contents of your iRODS directory or prompt you to initialize your iRODS environment if it hasn’t been set up yet (using iinit).
ERROR: environment_properties::capture: missing environment file. should be at [/home/alex.badacz/.irods/irods_environment.json]
ERROR: _rcConnect: setRhostInfo error, IRODS_HOST is probably not set correctly status = -302000 USER_RODS_HOST_EMPTY
When you see these errors thrown to your console, it means you need to initialize your iRODS environment for a specific iRODS server, such as CyVerse.
Refer to the next section to correctly set up your iRODS client, ensuring that all necessary server and user details are accurately provided.
iRODS Server
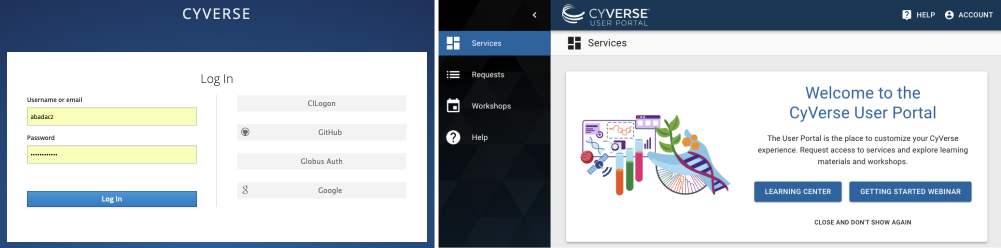
You must register for an account on the specific iRODS server, such as CyVerse. This typically involves signing up through their online portal or website. Once your registration is approved, you will receive a username and a password. These credentials are essential for setting up your iRODS environment using the iinit iRODS command.
Sign up for CyVerse account online
1. Visit the CyVerse Website: Go to the CyVerse official website at https://cyverse.org/.
2. Navigate to the Registration Page:
Click on the Sign Up tab, usually found at the top right corner of the homepage or in the main navigation menu bar.

3. Fill Out the Registration Form:
Enter all required information in the registration form. This typically includes your full name, email address, institutional affiliation, etc.
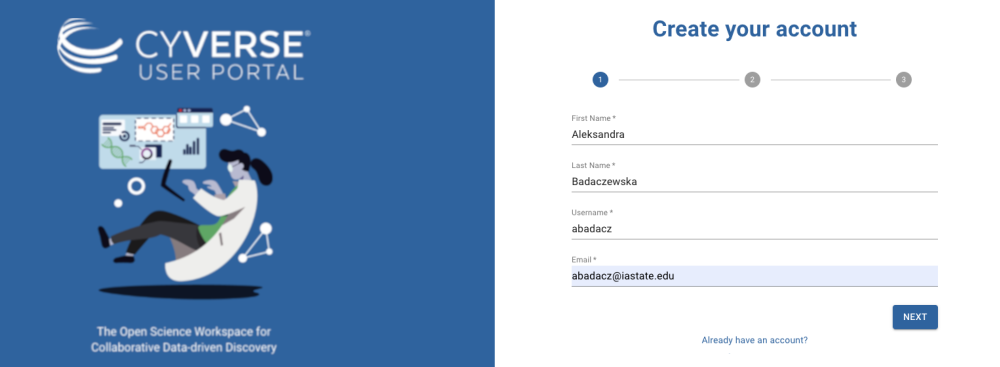
4. Submit Your Registration: Click the button to complete your registration.
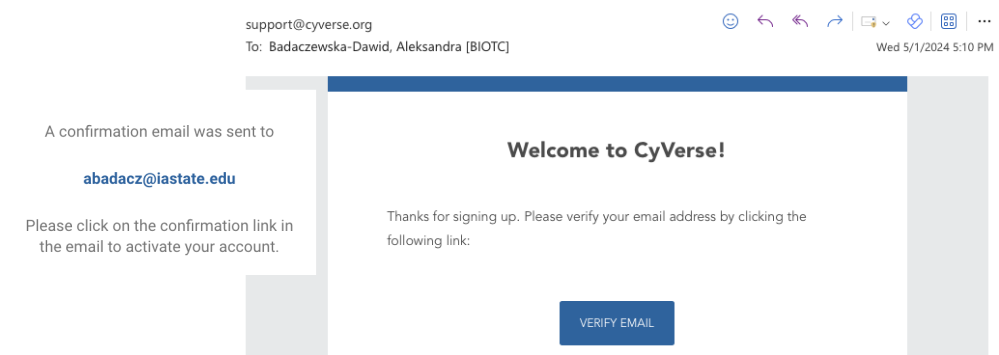
5. Email Verification:
Check your email for a verification message from CyVerse. Follow the instructions in the email to verify your account. This may involve clicking a verification link.
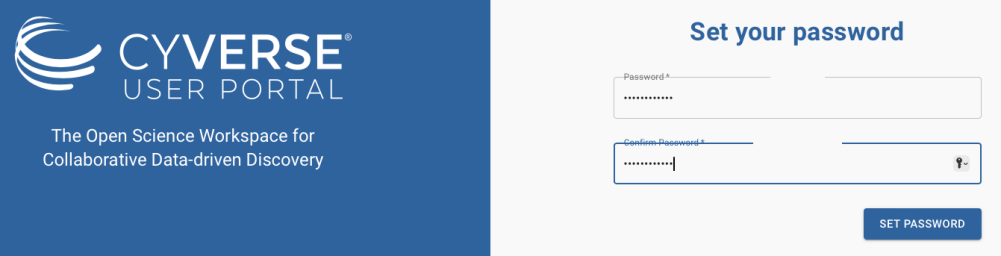
6. Complete Your Profile: (optional)
Once your email is verified, you may be asked to log in and complete your profile, adding any additional required (e.g., set password) or optional information.
7. Wait for Approval: (optional)
Some accounts may require manual approval, especially if they provide access to significant computational resources. Wait for an approval email before attempting to log in and use CyVerse services.
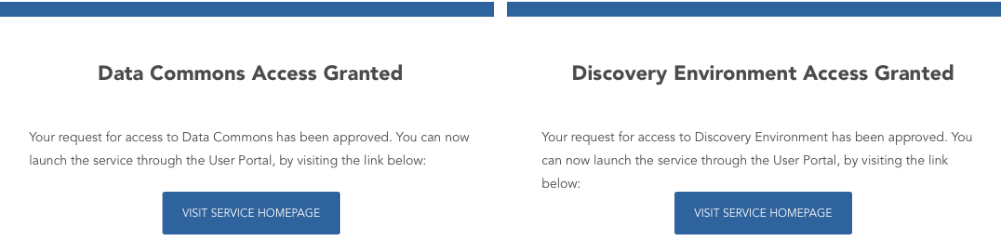
8. Start Using CyVerse:
Once your account is approved and activated, you can log in to CyVerse and explore the available tools and services.
It’s important to remember your CyVerse login credentials: username and password. These are necessary to access the CyVerse iRODS server, allowing you to manage and manipulate data stored there. Keep these credentials secure but accessible for when you need to set up or update your iRODS configuration.
Set up iRODS environment
Having an iRODS Server account with known username and password is crucial because without these, the iinit iRODS command cannot proceed to authenticate and configure the connection to the iRODS server such as CyVerse. Therefore, the first step before using iRODS client tools is always to ensure you have valid credentials by registering with the iRODS server provider.
0. Make sure you completed steps from sections:
- iRODS client to have iRODS tool on your computing machine or HPC system
- iRODS Server to have your CyVerse account and related user credentials
1. Start interactive iRODS session
Use the iinit command to log in to the iRODS server of CyVerse platform. This setup is necessary only once per cluster, as it saves your authentication details for future sessions.
A. if irods module available and loaded:
- initiate interactive irods session
iinit
B. if irods module unavailable: (and apptainer or singularity is loaded)
- initiate interactive container session
apptainer shell --bind $PWD irods.sif
iinit
2. Enter CyVerse credentials
When prompted, enter the CyVerse credentials:
- hostname:
data.cyverse.org - port number:
1247 - iRODS zone:
iplant - and your CyVerse
usernameandpassword
Ensure that all information is entered correctly to avoid authentication issues.
Based on the current documentation (May 2024) and information available from CyVerse, the updated host name (DNS) to connect to the CyVerse iRODS server is data.cyverse.org (instead of depreciated: data.iplantcollaborative.org), and the iRODS zone remains iplant. Port Number is 1247, as a standard iRODS port.
iinit
ERROR: environment_properties::capture: missing environment file. should be at [/home/alex.badacz/.irods/irods_environment.json]
One or more fields in your iRODS environment file (.irodsEnv) are missing; please enter them.

Enter the host name (DNS) of the server to connect to: data.cyverse.org
Enter the port number: 1247
Enter your irods user name: abadacz    # use your own CyVerse user name
Enter your irods zone: iplant
Those values will be added to your environment file (for use by other i-commands) if the login succeeds.

Enter your current iRODS password:     # password won't be displayed when typed
When prompted for your irods user name or your current iRODS password, it referrs to your CyVerse account credentials. This is required to access private files from the CyVerse data store via the iRODS server. You only need this authentication once per cluster/computing machine.
As it involves data transfer, the best practice recommends using the data transfer nodes on HPC.
Alternatively, you can save this configuration into ~/.irods/irods_environment.json file.
This will let you connect automatically each time you want to login by just typing in iinit command.
see the step-by-step instructions
The configuration file format for iRODS has transitioned from the older ~/.irods/irodsEnv to the newer ~/.irods/irods_environment.json. If you are running iRODS version 4.0 or later, it is recommended to use this config file for configuring your environment.
irods_environment.json: This is the current standard configuration file for iRODS 4.x and later versions. It uses a JSON format, which is more structured and versatile compared to the older format. This file should be placed in the ~/.irods/ directory and contains necessary configuration details such as host, port, user name, and zone, among other settings. ~/.irods/ directory. The format is more straightforward, using a key-value pair structure, but it lacks the flexibility and readability of JSON.
Example of irods_environment.json
{
    "irods_host": "data.cyverse.org",
    "irods_port": 1247,
    "irods_user_name": "your_username",
    "irods_zone": "iplant",
    "irods_default_resource": "",
    "irods_authentication_scheme": "native"
}
Example of irodsEnv (obsolete)
irodsHost data.cyverse.org
irodsPort 1247
irodsUserName {username}
irodsZone iplant
irodsPassword {your password}
You can also exclude the last line (password), so that it will prompt only password for logging in.
Now you are logged in.
You can logout anytime by typing iexit command.
Although your working directory doesn’t change, all irods commands can now access the remote CyVerse datastore.
ils
/iplant/home/abadacz:
3. Explore your CyVerse file system
When you run ils and see /iplant/home/<username>, it indicates that you are successfully connected to the iRODS server at CyVerse.
ils
/iplant/home/abadacz:
It lists the directories and files in your iRODS user directory. The output would be empty if you haven’t yet uploaded any files.
How to find the corresponding location via website interface?
Once you logged in to your CyVerse account, your default landing page is Services (could be also selected as a tab on the left). Under section My Services, find and click this card to LAUNCH the service in a new browser tab.
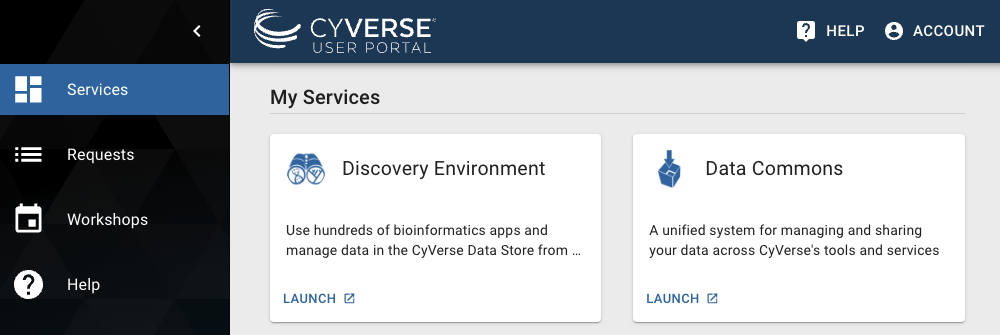
You will get redirected to the CyVerse Discovery Environment service.
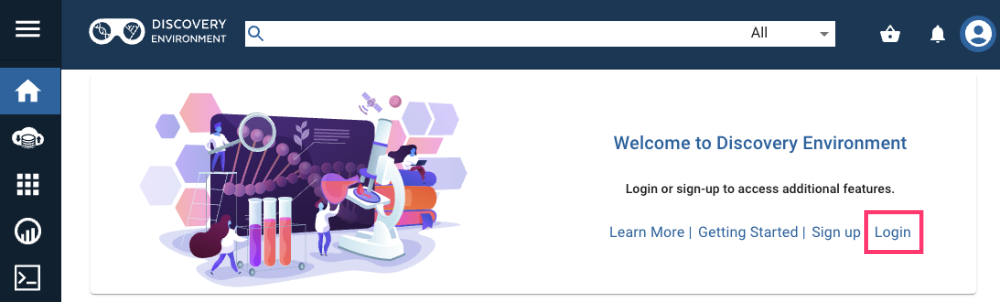
- First, log in to this service.
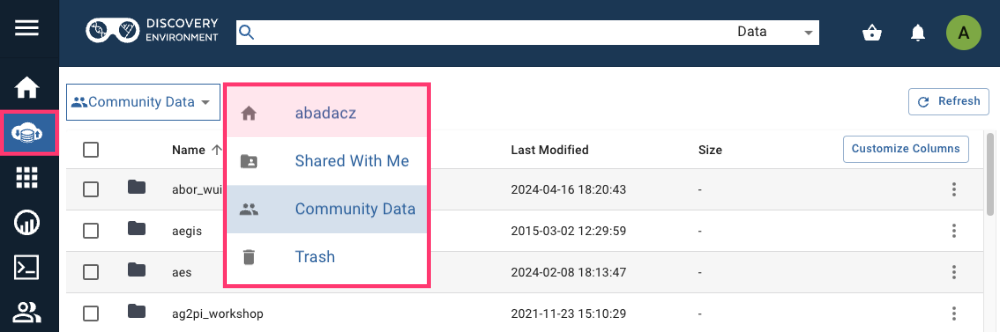
- Navigate to Data Store: Once logged in, navigate to the Data section (accessible in the menu on the left) where you can manage your files and folders.
How to upload files via website interface?
By default, you will see the Community Data storage space, but you can easily switch to your user home directory (i.e., abadacz in my case ). You can browse and upload new data there.
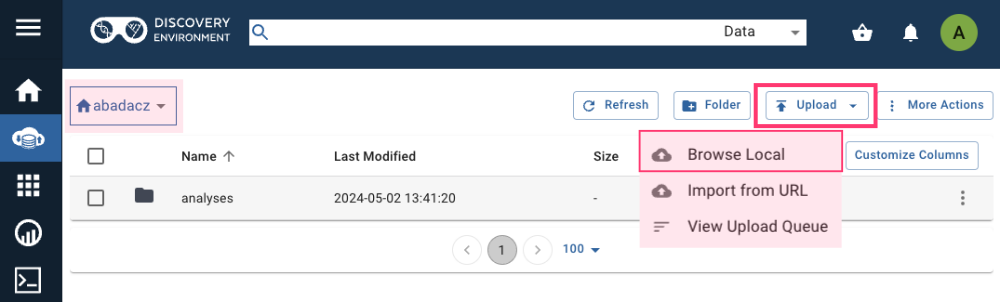
Specifically, you can upload files from your local machine (the one you have web browser on).
You can create new folders and organize files as needed directly through the web interface.
Avoid uploading individually large files or batches with countless files. Instead, Add files via iRODS.
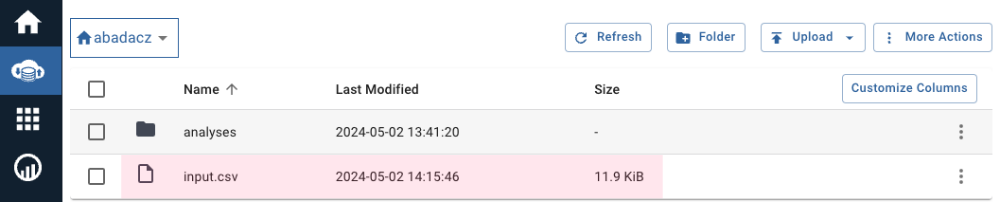
The uploaded file will be immediately visible in your file system while accessed in the CLI via iRODS. (Return to your terminal window where you have your iRODS session initiated.)
When you run ils again, it will now display the updated state of your CyVerse datastore:
ils
/iplant/home/abadacz:
    input.csv
4. Transfer data via iRODS
When you’re in an interactive iRODS session, you retain access to your local file system, allowing you to use both relative and absolute paths to locate files on your computing machine with CLI access.
Similarly, your remote storage on CyVerse is accessible at the path /iplant/home/username.
With this knowledge of your source and destination paths, i.e., local system and remote CyVerse data store, you can seamlessly transfer files back and forth. Simply use the iput command to upload files to CyVerse and the iget command to download files to your local system, ensuring smooth data exchange between your CLI environment and CyVerse.
Add files via iRODS iput
-
Prepare Your Files
Ensure that the files you want to upload are accessible on the system where your iRODS client is installed, such as your local computer or HPC environment. -
Use iRODS Commands
iput: to upload files to CyVerse using iRODS.
use-Kflag : to request checksum verification to ensure data integrity during the transfer
Here’s how you can use it:
iput -K local_file /iplant/home/<username>/destination_file
For example:
iput -K /project/isu_gif_vrsc/alex/my_data.txt /iplant/home/abadacz/
This command uploads my_data.txt from local system to iRODS home directory at CyVerse.
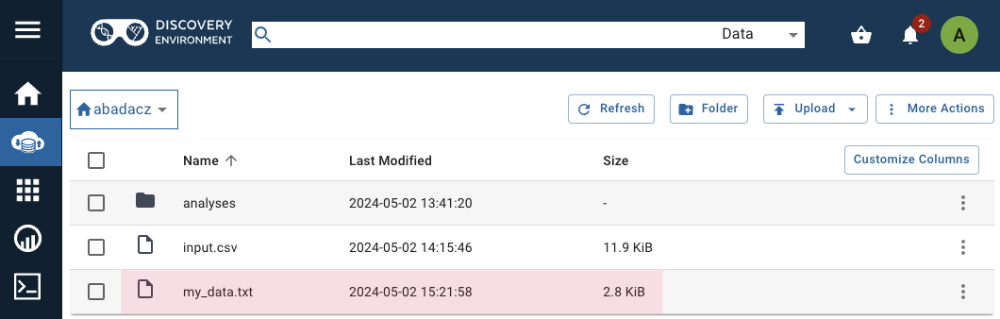
After uploading, you can run ils again to see if your file appears in the directory listing:
ils
/iplant/home/abadacz:
  input.csv
  my_data.txt
Be mindful of file permissions and sharing settings, especially if you are collaborating with others through CyVerse. You can manage permissions via the web interface or using iRODS commands like ichmod.
Uploading a Directory
The iput command in iRODS is not limited to uploading just a single file; it can also be used to upload entire directories. This flexibility makes it highly useful for managing larger datasets or multiple files at once.
To upload an entire directory, including all its contents and subdirectories, you can use the -r option, which stands for recursive.
Here’s how to do it:
iput -rK local_directory /iplant/home/username/remote_directory
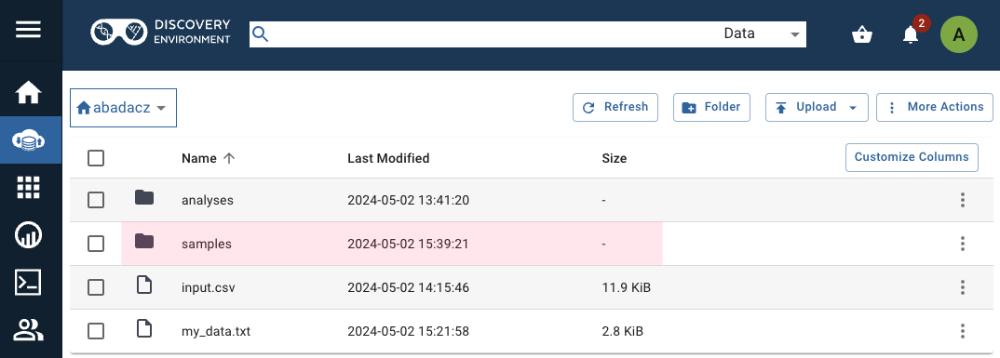
For example:
iput -rK /project/isu_gif_vrsc/alex/test_data /iplant/home/abadacz/samples
Be mindful of the size of the data being transferred, especially when uploading large directories. It is recommended to always use transfer node for exchanging data with remote iRODS servers.
Get files via iRODS iget
The iget command in iRODS is used to download files or entire directories from your iRODS data store to your local file system.
Downloading a Single File
To download a single file from the iRODS data store to your local machine, specify the source path in your iRODS space and the destination path on your local machine.
iget -K /iplant/home/username/remote_file.txt local_file.txt
For example:
iget -K /iplant/home/abadacz/my_data.txt data.txt
In an iRODS session, the ils command lists the contents of directories in your remote iRODS data store.
ils
/iplant/home/abadacz:
Conversely, the ls command used in an IRODS session, lists the contents of directories on your local machine. It operates outside of the iRODS-specific commands and works just like the standard Unix ls command, showing local files and directories.
ls
data.txt  irods.sif
Downloading a Directory
To download an entire directory, including all its contents and subdirectories, use the -r option for recursive download.
Here’s the command:
iget -rK /iplant/home/username/remote_directory local_directory
For example:
iget -rK /iplant/home/abadacz/samples
ls
data.txt  irods.sif  samples
Before downloading large directories, ensure that you have enough storage space available on your local machine.
- Organize your local directory structure in a way that makes it easy to integrate the downloaded data.
- Downloading large amounts of data can be time-consuming and may impact network performance.
Consider performing large transfers during off-peak hours if possible. - After the download is complete, especially for important data, verify that all files have been correctly transferred and are intact. This can be done by checking file sizes, using checksums, or simply opening and reviewing a few files.
Synchronize with irsync
The irsync command in iRODS is a powerful tool used to synchronize data between your local file system and the remote data store, or even between two different locations within iRODS server. The -r flag indicates the recursive operation, to include all subdirectories and files. This functionality is especially useful for ensuring that large numbers of files are kept up to date across different storage environments.
Assuming we have the following file structure, where:
foo1: the local directory you want to synchronizefoo2: the remote iRODS server, prefixed withi:to indicate an iRODS pathfoo3: the other data collection on the remote iRODS server
we can perform the following:
1. Synchronize from Local to iRODS server
To synchronize data from a local directory (source) to an iRODS server (destination), ensuring that the remote iRODS datastore matches the local directory:
irsync -r foo1 i:foo2
2. Synchronize from iRODS to Local
To pull data from an iRODS server (source) to a local directory (destination), ensuring your local directory mirrors the iRODS datastore:
irsync -r i:foo2 foo1
3. Synchronize Between iRODS Collections
For synchronizing data directly between two iRODS collections:
irsync -r i:foo2 i:foo3
Both paths are prefixed with i:, indicating that both the source (foo2) and the destination (foo3) are within iRODS.
Further Reading
Remote data downloadDownloading Online Data using WGET
Downloading online data using API
Downloading online data using Python-based web scraping
Downloading online repos using GIT: [GitHub, Bitbucket, SourceForge]
Downloading a single folder or file from GitHub
Remote data preview (without downloading)
Viewing text files using UNIX commands
Viewing PDF and PNG files using X11 SSH connection
Viewing graphics in a terminal as the text-based ASCII art
Mounting remote folder on a local machine
Data manipulation
Data wrangling: use ready-made apps
MODULE 08: Data Visualization