Introduction
PyCharm ⤴ is a popular integrated development environment (IDE) for professional Python programming. It is developed by JetBrains ⤴, the same company that created other popular IDEs such as IntelliJ IDEA ⤴ for Java development, and RubyMine ⤴ for Ruby development.
PyCharm is a powerful tool for Python developers, providing a wide range of features that make it easier to write, debug, and test Python code. There are several unique features that set PyCharm apart from other Python IDEs:
-
Intelligent Code Editor
PyCharm’s code editor includes features like code completion, syntax highlighting, error highlighting, and code navigation, which help developers write code more quickly and accurately. -
Integrated Version Control
PyCharm supports popular version control systems like Git, Mercurial, and Subversion. It provides features likecommit,push,pull,merge, anddiff, allowing developers to manage their codebase more efficiently. -
Integrated Debugger
PyCharm has a powerful integrated debugger that allows developers to step through code, set breakpoints, inspect variables, and more. The debugger also includes features like remote debugging and multi-process debugging. -
Integrated Test Runner
PyCharm includes a built-in test runner that supports popular testing frameworks likepytestandunittest. The test runner can run tests in parallel, show test results in the editor, and provide coverage reports. -
Integration with Popular Tools and Frameworks
PyCharm integrates with a wide range of Python libraries, frameworks, and tools, such asDjango,Flask,NumPy, and many more. It also integrates with popular tools like Docker, Vagrant, and virtualenv. -
Code Quality Analysis
PyCharm includes features for code quality analysis, such as code inspections and code smells, which can help developers identify and fix potential issues in their code. -
Customizable User Interface
PyCharm’s user interface is highly customizable, allowing developers to choose from different color schemes, themes, and editor layouts. This can help make the development environment more comfortable and efficient for individual developers.
Getting started with PyCharm
If you’re new to PyCharm and want to get started with this powerful Python IDE, this section will guide you through the basics. Whether you’re a beginner or an experienced Python developer, PyCharm can help you write, debug, and test your code more efficiently.
In this section, we’ll cover the following topics:
-
Installing PyCharm
We’ll show you how to download and install PyCharm on your machine, whether you’re using Windows, macOS, or Linux. -
Creating Project
We’ll walk you through the process of creating a new PyCharm project, choosing a project interpreter, and configuring project settings. -
Writing Python Code with PyCharm’s Features
We’ll explore some of PyCharm’s powerful features while coding in Python, including code completion, syntax highlighting, code navigation, and more. -
Running & Debugging Code
We’ll show you how to run and debug your code, and use PyCharm’s built-in test runner to test your code.
1. Installing PyCharm
PyCharm is available in two editions: the Community Edition ⤴, which is free and open-source, and the Professional Edition ⤴, which is a paid version with additional features like support for web development, database integration, and remote development.
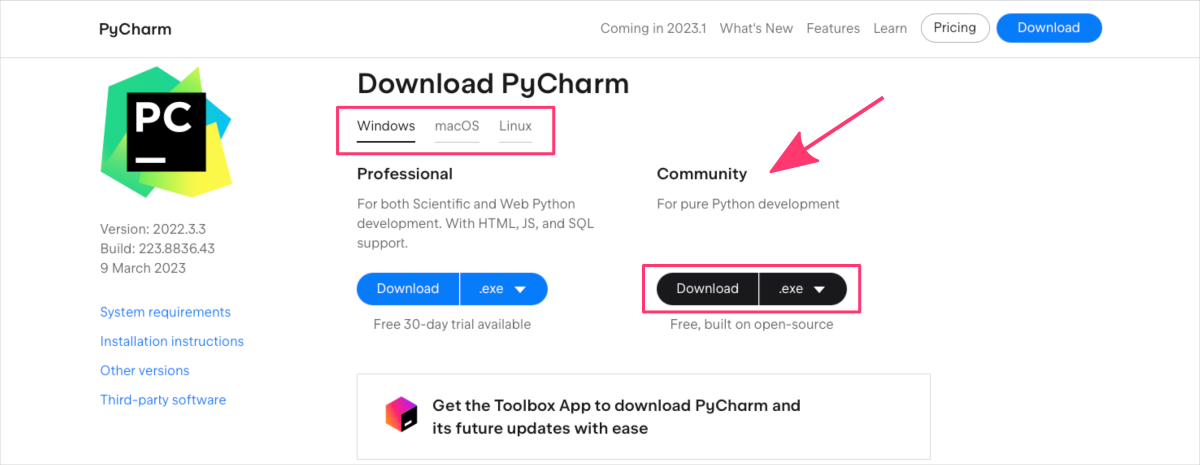
You have two options to choose from when installing PyCharm:
- the Toolbox App, https://www.jetbrains.com/help/pycharm/installation-guide.html#toolbox ⤴
- a standalone installation, https://www.jetbrains.com/help/pycharm/installation-guide.html#standalone ⤴
The Toolbox App is a unified installer that can be used to install, manage, and update multiple JetBrains IDEs, including PyCharm. It provides a centralized location to manage all of your JetBrains tools and provides easy access to all the installed tools. With the Toolbox App, you can easily update all your JetBrains IDEs from a single interface and install new IDEs with just a few clicks.
A standalone installation of PyCharm involves downloading and running a separate installer for your operating system. With a standalone installation, you have more control over the installation process and can customize which components of PyCharm to install and where to install them. Standalone installations are also a good option if you need to perform advanced installation tasks.
If you only plan on coding in Python, either installation option will work well for you. The Toolbox App is a good option with a simple, streamlined installation process, and that is why it is recommended installation method. It also provides you flexibility in using multiple JetBrains IDEs if you decide so in the future.
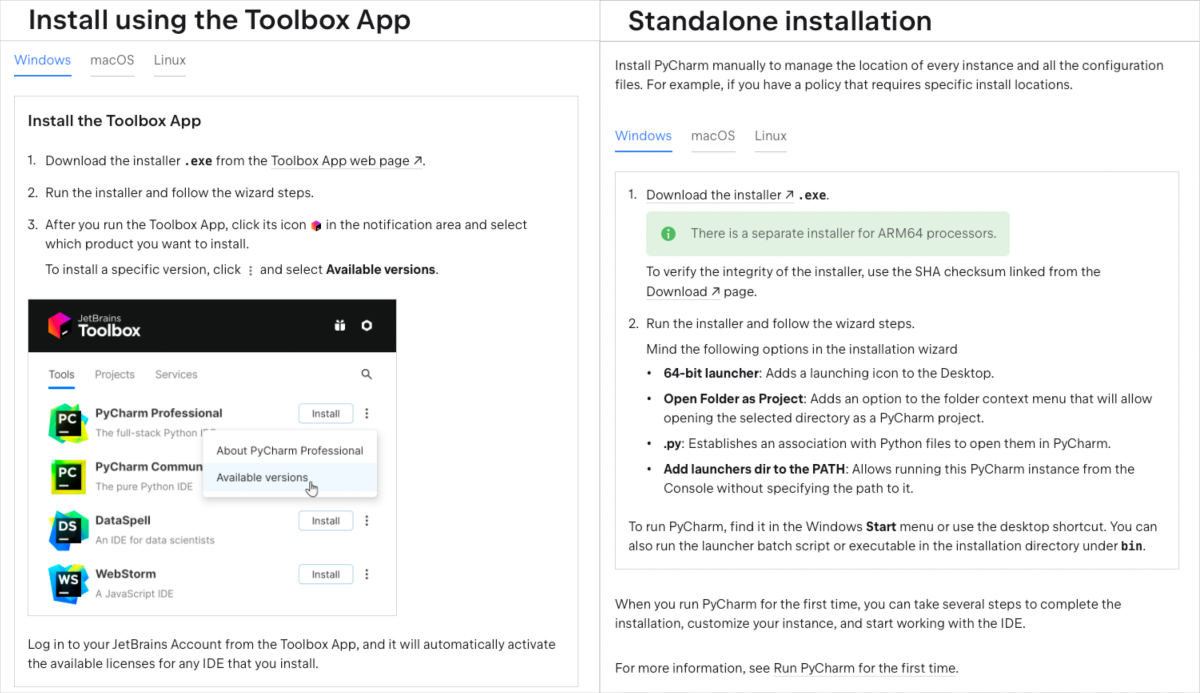
Follow a step-by-step guide on how to download and install PyCharm on your operating system provided in the official PyCharm documentation.
PyCharm Interface
PyCharm has a graphical user interface (GUI) that allows you to interact with and use the various features of the IDE. The GUI is designed to be intuitive and user-friendly, with a variety of panels and windows that allow you to view and interact with your code, debug your programs, manage your projects, and more.
To open the PyCharm interface, follow the guide for your operating system:
Windows
- Click the button in the bottom left corner of your screen.
- Type
PyCharmin the search box. - Click the PyCharm icon that appears.
macOS
- Click the
Launchpadicon in your dock. - Type
PyCharmin the search box. - Click the PyCharm icon that appears.

^ Alternatively, you can open the Applications folder in Finder, then double-click the PyCharm icon.
Linux
- Open the Activities overview by clicking the
Activitiesbutton in the top left corner of your screen. - Type
PyCharmin the search box. - Click the PyCharm icon that appears.
^ Alternatively, you can open a terminal window and type “pycharm” at the command line to launch PyCharm.
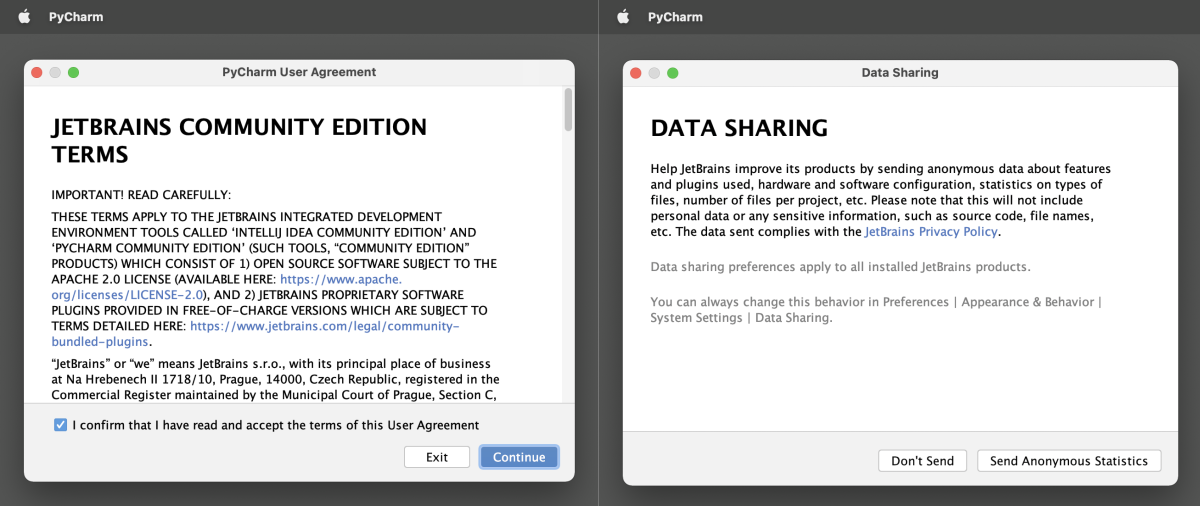
When you first launch PyCharm, you will be presented a few dialog boxes that includes a message asking you to accept the JetBrains terms of use and consider sharing anonymous usage statistics with JetBrains.
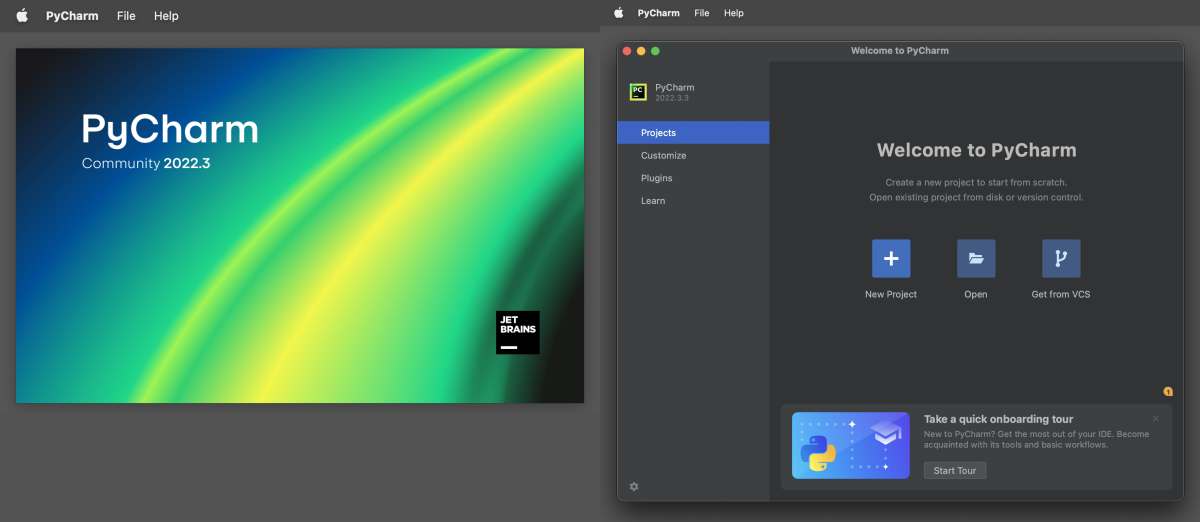
Once you have opened PyCharm, you will be presented with the PyCharm welcome screen. From here, you can create a new project, open an existing project, or access other PyCharm features.
CUSTOMIZE IDE
The PyCharm GUI provides a rich and customizable environment for working with Python.
The PyCharm interface is highly customizable, allowing you to adjust the layout and appearance of the various panels and windows to suit your personal preferences and workflow. You can rearrange panels, change the color scheme, adjust font sizes, and more. Additionally, PyCharm supports multiple tabs and split views, allowing you to work with multiple files and projects at the same time.
One of the ways that users can customize the PyCharm IDE is through the Customize tab on the welcome view.
In this tab, users can customize various aspects of the PyCharm GUI, including:
- the color theme, determines the color scheme used throughout the IDE, including the background, text, and highlighting colors
- IDE font, allows adjusting the font size, style, and even support for vision deficiency
- keymap, refers to the set of keyboard shortcuts used to perform various actions in the IDE
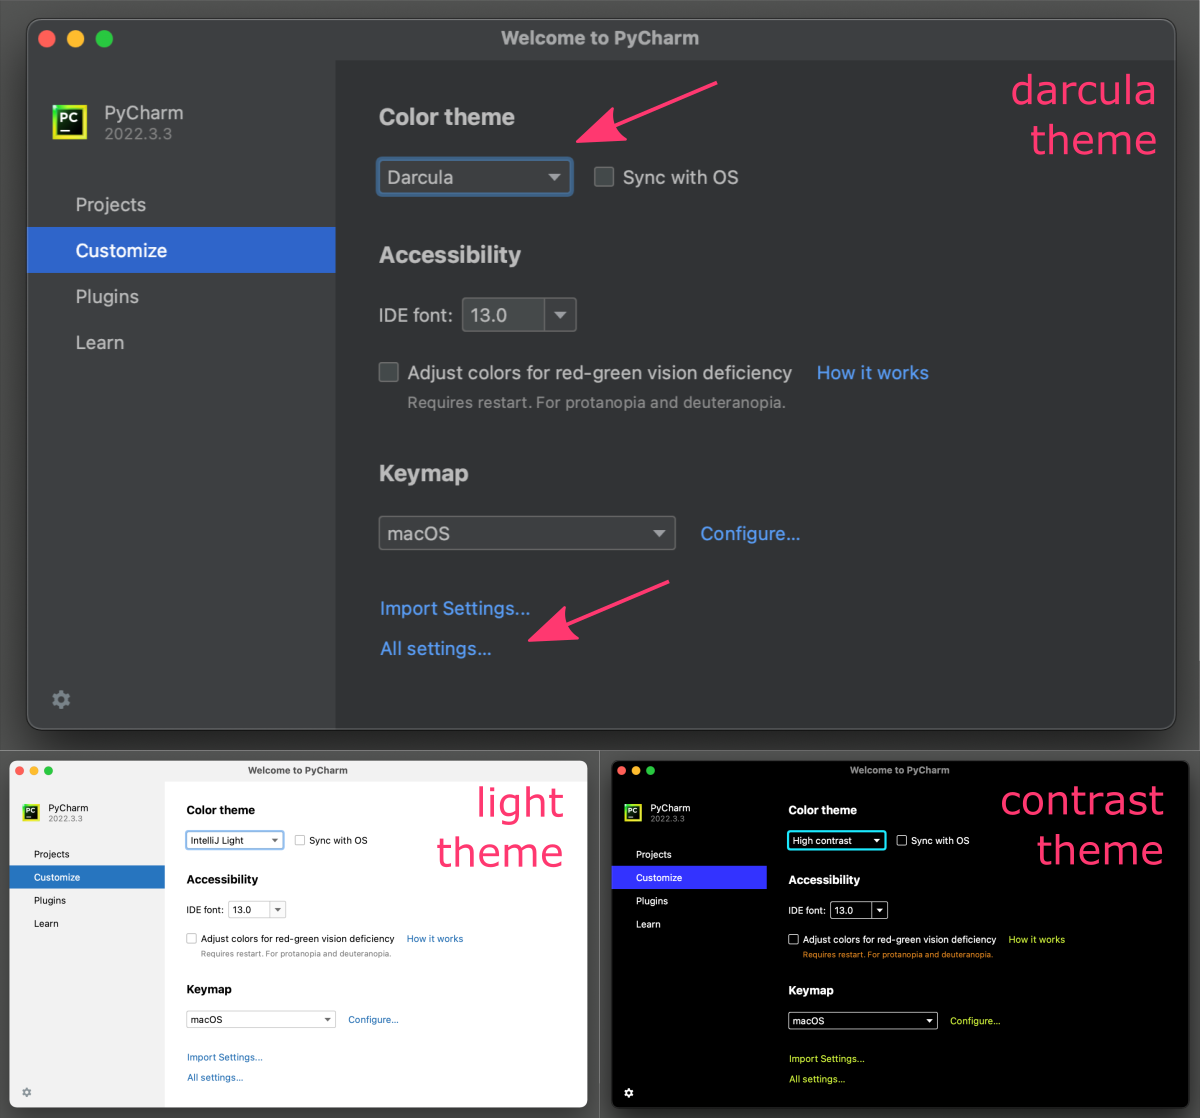
PyCharm offers a few pre-defined color themes [Darcula, IntelliJ Light, High contrast] that can be synchronized with settings in your operating systems, as well as the ability to create custom themes. IDE to their personal preferences and workflow.
Within the tab, PyCharm also offers an Import Settings... option, which allows users to import settings from a previous installation of PyCharm or from another JetBrains IDE.
This can help users quickly set up PyCharm with their preferred settings.
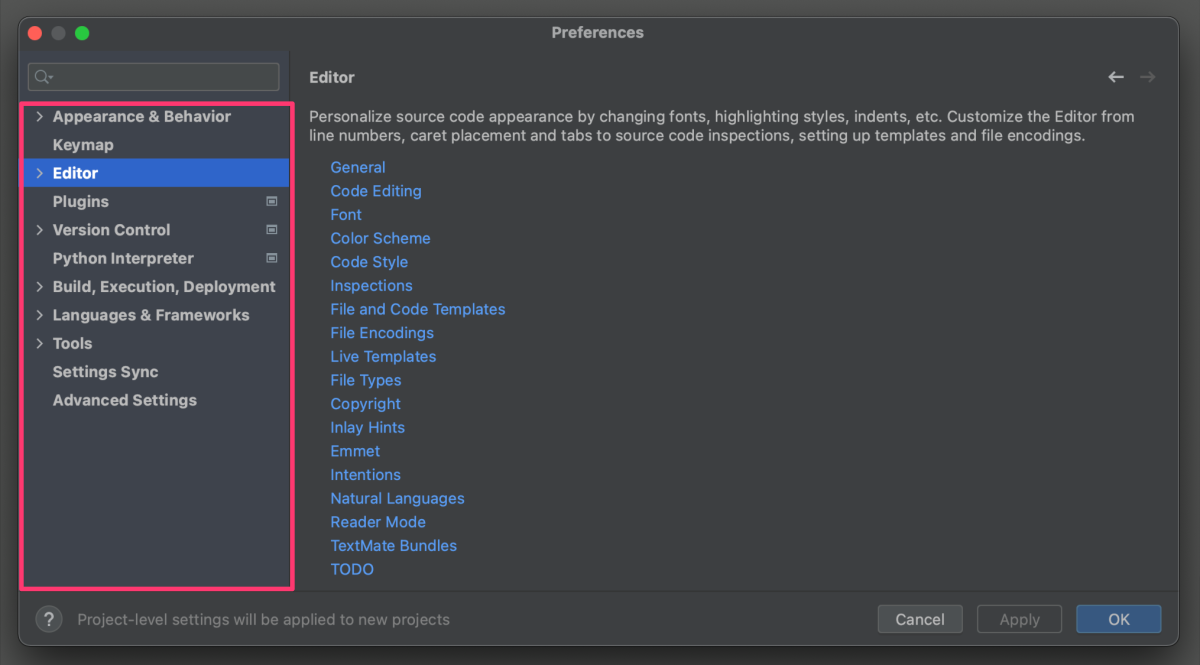
For more advanced customization options, PyCharm offers an “All Settings” section in a separate dialog box, which provides a detailed view of all the configurable options in the IDE. This section allows users to fine-tune settings for specific features or components of the IDE, such as:
- the code editor,
- debugger,
- version control integration.
ADD PLUGINS
The section in the general options of PyCharm provides users with a way to manage the various plugins and add-ons that are available for the IDE.
Plugins are additional software components that can be installed in PyCharm to extend its functionality and provide additional features.
The Plugins section allows users to browse and install plugins from the JetBrains Plugin Repository, which is a centralized repository of plugins for all JetBrains IDEs. Users can search for plugins by name, category, or keyword, and can view ratings and reviews from other users.
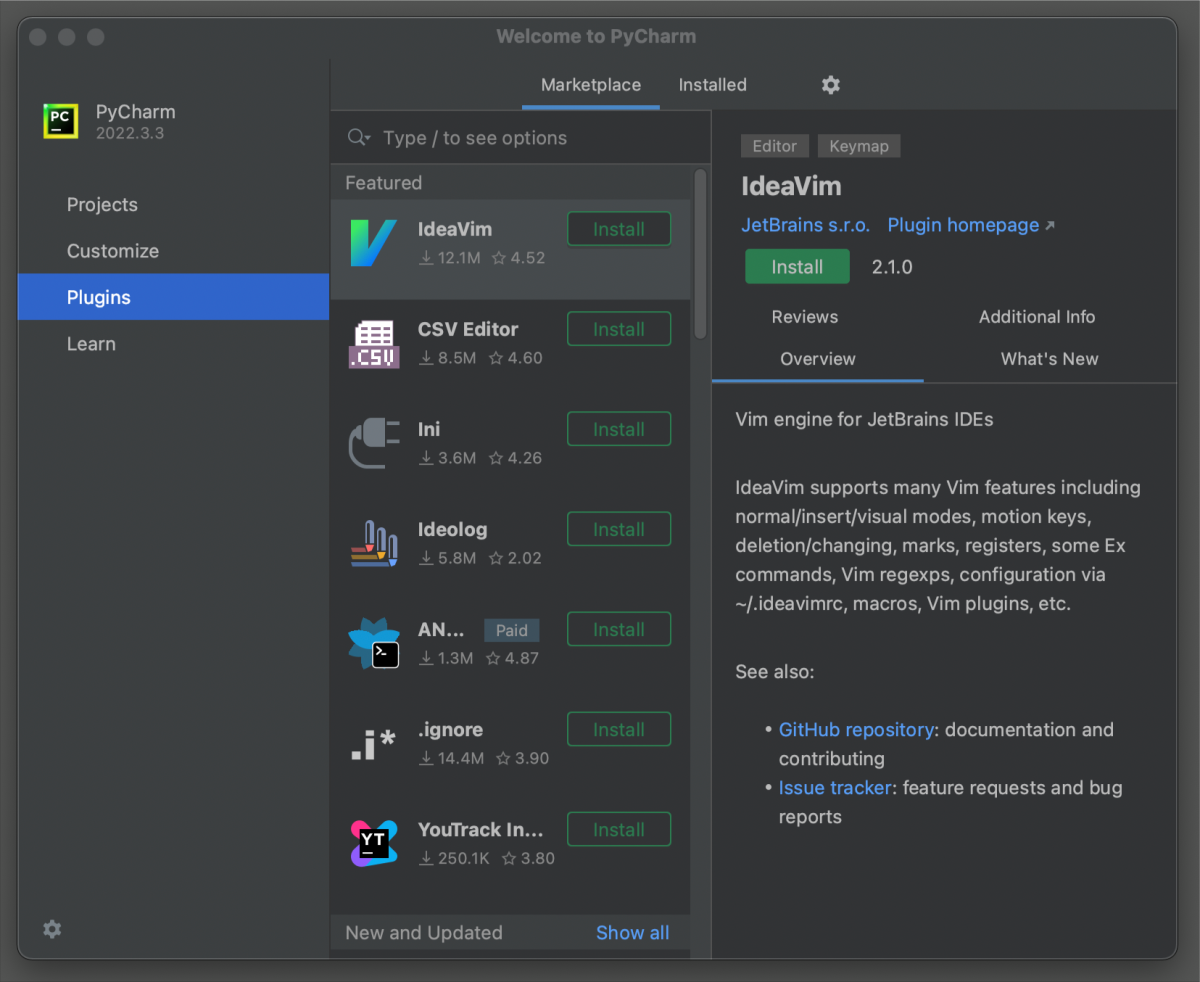
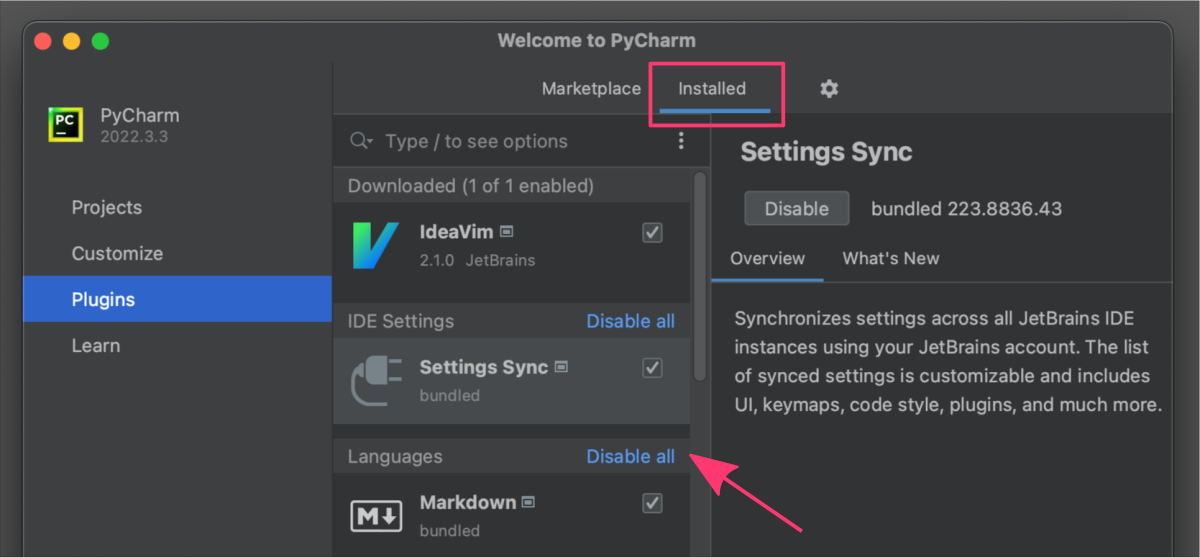
Once a plugin is installed, it may require to Restart IDE to apply changes in PyCharm interface and functions. Then, in the Installed tab, different groups of plugins can be enabled or disabled. Users can also configure plugin settings, such as key bindings, appearance, or behavior, from this section.
Some examples of popular PyCharm plugins include:
| PLUGIN | DESCRIPTION |
|---|---|
| Anaconda | Provides integration with the Anaconda Python distribution and its associated libraries and tools. |
| Django | Supports the Django web development, i.e. code completion, templates, and management commands. |
| Pytest | Integrates PyCharm with the Pytest testing framework, allowing users to run tests and view results directly within the IDE. |
| GitToolBox | Enhances Git integration in PyCharm, providing additional features such as interactive rebasing, cherry-picking, and stashing. |
| Jupyter | Integrates PyCharm with the Jupyter Notebook and JupyterLab environments, allowing users to edit and execute notebooks directly within the IDE. |
| SQL Database | Provides tools for working with SQL databases, including syntax highlighting, code completion, and query execution. |
| Rainbow Brackets | Enhances bracket highlighting, making it easier to see matching brackets and nested code blocks. |
| BashSupport | Supports writing and executing Bash scripts, i.e. syntax highlighting, code completion, and debugging. |
| CSV Editor | Enables syntax-validation, highlighting, customization and editing CSV files with a rainbow colored table. |
| CodeGPT | Introduces chatGPT functionality into PyCharm to improve your code by custom prompts, finding bugs, adding tests, optimizing and explaining when needed. |
LEARN MORE
The section in PyCharm provides a variety of resources and tools to help users learn and improve their coding skills.
Here are some of the features that are included in this section:
1. Educational Tools
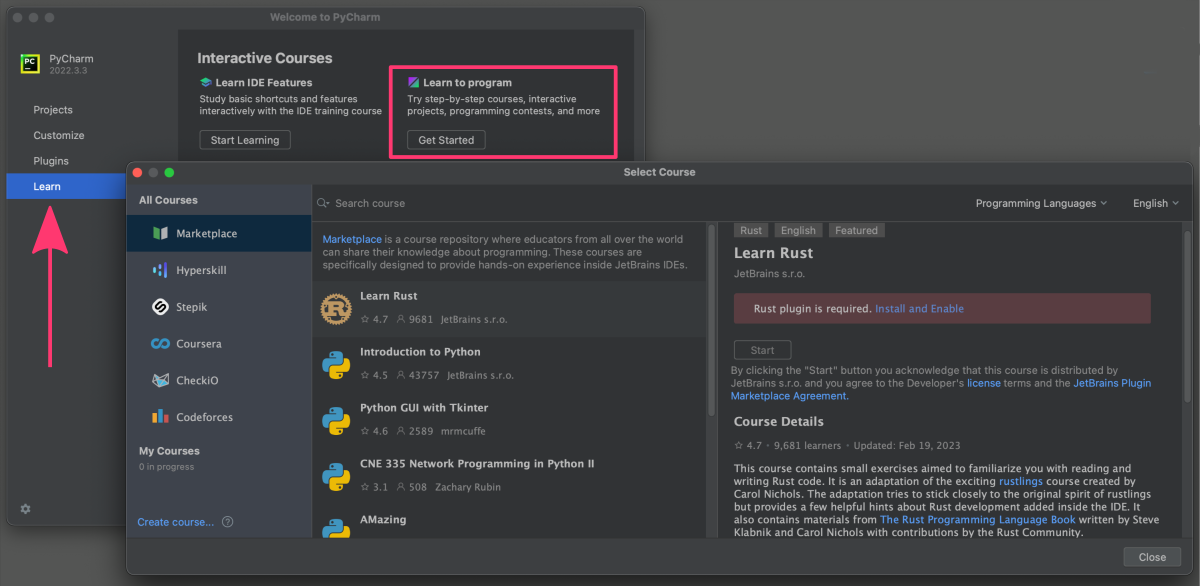
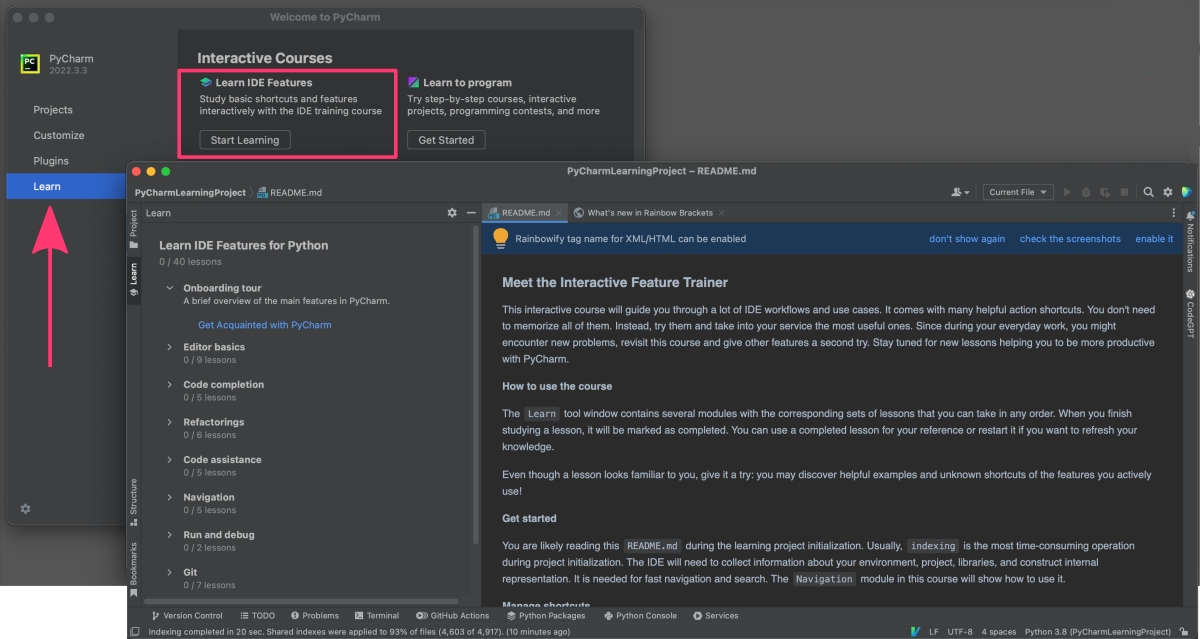
PyCharm provides built-in support for the Python programming language (“Learn to program”) and offers an educational tool called “PyCharm Edu” which is aimed at beginners. This tool offers interactive courses, lessons, and exercises to help users learn Python in a structured and interactive way.
2. Code Examples
PyCharm offers a collection of code examples for various programming languages and frameworks. These examples are intended to provide users with practical examples of how to use PyCharm’s features to solve common coding problems.
3. Educational Videos
PyCharm offers a collection of video tutorials and webinars covering a wide range of topics related to programming and software development. These videos can be a useful resource for users who prefer to learn through visual demonstrations.
PyCharm by JetBrains: Quick Tips & Tricks ⤴
4. Shortcuts
One of the resources available in the Learn tab is a Keyboard Shortcuts cheat sheet in PDF format.
Keyboard shortcuts are combinations of keys that perform certain functions in PyCharm, such as opening a file, running a program, or debugging code. Knowing and using keyboard shortcuts can save time and make coding more efficient.
The Keyboard Shortcuts cheat sheet in PyCharm provides a comprehensive list of keyboard shortcuts that are available in PyCharm, along with a brief description of each shortcut’s function.
This cheat sheet can be opened on demand anytime you need it, by clicking on the Keyboard Shortcuts link in the Learn tab.
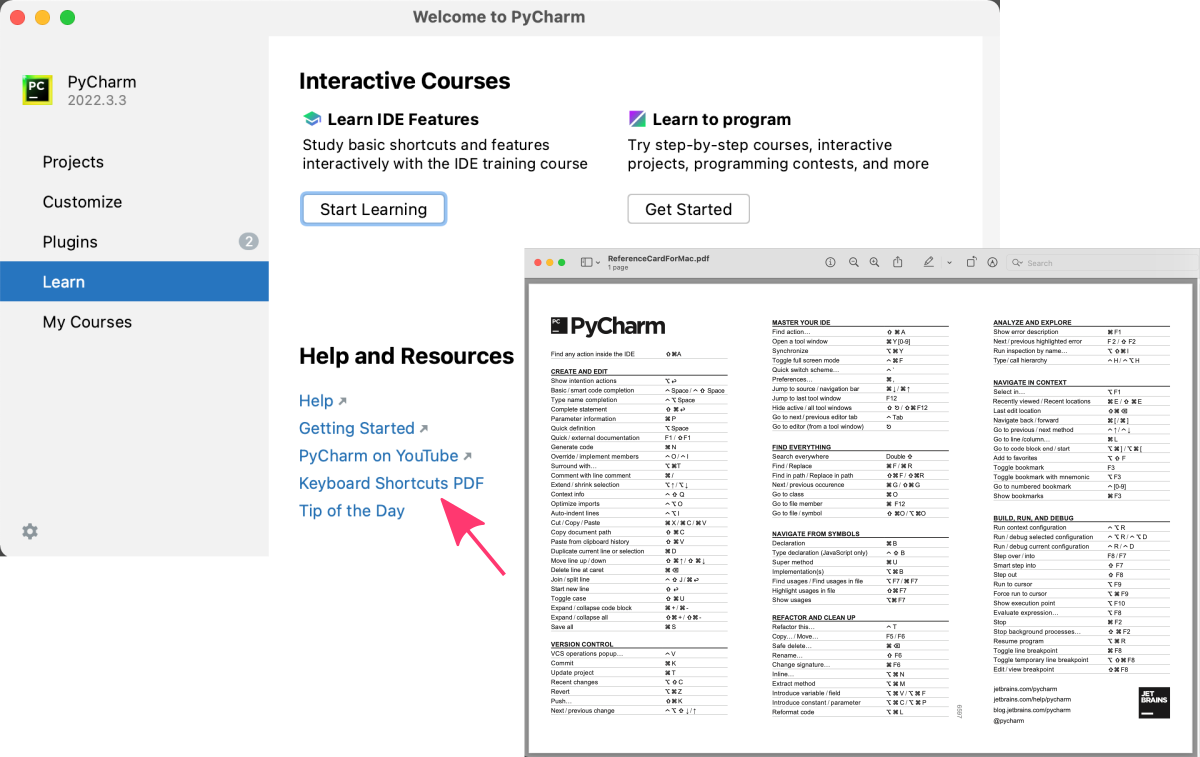
The keyboard shortcuts may differ depending on the operating system and PyCharm configuration being used. Consult the Keyboard Shortcuts cheat sheet in your PyCharm instance to find the right shortcuts for your specific setup.
2. Creating Project
When you use PyCharm for the first time, the “Projects” section in the general options will be fairly basic. The main options that you will see include creating a new project, opening an existing project or downloading a project from a version control system (VCS) repository such as Git, Subversion, or Mercurial.
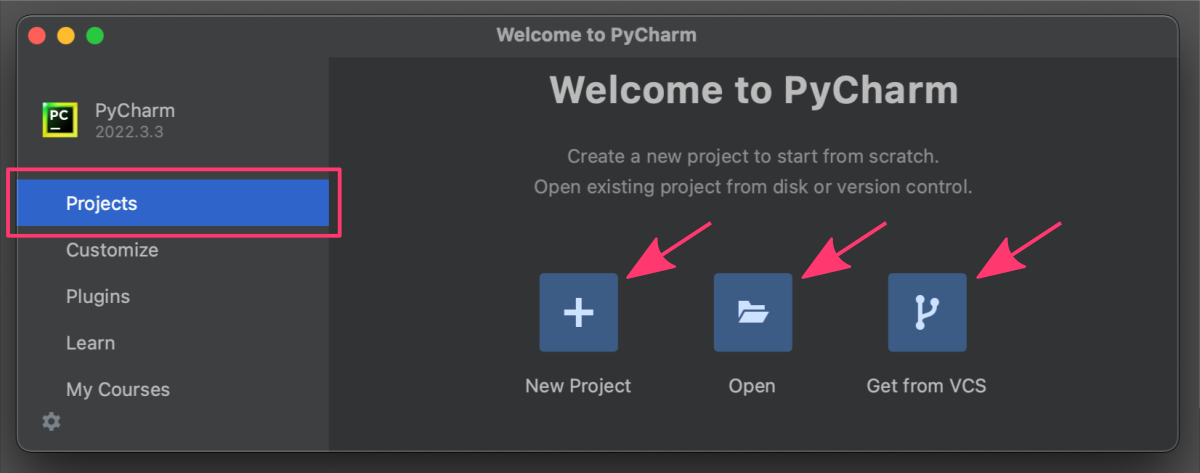
First project
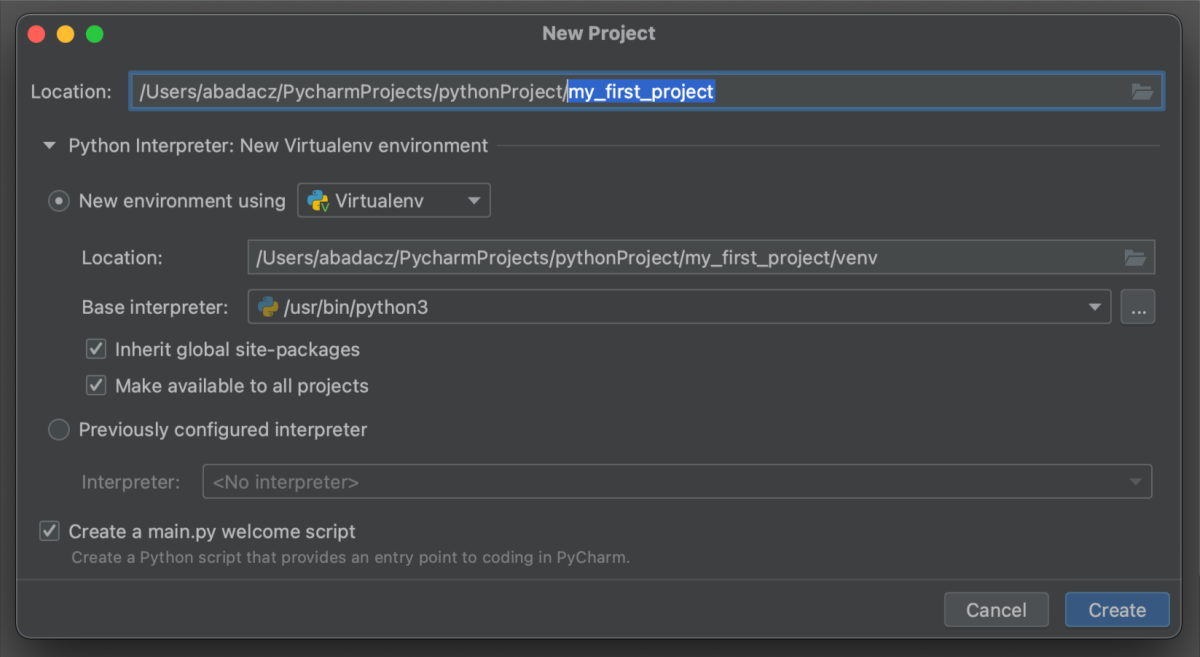
If you choose to create a new project, you will be able to specify a Python version, provide the project name and location, select virtual environment, and automatically create the main.py Python script file.
-
Choose the project location and name your project to create a new directory for it.
-
If collapsed, expand the
Python Interpretersection and select the method to create a new environment. The most common options include:virtualenvpipenvcondapoetry…about creating and managing Python environments from the practical tutorial (see section 3. Manage Python environments)
Python best practice is to create a
virtualenvfor each project.
In most cases, PyCharm create a new virtual environment automatically and you don’t need to configure anything. -
You can choose to select or deselect the checkbox for the automatic creation of a
main.pyfile. Typically this file is intended to contain the code that launches your multi-file application. For a simple project, all your code can exist within this single file. You can keep the namemain.pyor change it for something more meaningful. -
Click the button located in the bottom right corner of the dialog window.
Panels in the project interface
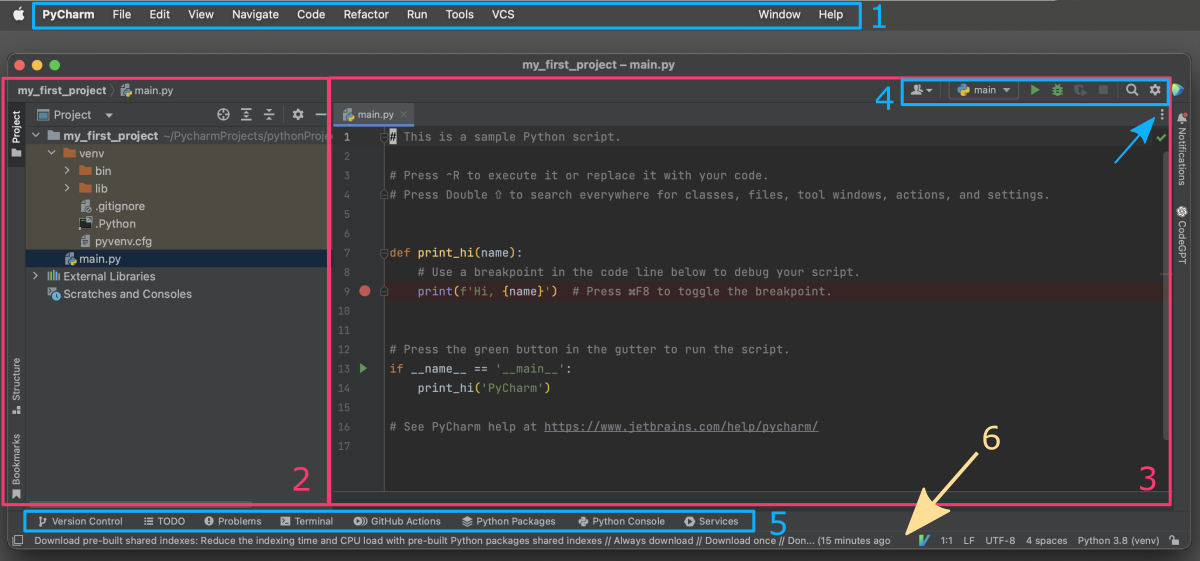
Once you create a new project in PyCharm, you will be taken to the project interface, which includes several key components:
(1) Toolbar (3) Editor panel (5)Panel Manager
(2) Project panel (4) Navigator Bar (6)Status bar
Toolbar
The toolbar (1, blue box) is located at the top of the PyCharm window, and contains various buttons and icons that allow you to perform common actions, such as running your code, debugging your code, and navigating to different parts of your project.
Project panel
Project panel (2, pink box) is typically located on the left side of the PyCharm window. You can toggle it on and off by clicking the “Project” button in the left-hand toolbar. Within the Project pane, you can navigate through your project’s directories and files. You can expand and collapse the various nodes, and select individual files to edit.
Editor panel
Editor panel (3, pink box) is typically located in the center of the PyCharm window. When you open a file in the project pane, it will be displayed in the editor pane. You can open additional tabs in the editor pane by double-clicking on files in the project pane, or by using the keyboard shortcut Ctrl + Shift + N (replace Ctrl with cmd on macOS).
By default, PyCharm opens the main file for your project (e.g. “main.py” for a Python project) in the editor pane.
Navigator Bar
Navigator Bar (4, blue box) is located at the top of the editor pane, and displays the path to the currently open file. Using the dropdown menu (folded under three vertically-stacked dots in the top-right corner), you can quickly navigate to different files in your project or bookmark open tabs. Above, there is an additional menu bar, allowing you to quickly run or debug the currently opened file or search for classes, files, tools, actions, and settings.
Panel Manager
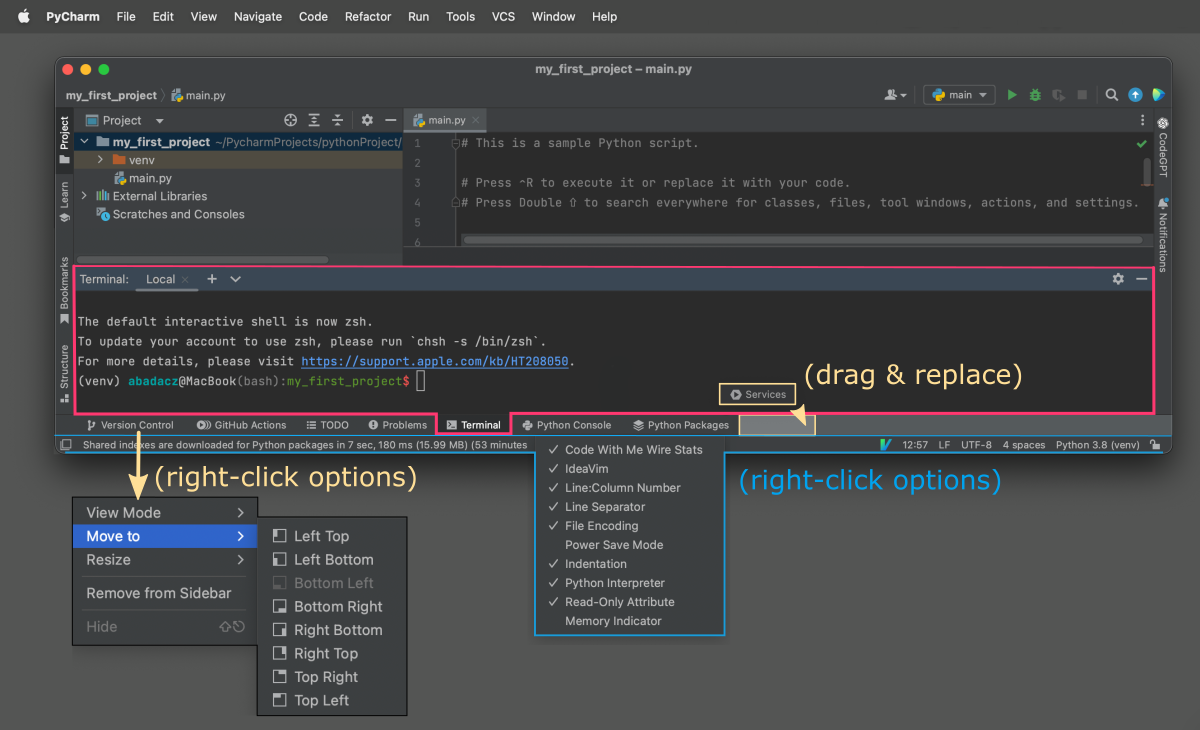
Panel Manager (5, blue box) is typically located at the bottom of the PyCharm window, directly below the editor pane. There are many additional panels available such as Terminal, Python Console, Problems detected, Services, or Version Control that can be showed as separate horizontal subsection in the project view. If all of them are collapsed try to click on any button to expand its content.
Status bar
Status bar (6, yellow arrow) is located at the bottom of the PyCharm window. It displays information about your project and the current state of PyCharm. You can customize the information that is displayed in the status bar by right-clicking on it and selecting displayed parameters.
Customize your Project Interface
By default, all additional panel-like features (except project and editor) are collapsed in the Panel Manager bar at the bottom of the window. Once you click on the selected button, for example Console, its content will expand as a horizontal panel just below the editor. If you click on the next button, for example Terminal, it will switch on the corresponding features.
You can customize the layout of the Project view to your needs.
- For example, you can
drag & dropthe buttons in the Panel Manager to adjust the order. - When you
right-clickthe selected button, the dialog box will pop up showing you the available options. - Each button has a
Move tooption that will help you to pin the corresponding panel in the selected part of the Project window. This way, you can have more panels opened at once. - You can further
split panelsaccording to your needs, for example to have two Terminal instances to be in two locations of the file system in the same time. - With rhight-click options you can also customize the information displayed on the Status bar (marked with blue).
Next or continuing project
PyCharm IDE registers all your projects that you worked on through the IDE interface, so you can quickly jump into your continuing developments in the Projects tab. In this section, you can see all the projects that you have created or opened in PyCharm. You can easily switch between projects by clicking on the project name in the list.
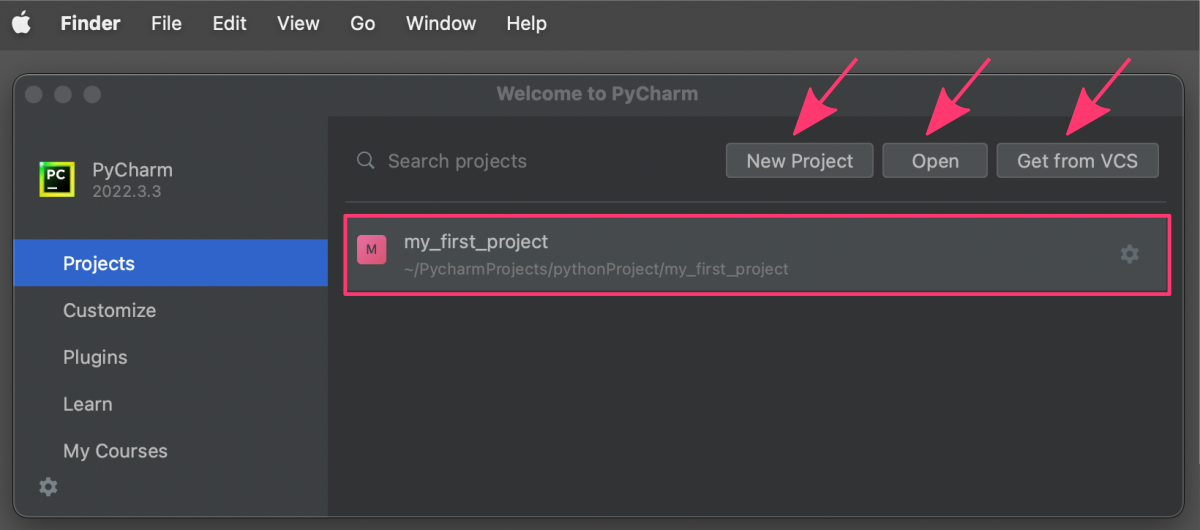
The Project view also allows you to:
- create a new project,
- open an existing project, or
- clone a project from a version control system.
To create a new project, click the New Project button in the toolbar. This will open the New Project dialog, where you can specify the name, location, and other settings for your new project. Open button in the toolbar. This will open a file browser where you can select the project you want to open. Get from VCS button to clone the project from your version control system.
Add a new file
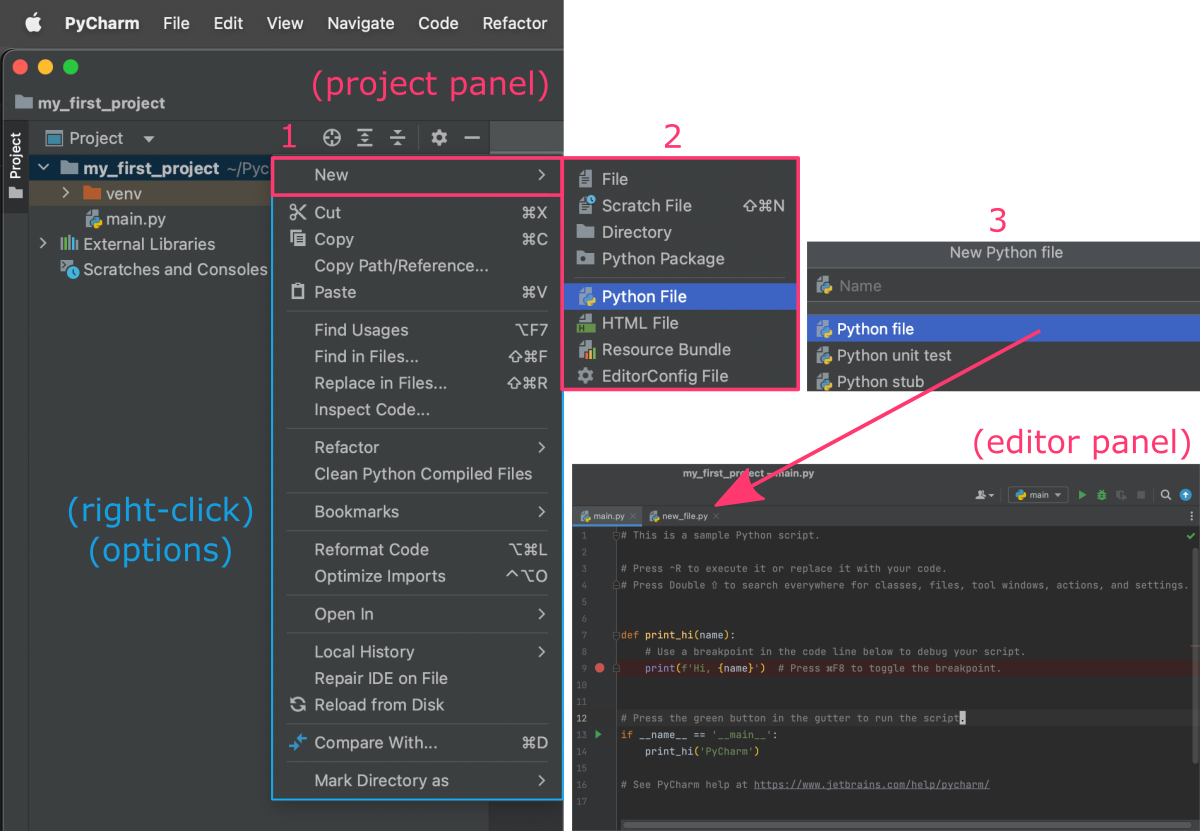
In the Project panel (left side) you can display the Project tools options using the right-click on your mouse. From the menu window, select (1) New, followed by (2) Python File and in (3) the “New Python file” dialog box enter the name of a new file. This will add a new empty file to your project (visible in the project panel) and open it automatically as a new tab in the editor panel.
Tip of the day
The Tip of the Day is a feature in PyCharm that displays a useful tip or trick about the IDE or Python development in general every time you start a project in the IDE. By default, only one tip is displayed at a time. However, you can click the Next button to explore as many tips as you wish. The Tips dialog window is enabled by default, but once you are done with learning you can choose to turn it off by checking the “Don’t show tips on startup” box. This will prevent the tips from appearing every time you start PyCharm.
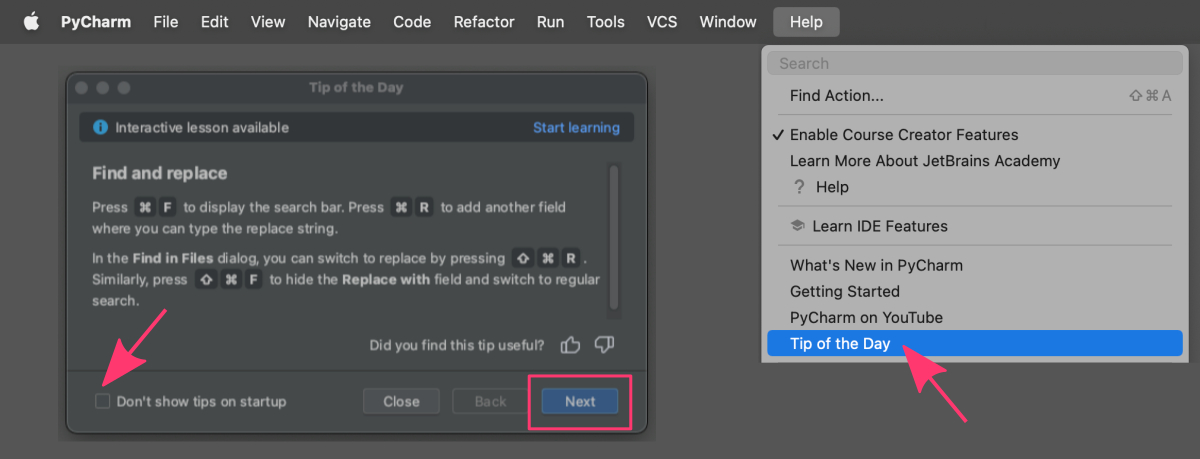
The tips presented in the “Tip of the Day” feature are meant to help users become more proficient in using PyCharm and developing in Python. It is smart to spend a few minutes exploring these tips every day to enhance your fluency with the IDE features. Help menu.
3. Writing Python Code with PyCharm’s Features
In this section we will focus on features available in the Editor Panel of the Project view in PyCharm. It offers a wide range of built-in features to make coding easier and more efficient.
The file editor area in PyCharm is where you can view and edit the contents of your project files. It includes a variety of features to help you write and maintain high-quality code.
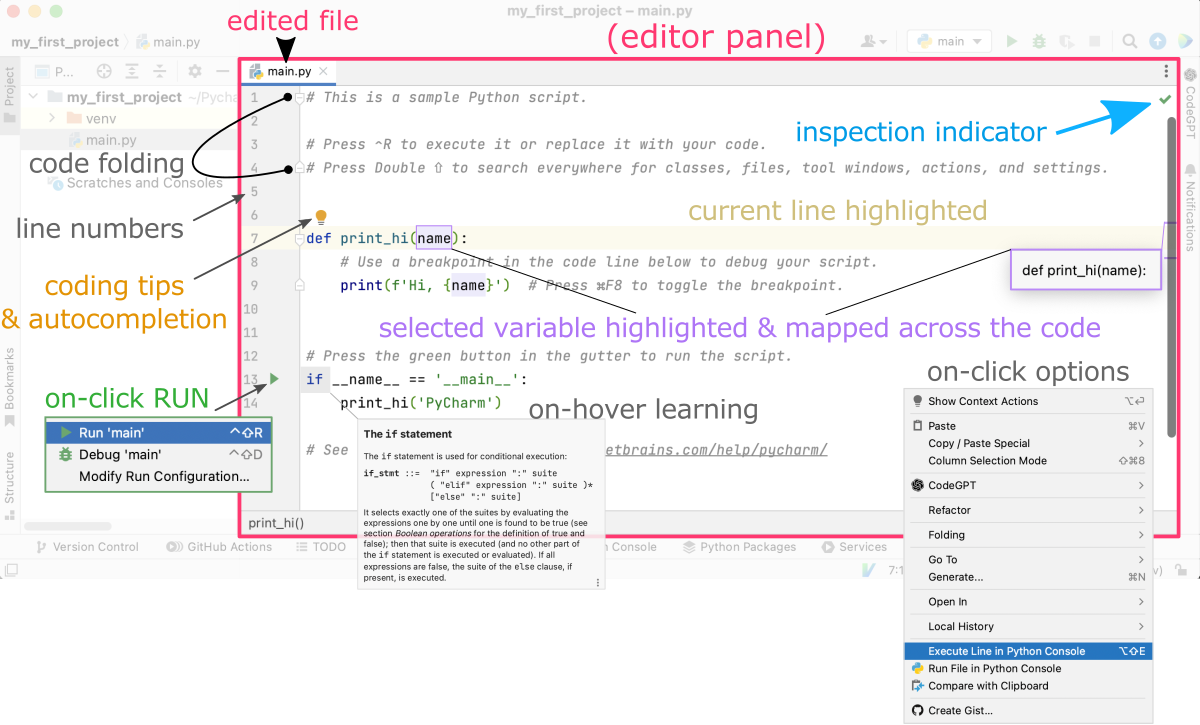
Here are some of the most useful options in the PyCharm editor:
-
SYNTAX HIGHLIGHTING
PyCharm automatically highlights different parts of your code with different colors, making it easier to read and understand. For example, statement keywords (e.g.,def,if,else,while), strings *(‘text’), and comments (#) are all highlighted in different colors (See Figure below). -
CODE FOLDING
PyCharm lets you fold sections of your code to hide them and make it easier to focus on the parts you’re working on. This can be especially helpful for large files or complex code.
-
LINE NUMBERS
PyCharm displays line numbers in the left-hand margin of the editor area (see the Figure above). This makes it easy to refer to specific lines of code when debugging or collaborating with others. -
CODE FORAMTTING
PyCharm provides a variety of options for formatting your code, such as indenting, line wrapping, and spacing. This helps you ensure that your code is consistent and easy to read.In
PyCharmtop menu, you can find the “Editor” configuration window by selecting theSettingsorPreferencesoption, depending on your operating system.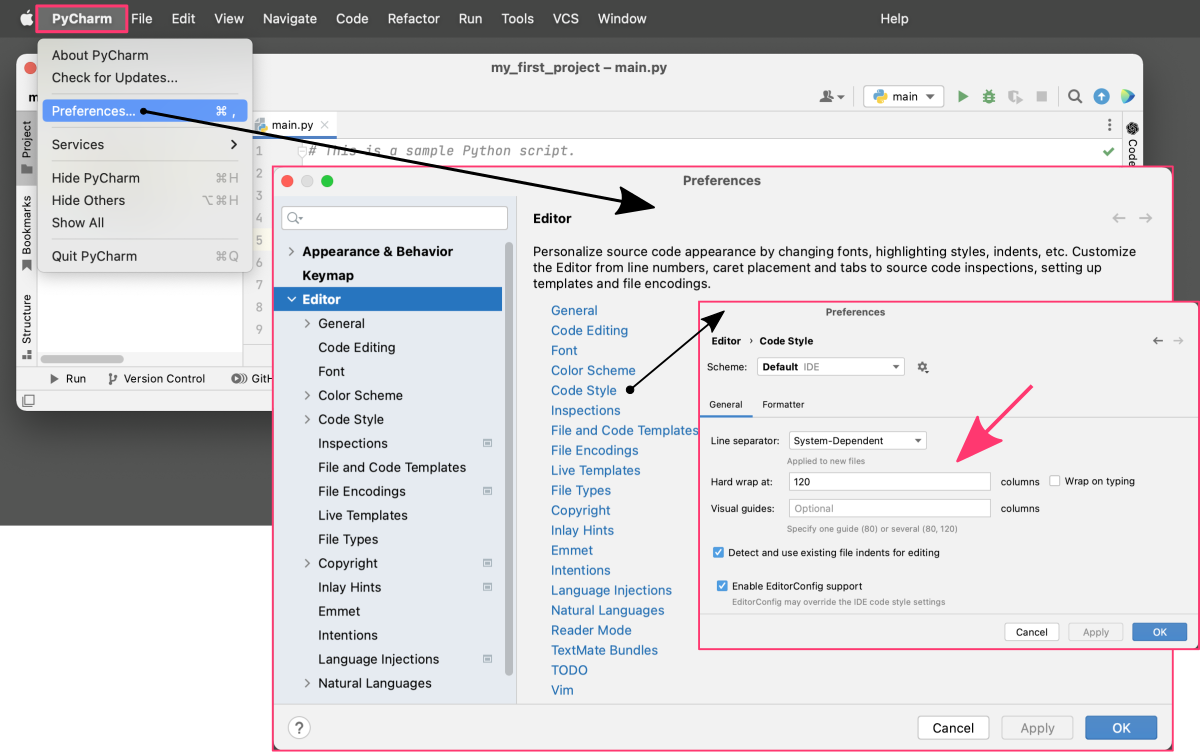
You can customize formatting preferences to match your coding style and improve the readability of your code. These are just a few of the many formatting options available in PyCharm:
option description Indentation choose between tabs and spaces for indentation Line wrapping automatically wrap long lines of code to make them more readable (set the preferred line length) Code alignment align code elements such as assignment operators or function parameters to make the code more consistent and readable Code spacing add or remove spaces around operators, parentheses, and other code elements Code commenting select options for commenting out code, including single-line and multi-line comments -
CODE COMPLETION
PyCharm provides intelligent code completion suggestions as you type, based on the context of your code. This can save you time and reduce errors by suggesting method names, variable names, and more.
-
FIND & REPLACE
PyCharm includes a powerful search and replace feature that allows you to quickly find and replace text within the current file or across the entire project. To display the “find-replace” menu bar, usectrl+Rorcmd+Rkeys.
-
CODE ANALYSIS
PyCharm includes a variety of code analysis tools that can help you identify and fix errors, optimize your code, and improve its readability. These tools can highlight syntax errors, unused code, and other issues in your code.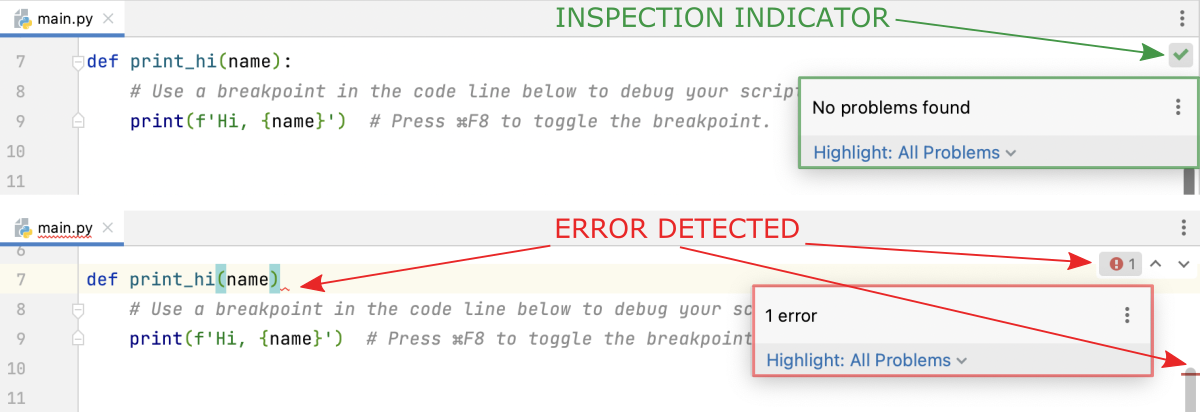
-
REFACTORING
PyCharm provides tools for refactoring your code, such as renaming variables and functions, extracting code into separate functions or classes, and more. This can help you keep your code organized and maintainable.
-
VERSION CONTROL
PyCharm integrates with popular version control systems like Git, allowing you to easily manage your code changes and collaborate with others directly from the editor area.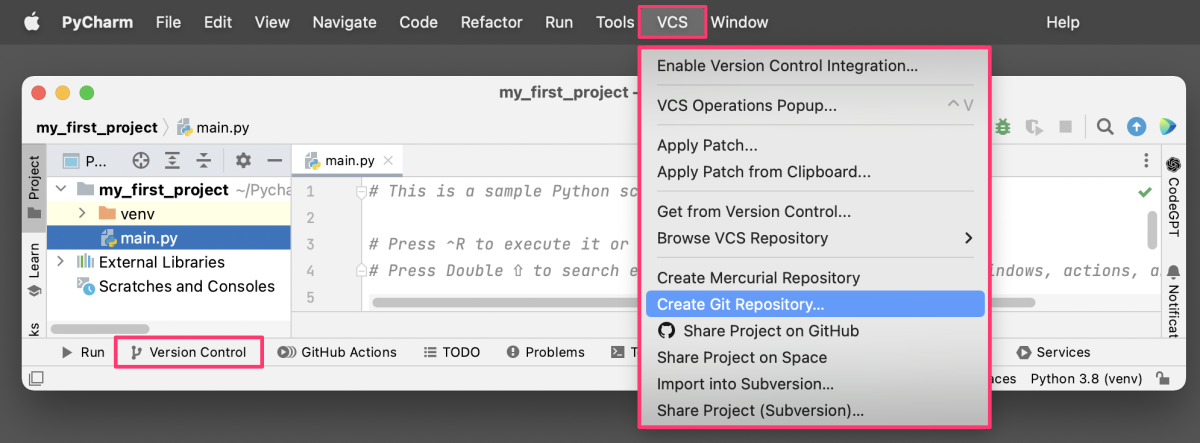
4. Running & Debugging Code
PyCharm provides powerful tools and features that help streamline the development process and make coding in Python easier and more efficient. One of the most important aspects of any IDE is the ability to run and debug code, and PyCharm is no exception. In this tutorial section, we will walk you through the process of running and debugging Python code in PyCharm.
Run the code
There are several ways to run Python code in PyCharm, including (1) using the Run button, (2) the context menu, (3) the Run menu, and (4) custom run configurations. All of these options are easy to use and provide a lot of flexibility for running your Python code in PyCharm.
1. Running code using the Run button:
The simplest way to run Python code in PyCharm is to click on the Run button, which is located in the top-right corner of the editor window.
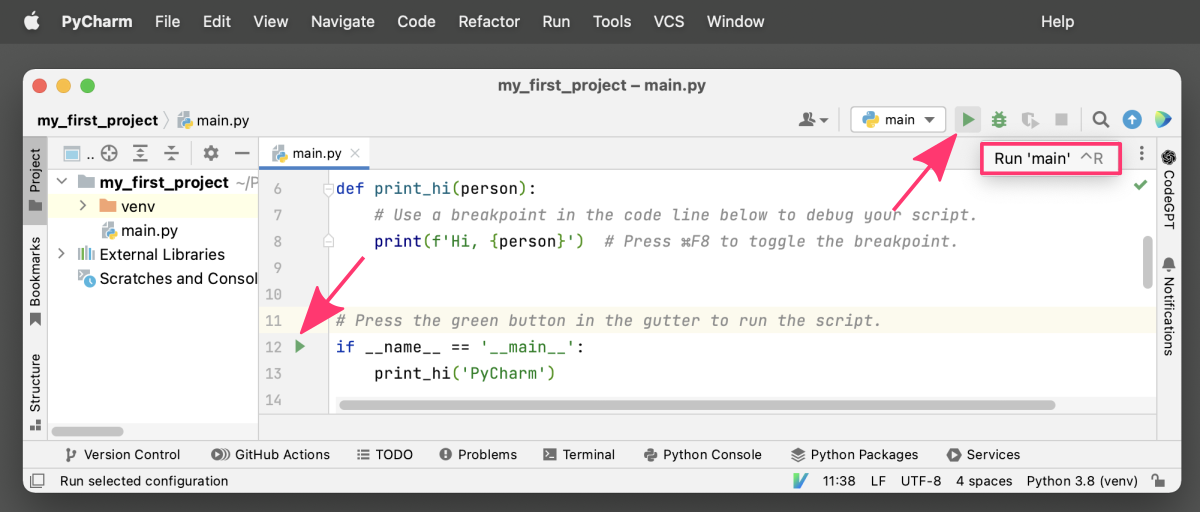
When you click on this button, PyCharm will automatically run your code and display the output in the Run tool window, which is located at the bottom of the IDE.
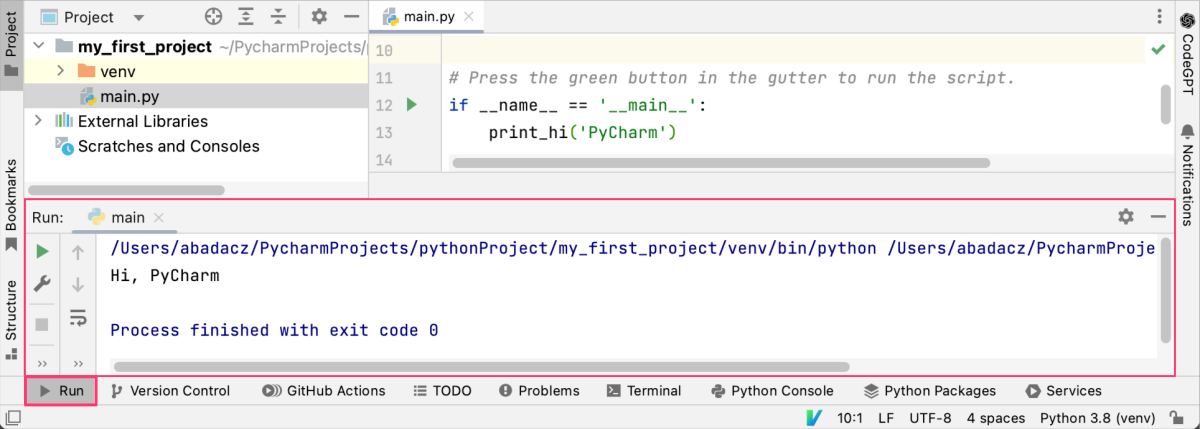
To use this option, simply open the Python file you want to run in the editor, and click on the Run button. If you prefer using keyboard shortcuts, you can press Shift + F10 or ctrl + R (on mac) to run the current file.
2. Running code from the context menu:
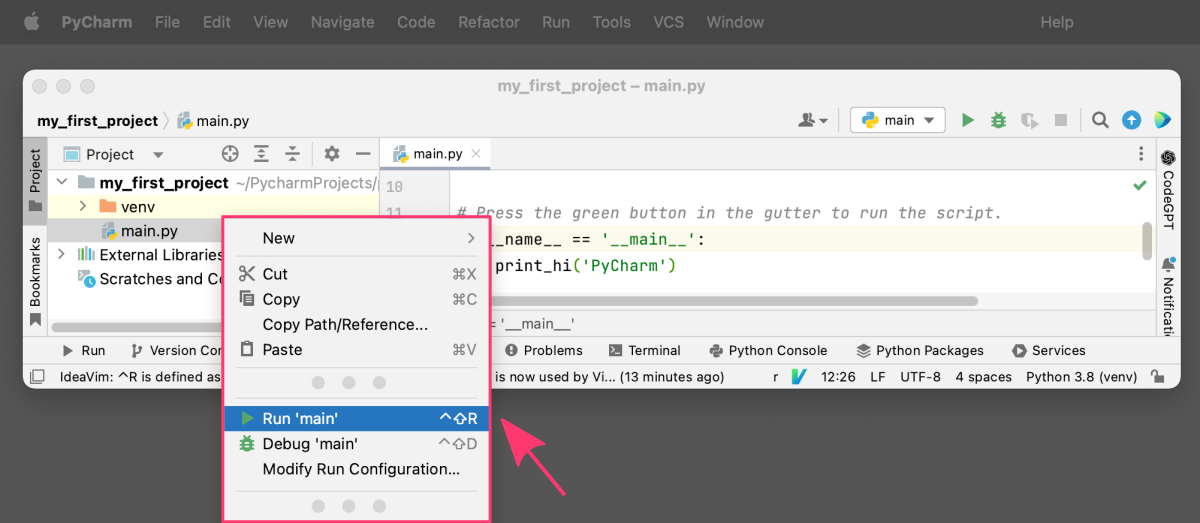
Another way to run Python code in PyCharm is to use the context menu. To do this, right-click on the Python file you want to run in the project explorer, and select “Run filename.py” from the context menu. PyCharm will then run the file and display the output in the Run tool window.
3. Running code from the Run menu:
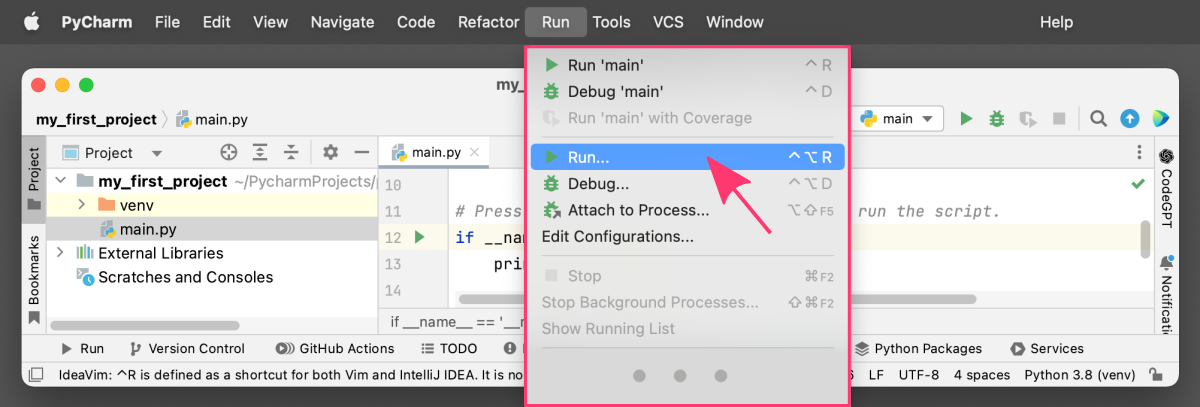
PyCharm also provides a Run menu, which you can use to run Python code. To access this menu, go to “Run” in the main menu bar and select Run filename.py. This will run your code and display the output in the Run tool window.
4. Running code within built-in Terminal or Python Console:
Finally, PyCharm has a built-in terminal and Python console that you can use to run Python code.
When you run Python code using the Run button, the context menu, or the Run menu, PyCharm executes the code in the built-in Python console by default. This console is a full-featured interactive interpreter that allows you to execute Python code and see the results in real-time. You can access the console by clicking on the “Python Console” tab in the bottom panel of the IDE.
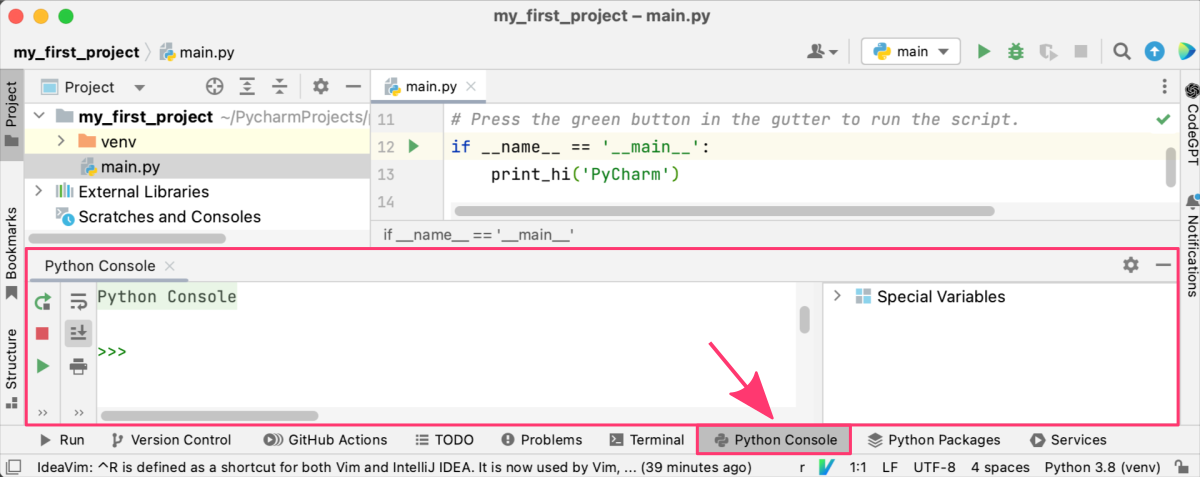
If you want to run Python code in a terminal instead of the Python console, you can do so. You can access the built-in terminal by clicking on the Terminal tab in the bottom panel of the IDE. By default you will be located in the current project directory with the same environment loaded.
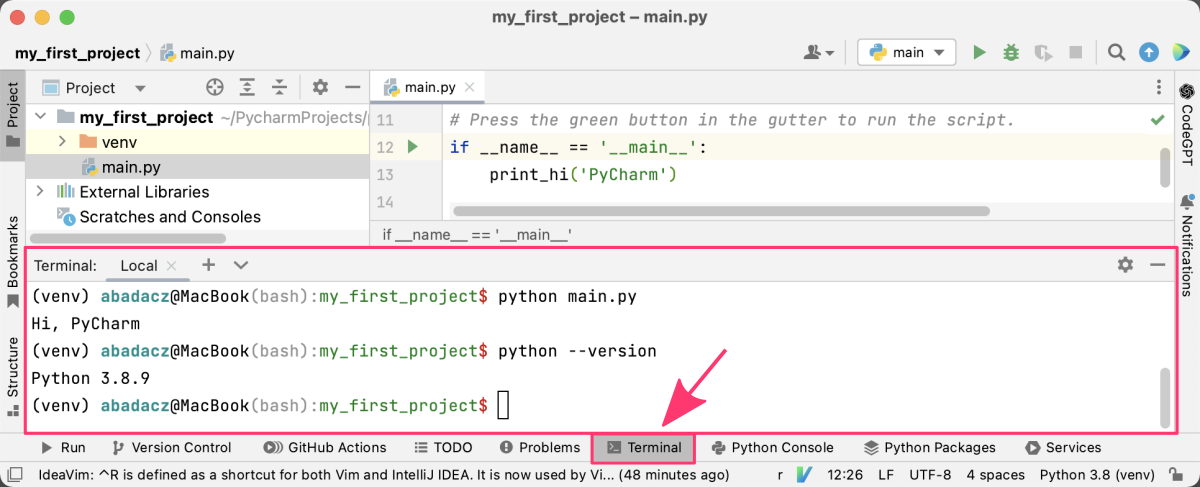
You can run your Python code the same way you do it in the separate Terminal window:
python main.py
Debug the code
PyCharm provides a comprehensive set of tools for debugging Python code, and it can greatly improve your development workflow by helping you diagnose issues quickly and efficiently.
Here are some of the options you can use to debug Python code in PyCharm:
1. Setting Breakpoints
You can set breakpoints at specific lines of code in your Python program, which will pause the program’s execution when it reaches that line.
A breakpoint is a tool that allows you to pause the execution of your Python code at a specific line or point in the code, allowing you to examine the state of your program at that moment.
To set a breakpoint in PyCharm, you can click on the line number in the editor where you want to pause execution. This will add a red dot to the line, indicating that a breakpoint has been set. You can also the key shortcut or use the Run menu on the top and select “Toggle Breakpoint”.
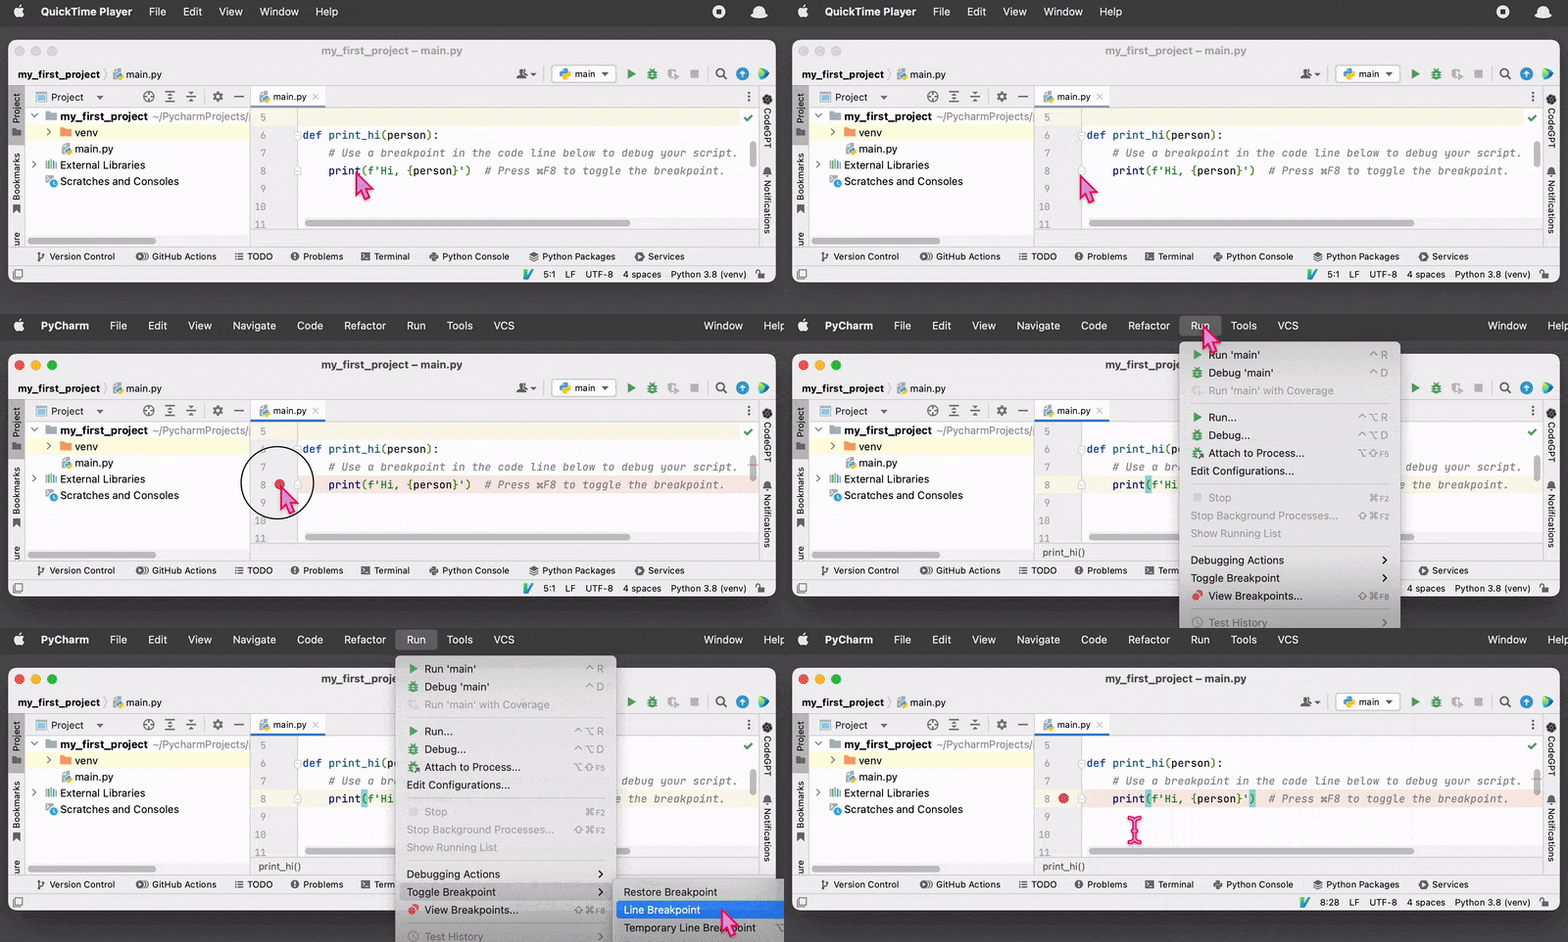
When you run the program and it reaches that line, it will pause execution and display the current state of the program. You can then use various tools to inspect the program’s state and diagnose any issues, including the Debug Console, Watches, and Variables panels.
See the steps to set a breakpoint
- Open the Python file you want to debug in PyCharm.
- Navigate to the line of code where you want to set the breakpoint.
- Click on the left-hand margin of the line to set a breakpoint. You will see a red dot appear on the line, indicating that a breakpoint has been set.
- Run the program in debug mode by clicking the Debug button on the toolbar or using the keyboard shortcut.

- The program will now run in debug mode, and when it reaches the breakpoint, it will pause execution and switch to the Debugging perspective.
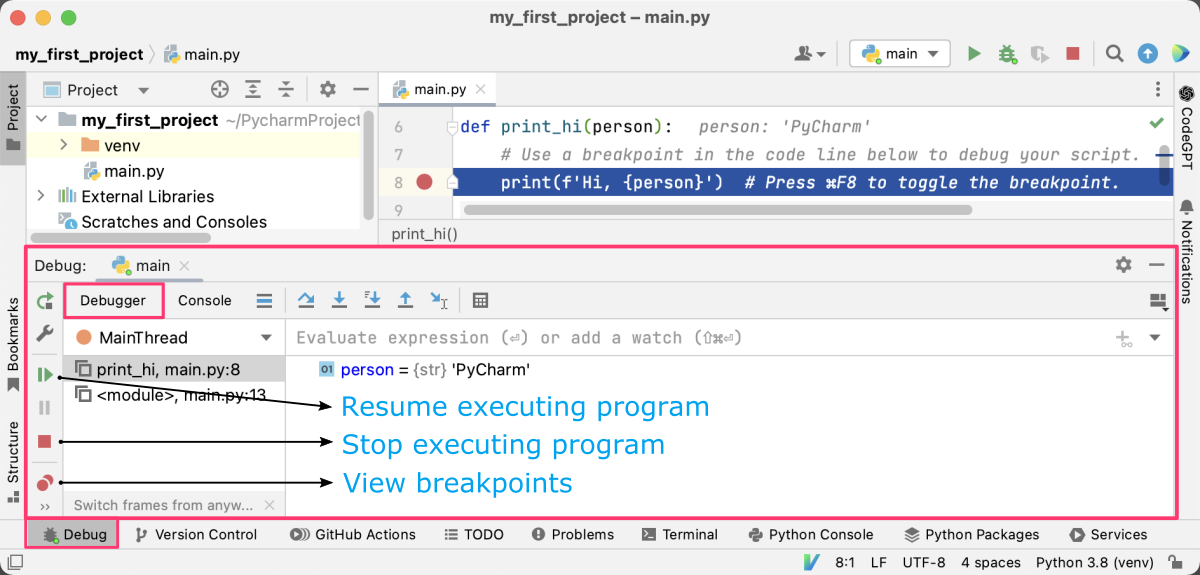
- You can now examine the state of the program by using various tools provided by PyCharm, such as the
Debug Console,Watches, andVariablespanels. - You can continue program execution by clicking the Resume button on the toolbar or using the keyboard shortcut.
2. Debugging Console
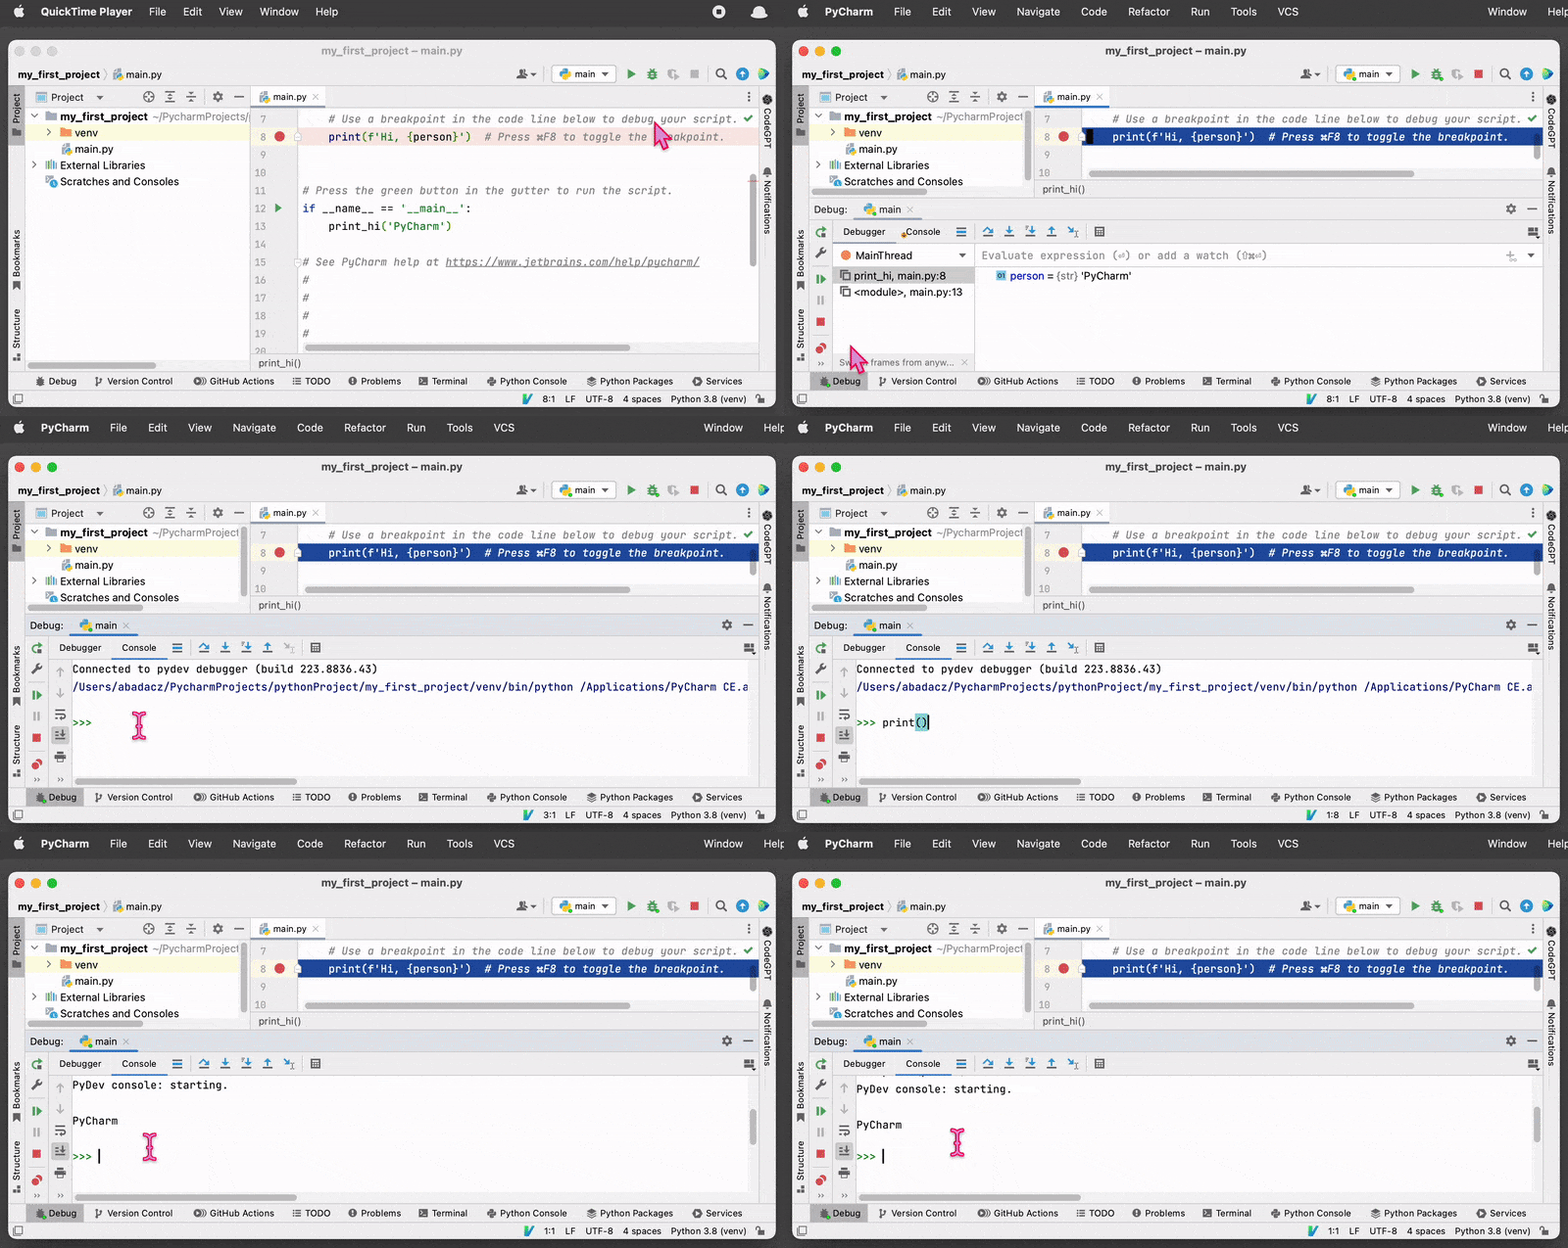
PyCharm provides a debugging console that allows you to evaluate expressions and commands while the program is paused at a breakpoint. This can be useful for inspecting variables or testing out fixes.
Once the program is paused at a breakpoint, you can open the debugging console by clicking on the “Console” tab in the “Debug” panel at the bottom of the PyCharm window. The console will display a prompt where you can enter commands and evaluate expressions (for example, print the current value of the variable).
3. Debugging Toolbar
The debugging toolbar in PyCharm provides a set of buttons that allow you to step through the program’s execution, pause and resume the program, and inspect the program’s state. The toolbar also provides useful information such as the current line of code and the value of the current variable.
The debugging toolbar is located at the top of the PyCharm window, and it contains a set of buttons for controlling the debugging process. The set of buttons with a blue arrow on the top, from left to right, include: “Step Over”, “Step Into”, “Step into my code”, “Step Out”, “Run to cursor”. The other set of buttons is located verically on the left and includes, from top to bottom: “Rerun”, “Modify Run Configuration”, “Resume Program”, “Pause Program”, “Stop”, “View Breakpoints”, “Mute Breakpoints”, and “Settings”. Hovering over each button will display a tooltip explaining its function.

4. Watch Expressions
You can set watch expressions in PyCharm, which will evaluate and display the value of an expression each time the program stops at a breakpoint. This can be useful for tracking the value of a variable or checking if a condition is met.
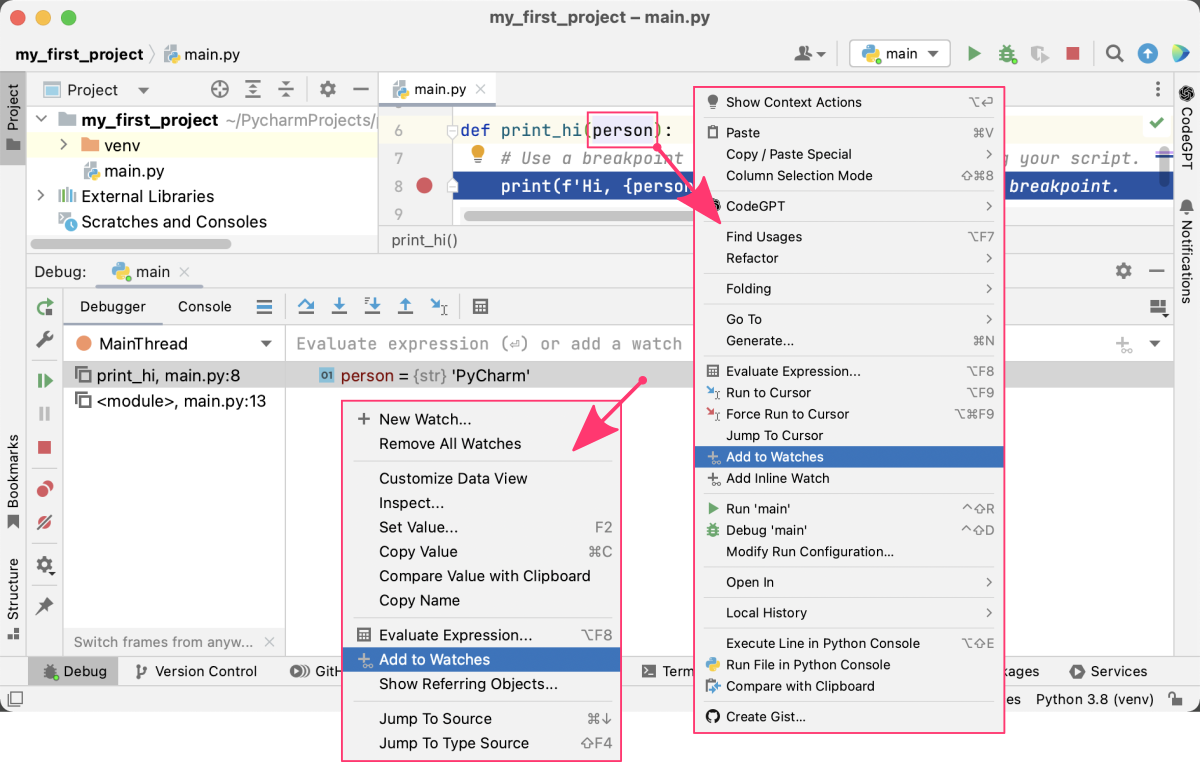
You can add a watch expression by right-clicking on a variable in the code editor window and selecting “Add to Watches” from the context menu. If you have the debugger panel opened, you can select the same option by right-clicking on a line with selected variable. The watch expression will appear in the “Debugger” panel.
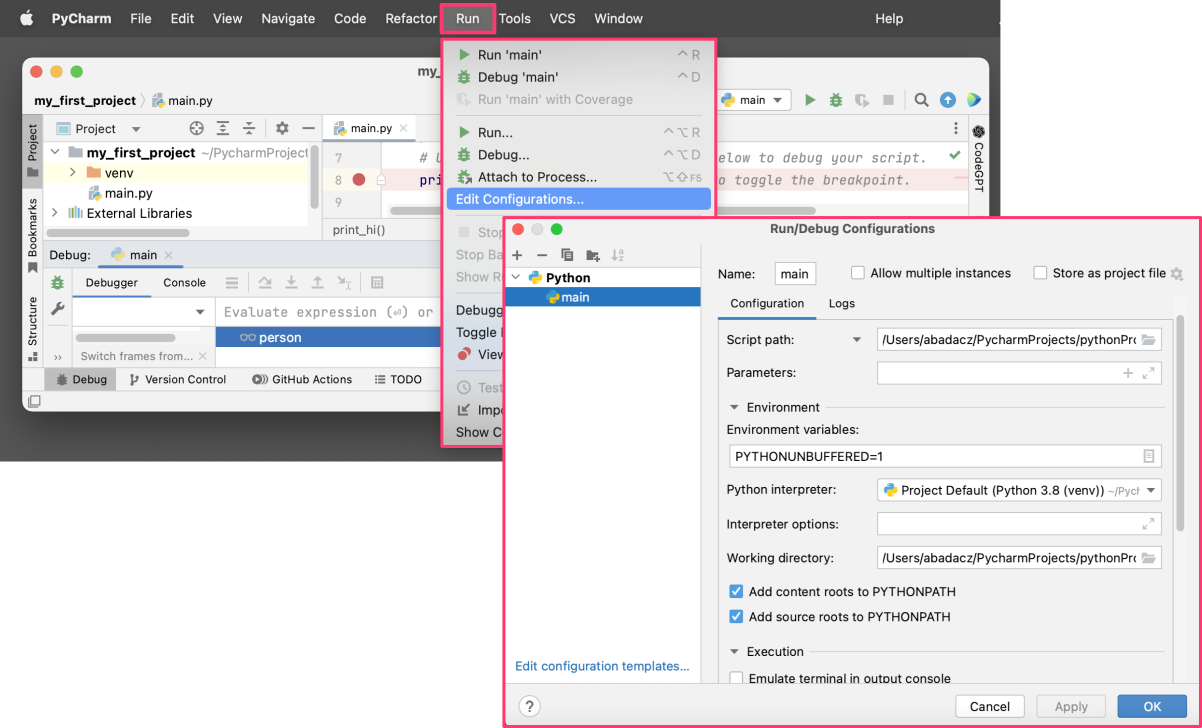
5. Debugging Configuration
PyCharm allows you to configure the debugging process by setting various options such as the Python interpreter to use, the arguments to pass to the program, and the environment variables. This can be useful for debugging complex programs with multiple dependencies.
You can configure the debugging process by selecting “Edit Configurations” from the dropdown menu expanded from the “Run” option in the top toolbar. This will open the “Run/Debug Configurations” dialog window, where you can set various options for the debugging process, including logs.
