What is a terminal?
The command-line interface (CLI) is a more efficient alternative for accessing the file system than through the graphical user interface (GUI). A terminal is an application that make it possible to browse files and execute programs on your laptop or another computing machine using text-like commands. So, to preview the contents of a folder, instead of clicking on the folder you have to type in the terminal the text command ls and confirm with enter. Then you will see a list of file names instead of graphical icons corresponding to the files (see Figure 1).
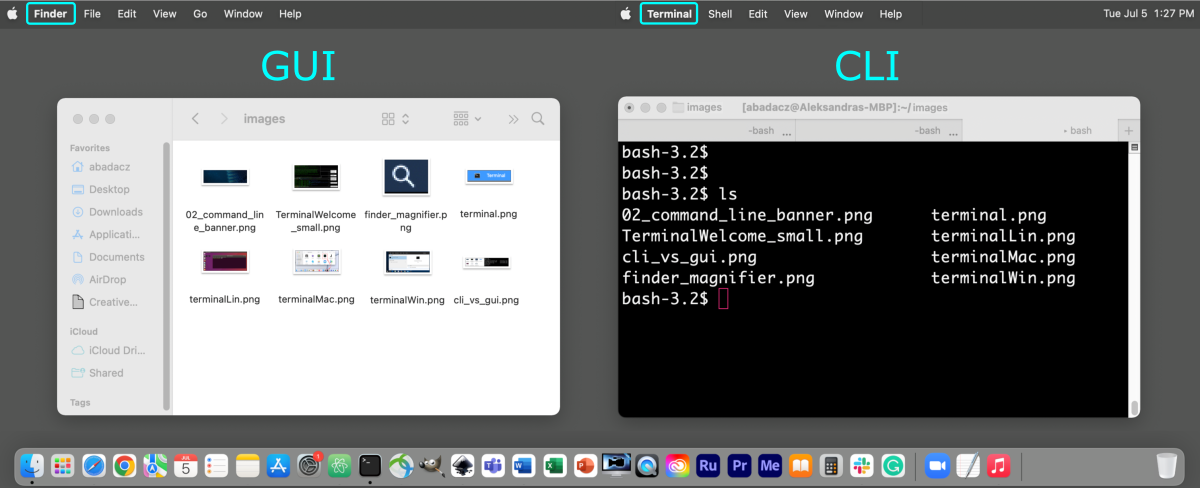 Figure 1. Alternative display of folder contents on the computing machine using the graphical interface (left) and the command line (right).
Why terminal is useful?
At first glance, the terminal seems rougher and less user-friendly, e.g., depriving you of a quick preview of graphical images. Although, it brings several conveniences that become indispensable when evolving from a casual user into a power user. One of the main advantages it provides is the ability to perform a repetitive task in a loop that can be easily scaled and distributed across available resources in parallel computing. That significantly saves the user time and manual effort since the job runs as a background process and notifies the user of its completion. Using a terminal promotes a more efficient exploitation of available computing resources. Until recently, command-line access was also the only interface providing the ability to perform high-performance computing (HPC) on remote cluster networks. Nowadays, admins are increasingly equipping with a simplified browser-based GUI, but native terminal access still gives the greatest flexibility and efficiency for advanced users.
Open terminal window
Depending on the operating system on your local computing machine (Windows, macOS, Linux) the way to run a terminal is slightly different but each of these systems should have at least a basic terminal pre-installed.
Windows
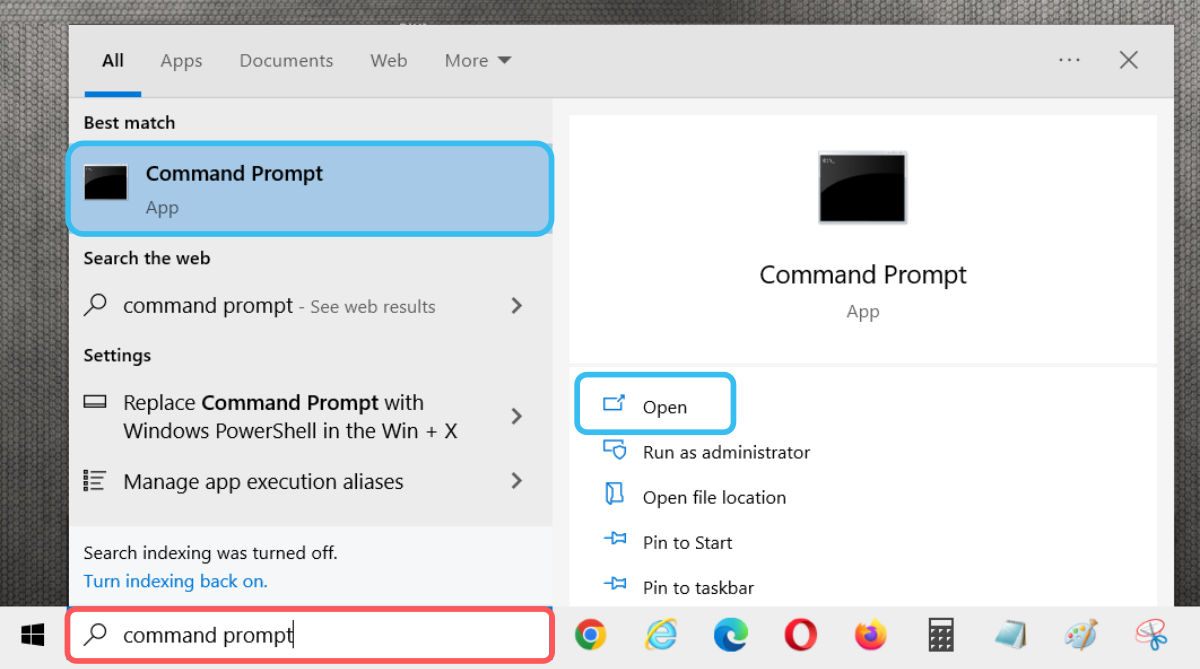
In Microsoft Windows, a command-line shell is usually called a Command Prompt or more recently a PowerShell.
Follow these steps to display the terminal window:
- Press
windows key + ror go to Start Menu (Windows icon available on the left corner of your desktop) and type ‘cmd’ or ‘powershell’.
The search results should display a dark square icon. - Click on the icon to open the terminal window.
macOS
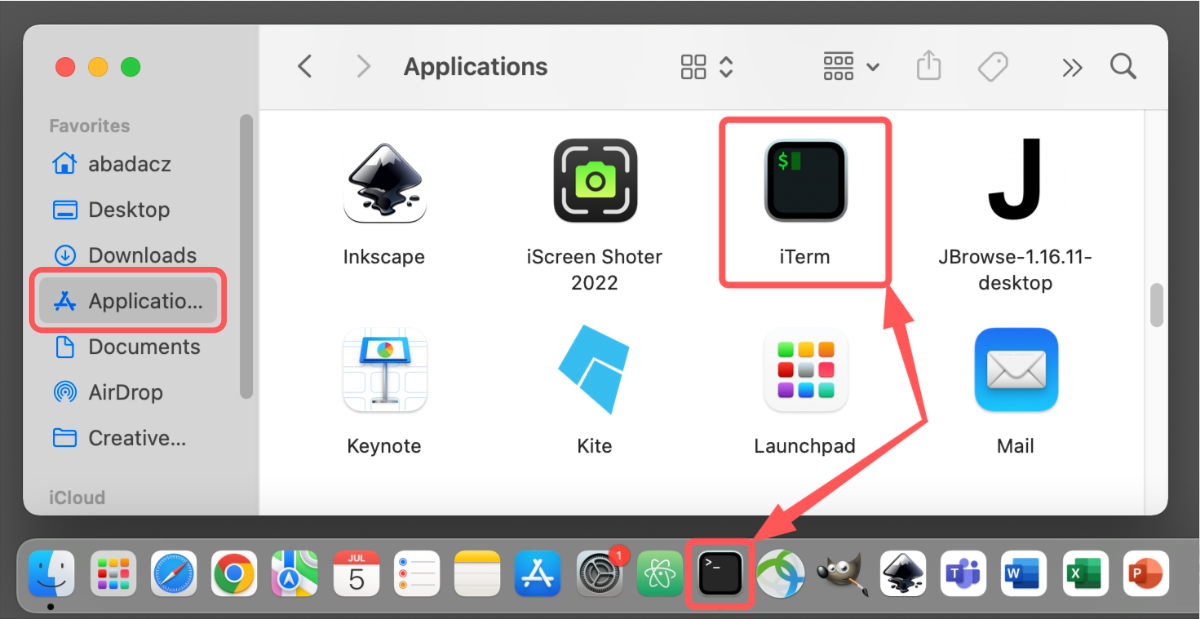
In macOS you can start a terminal session by clicking on the black square icon present in the Dock bar. If the shortcut is not there by default, you can search for ‘Terminal’ or ‘iTerm’ in the Finder.
- Use the Finder
 and search for and open the Terminal program
  .
.
Linux
In Linux you can start a terminal session by clicking on the black square icon ‘Terminal’ present in the Menu bar.
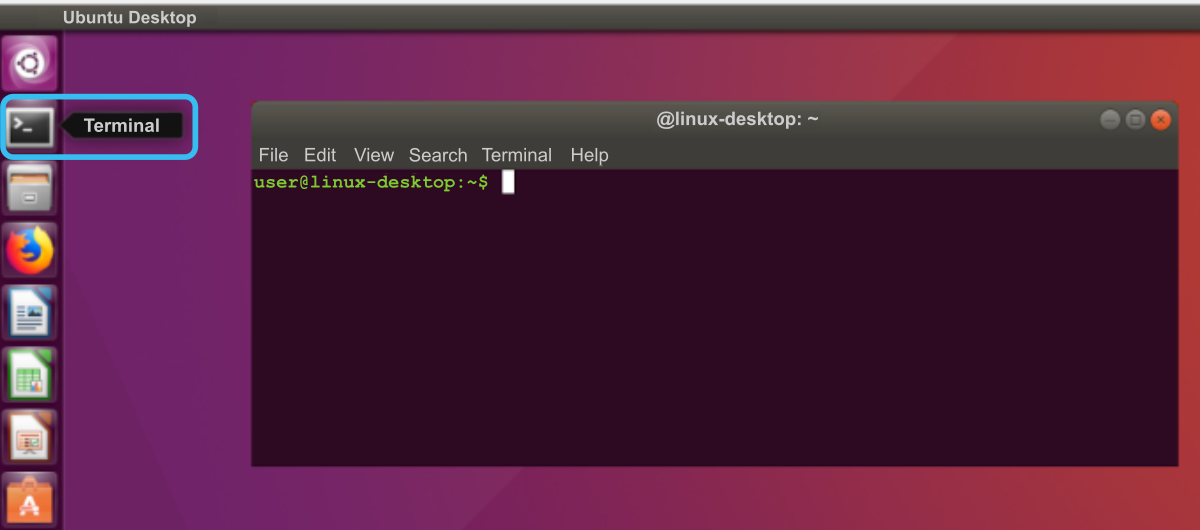
The window can be resized with the mouse and the font text can be increased by pressing cmd + or ctrl + on Mac or Windows/Linux, respectively.
Terminal Basics
In this section, you will learn about the structure of the terminal window and basic terminology related to the command line. Further, you will receive a few tips for exploring command history or autocompletion that enhance your daily terminal work.
Terminology
When working in a terminal, it is helpful to know some basic terminology. That may be also crucial when asking for help or describing a problem.
| TERM | DEFINITION | NOTES |
|---|---|---|
| Welcome Message | the startup message when logging into a remote machine | it usually tells you about the architecture of available resources and rules for the users |
| Prompt | the text next to where you type your commands | prompts can be modified to include addtional information like hostname or current folder location |
| Command | the program or script you are trying to run | built-in commands and aliases are called by name, while custom Bash scripts stored in files can be executed with ‘dot syntax’ . ~/path/your_script.sh |
| Argument | added to a Command to modify the output | there is always a space between a command and the argument |
| Standard Out | text result of a command | use > filename1 to redirect output into the file use >> filename1 to append output to the end of a file |
| Standard Error | error message of a failed command | use 2> filename2 to redirect error message into the file use 2>> filename2 to append error message to the end of a file |
Once you open a terminal window on your local machine or login into the remote one, first, you will see a welcome message. It contains the date of the last login and some information from the admins. Usually, it also tells you about the architecture of available resources and users’ rules.
Prompt is a pre-defined field in the terminal emulator which tells you, by default, who is the current user on which host and what is the current location in the file system. The components available in the prompt are adjustable in the shell configuration file called .bashrc. To learn more about prompt and terminal coloring, see the tutorial and the Introduction to UNIX Shell in this workbook.
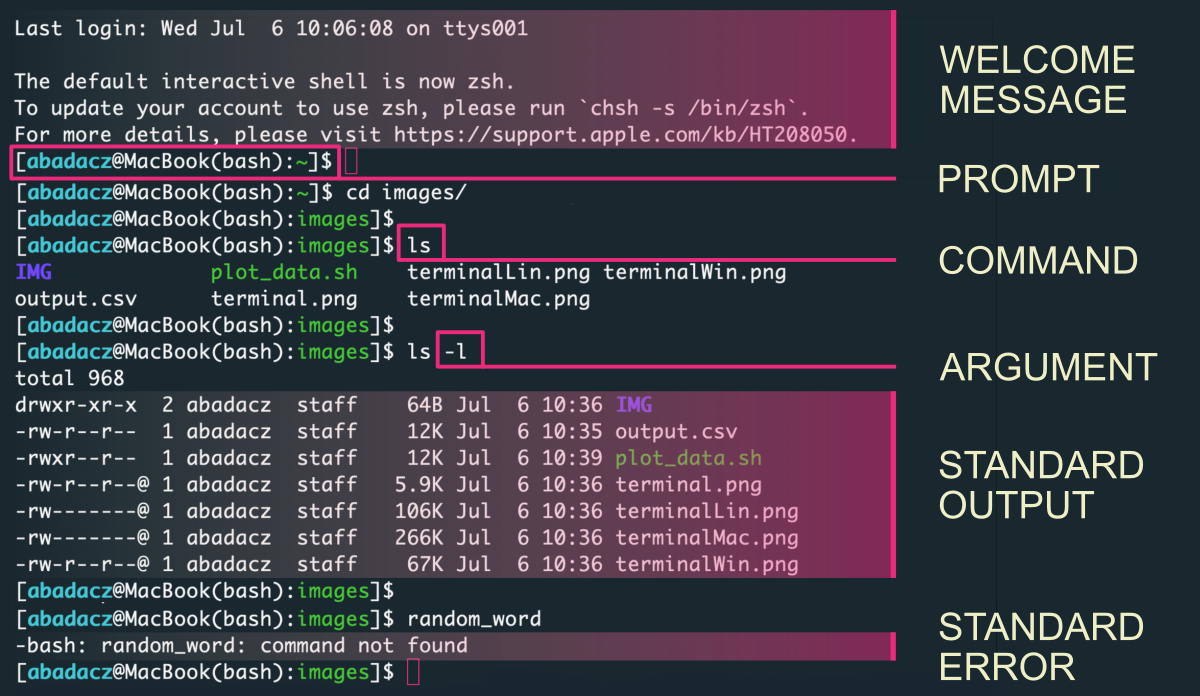
A command is a name of a program, a built-in shell process called by a specific word, user-customized alias, or a script with executability rights. Typing such a pre-defined word in the terminal and approving with enter (return on MacOS) communicates to the operating system to launch the desired process. Thus, commands can be considered abbreviations of computer instructions, easy for humans, interpreted and translated by operating system or compiler.
Commands usually take one or more arguments, which condition how the ordered commands are executed. Usually, the arguments are inputs and various program-specific options or flags that modify the track or variant according to which the algorithm is executed.
In most cases, operations are performed on text files (or numerical representations of other data, such as image files), so the most common result is text output. By default this information is returned in the standard outputs stream and printed on the screen. Error messages are passed in the standard error stream and also displayed on the screen. However, these two data flows can easily be separated and redirected to a shared or different file.
# print standard output and standard error on the screen
ls -l

# save standard output into the 'output' file and standard errors into the 'error' file
ls -l > output 2> error

# append standard output to the end of an 'output' file and standard errors into the 'error' file
ls -a >> output 2>> error
Command auto-completion
The tab key is your great friend while working directly in the terminal window. It facilitates you entering both the commands and names of files stored in your directories system.
That is useful when you remember only a few first letters of a less common command or want to reuse an alias created far in the past. In such a case, type as many characters as you remember and press the tab once.
(1) If there is a unique program matching your query, it will be automatically completed.
(2) In case of more matching options, you will hear a beep, but nothing will change on the command line. That means you should press the tab one more time. If there are few possibilities, let’s say less than 10, all of them will be displayed on the screen for you to use the hints. You just need to type enough letters to make your searched command unique among the others. Then auto-completion will work with the next pressing of a tab.
(3) However, if there are many more possible command choices, you will be asked if you want to show all possible options. Once you find the desired command, you can enter it manually or select it with the mouse, then copy and paste it into the command line.

^ on macOS, use return instead of arrow keys to browse the preview of possibilities
Command history
Another convenient feature of working in a terminal is the command history. Usually, the last 100-500 commands stay in the terminal memory, whether a single word command, a more complex sequence of processes, or even an inline script with nested loops. They all are always available after closing and reopening the terminal window.
To display all previously used commands, type history command on your terminal. Typically, that will print on your screen last 500 commands with indexing on the left-hand side.
history
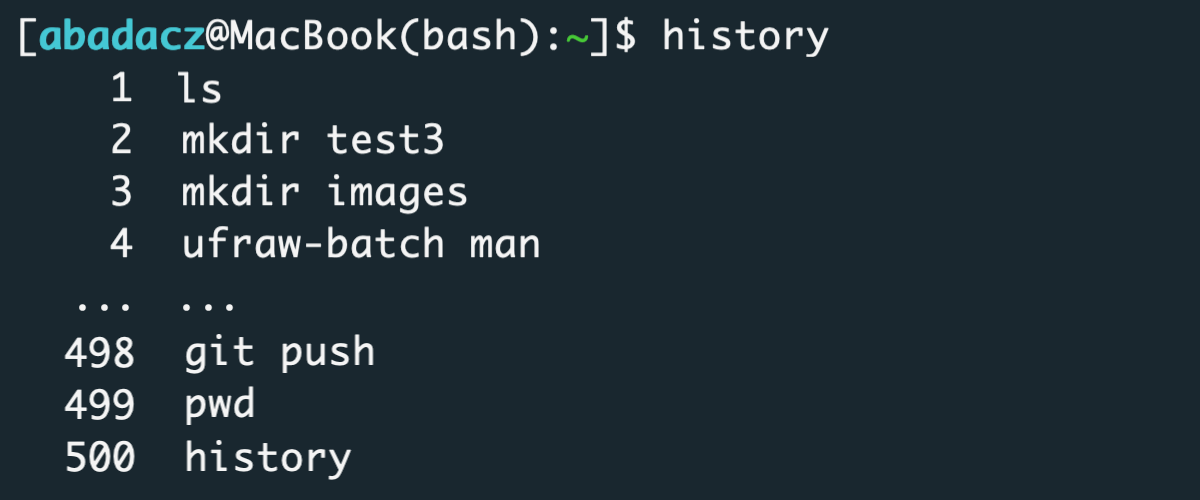
The history can be browsed directly in the terminal window with an upper-arrow key ↑ following the direction of older commands and a down-arrow key ↓ to return to more recent ones. Also, you can effortlessly search in history by keyword after pressing CTRL+R on your keyboard. That facilitates getting quick a syntax used far in the past if only you know the unique fragment of it. When the filtrated batch of commands is more than one in size, you can again use arrow keys to select a desired one.
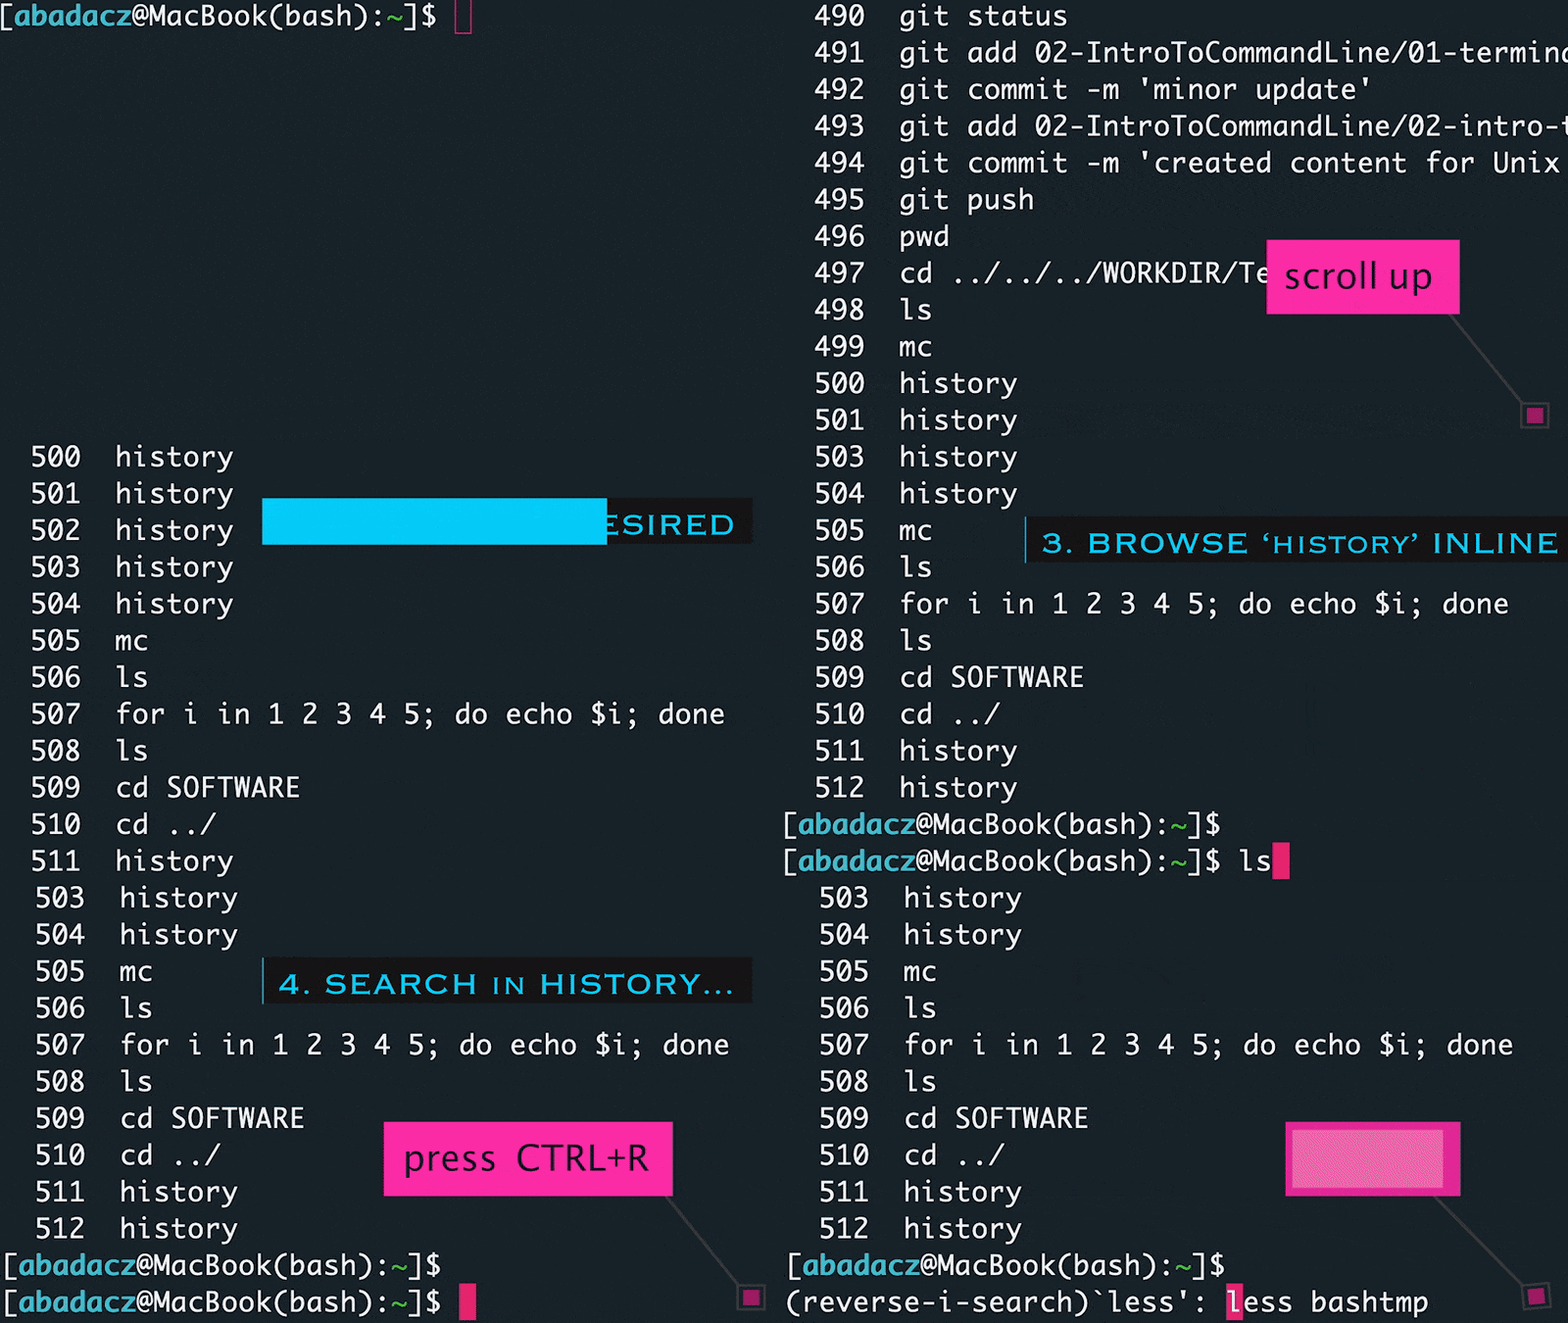
As you noticed, the history command returns the text output on the screen. Thus, you can further parse it to filtrate the required information. Since the history output is printed as a single command per line, it is easy to grep by keyword or limit the display to n last results with the tail -n command. The uniq allows you to remove redundant hits.
history | grep "for" | uniq | tail -5

Finally, it is good to know that the command history is stored in the hidden file called by default .bash_history and stored in the $HOME for given user. You can use the $HISTFILE variable to change the name of the history file and $HISTSIZE variable to adjust the number of remembered commands. You can set up that in the .bashrc configuration file. To learn more, see section 3. Unix Shell Configuration in the following tutorial.
To check if the hidden file exists, type in the terminal window:
ls -a ~
Note that ~ refers to the $HOME of a given user and / refers to the root directory in the file system!
You can replace it with a path to any location.
Then, you should find on your screen a bunch of files starting with a dot, such as .bashrc, .bash_profile, and .bash_history.

To preview the content of a .bash_history, from any location on the file system, type in the terminal window:
less ~/.bash_history
… and browse the command history with arrow keys ↓ and ↑. To close the preview, press q.
Further Reading
Introduction to UNIX Shell: configuration, variables, home dirBasic Commands: navigation, file creation & preview
Command Line text files editors: nano, vim
System info and access permissions
Superuser command: sudo
Getting started with UNIX + video + exercises
Useful text manipulation programs
UNIX Commands
MODULE 04: Development Environment
