
DataScience Workbook / 08. Data Visualization / 1. Introduction to Scientific Graphic Design / 1.2 Vector Graphics Tools
Introduction
Vector graphics are digital images composed of mathematical equations that define shapes, lines, and curves. Unlike raster graphics, which are made up of pixels, vector graphics can be scaled infinitely without losing quality. Vector images retain their sharpness and clarity at any size. They are commonly applied in various fields such as graphic design, logo creation, illustration, web design, architectural drafting, and print media, where precise and scalable artwork is required.
Advantages of vector graphics over raster graphics
Vector graphics offer scalability, easy editing, and small file sizes, making them ideal for projects that require resizing, flexibility, and efficient storage. However, they can be challenging for highly detailed and photorealistic images, and may require more processing power for rendering complex artwork.
| PROS | CONS |
|---|---|
Scalability Vector graphics are resolution-independent, meaning they can be scaled up or down without any loss of quality. This makes them ideal for projects that require artwork in various sizes, such as logos, illustrations, and print materials. |
Complexity for Photorealistic Images Vector graphics are not well-suited for highly detailed and photorealistic images. Since they are based on mathematical equations, creating intricate textures, gradients, and realistic effects can be challenging. |
Editability Vector graphics are composed of individual objects and mathematical equations that define their properties. This allows for easy editing and modification of shapes, colors, and other attributes. It also enables efficient workflow and flexibility when making changes to the artwork. |
Limited Representation of Continuous Tones Vector graphics are inherently composed of solid colors and well-defined shapes. They struggle to represent continuous tonal variations found in photographs or highly detailed images. |
Small File Sizes Vector graphics typically have smaller file sizes compared to raster graphics. Since vector graphics store information mathematically, they only need to record the equations and properties of the objects, resulting in compact file sizes. This makes them easier to store, share, and load on various devices and platforms. |
Performance Limitations While vector graphics are efficient in terms of file size, rendering complex vector artwork can sometimes require significant processing power. This can be a disadvantage when working with large and intricate vector graphics, as it may slow down performance or require powerful hardware. |
Vector Graphics in Science
Vector graphics play a crucial role in research visualization by enabling the creation of clear, precise, and scalable visual representations of data. Researchers utilize vector graphics tools to generate charts, graphs, diagrams, and illustrations that effectively communicate complex scientific concepts and findings. These vector-based visualizations can be easily resized, modified, and exported for presentations, scientific papers, posters, and online publications, ensuring optimal clarity and readability of the research information.
Here are some notable applications of vector graphics in science:
| Graphics example | Scope of Applications |
|---|---|
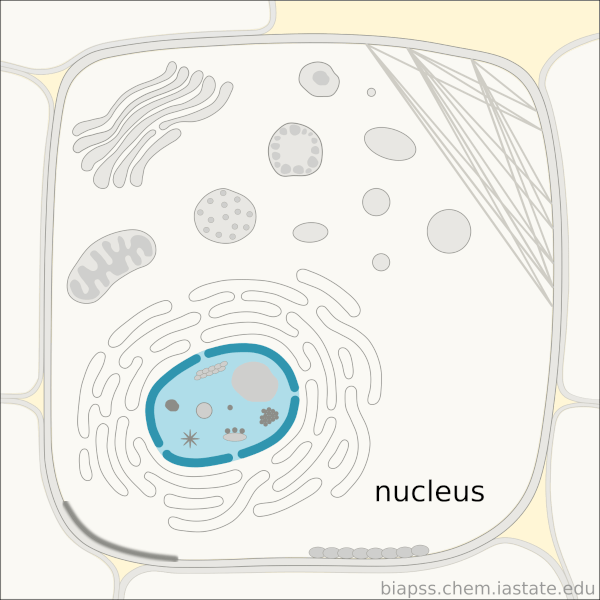 |
Scientific Illustration Vector graphics are widely used in scientific illustration to create accurate and visually appealing representations of biological organisms, anatomical structures, geological formations, and more. The scalability and precise editing capabilities of vector graphics make them ideal for illustrating complex scientific concepts. |
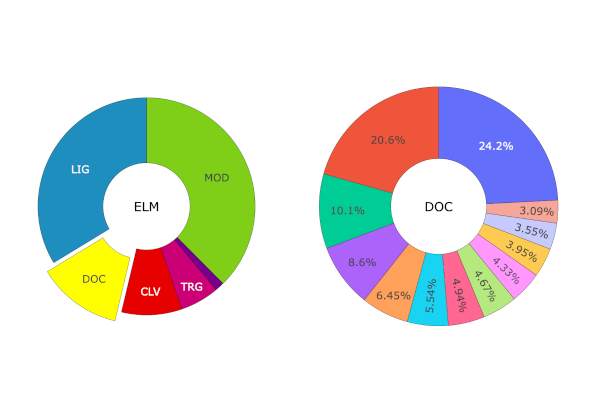 |
Data Visualization Vector graphics are employed in data visualization to present scientific data in a visually engaging and informative manner. Charts, graphs, and diagrams created with vector graphics tools help researchers and scientists communicate their findings effectively, allowing for easy understanding and analysis of complex datasets. |
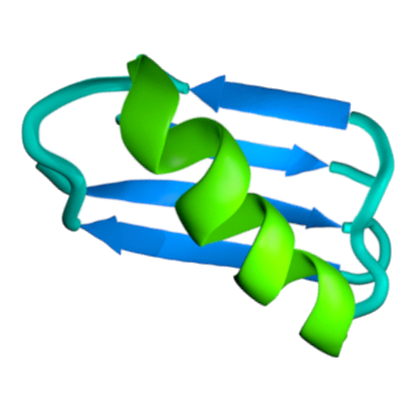 |
Molecular Modeling Vector graphics find applications in molecular modeling by creating 3D representations of molecules and protein structures. Vector-based software allows scientists to manipulate and study these structures, highlighting specific regions and interactions, aiding in drug discovery, and understanding molecular behavior. |
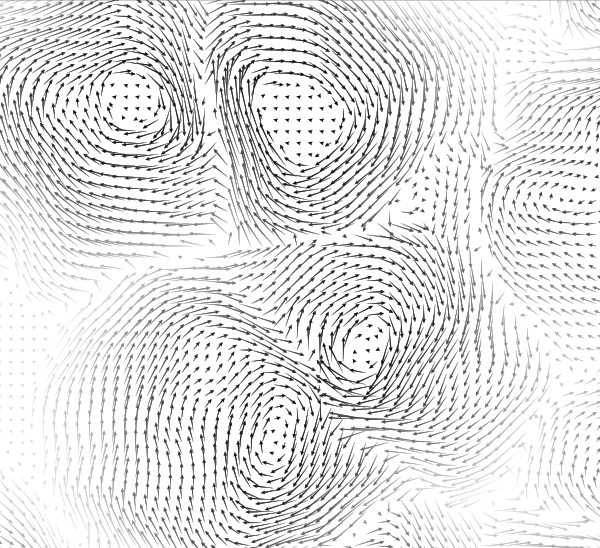 |
Physics Simulations Vector graphics play a role in visualizing and simulating physical phenomena. Using vector graphics, scientists can create interactive simulations and models of particle interactions, gravitational forces, electromagnetic fields, and more. |
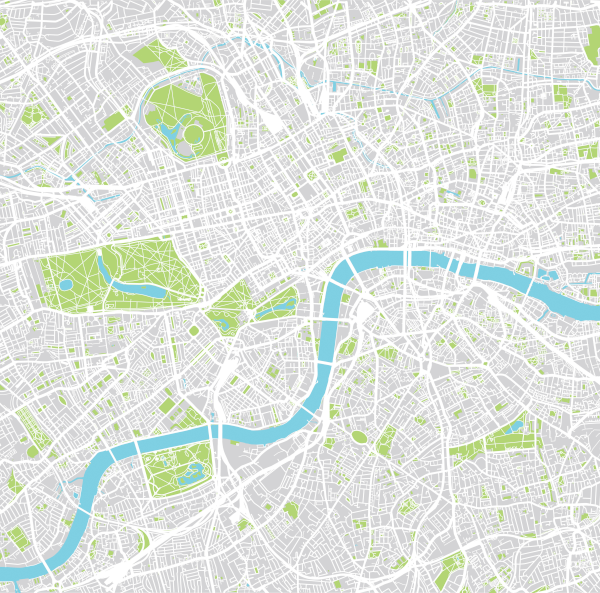 |
Geographic Information Systems (GIS) GIS platforms utilize vector graphics to represent geographic features such as maps, roads, boundaries, and terrain. The scalability and editability of vector graphics are valuable in GIS applications, allowing for precise rendering and analysis of spatial data, supporting environmental research, urban planning, and geological studies. |
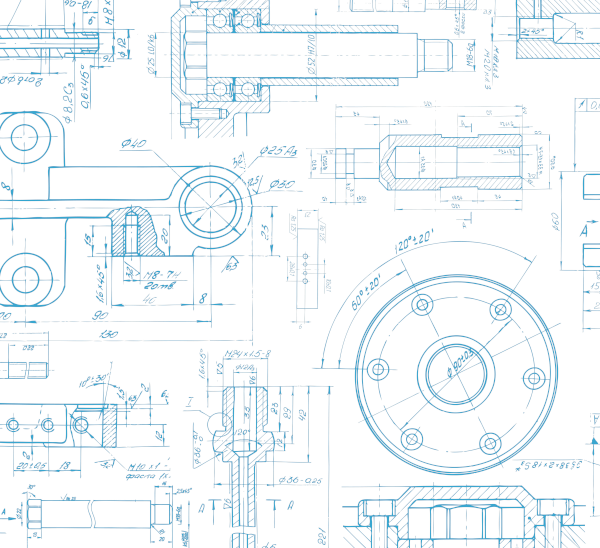 |
Engineering Design Vector graphics tools are utilized in engineering design for creating technical drawings, schematics, and blueprints. Engineers can accurately represent intricate mechanical components, architectural structures, circuit diagrams, and other engineering designs. The scalability and precision of vector graphics support effective communication and collaboration within the engineering field. |
Applications of editing vector graphics
Creating vector graphics offers greater potential for future modification and reuse compared to raster graphics due to their scalability, non-destructive editing, and ability to store object properties as mathematical equations, allowing for easy adjustments, modifications, and repurposing of the artwork. Overall, modifying vector graphics offers great flexibility, precision, and efficiency. Also, it is generally considered easier and more user-friendly than raster editing approaches.
Knowing editing techniques of vector graphics can be highly beneficial for scientists!
Editing vector graphics involves manipulating and modifying the various elements within the artwork. Here are several examples of common editing techniques used in vector graphics:
-
Shape Modification
Vector graphics tools allow for precise editing of shapes. Users can adjust the size, position, and proportions of shapes, as well as modify their curves and corners. For instance, a circle can be transformed into an ellipse or a square can be rounded to create a softer shape. -
Path Editing
Paths are the backbone of vector graphics, and editing them is a fundamental aspect of vector manipulation. Tools like the Pen Tool allow users to create and modify anchor points, adjust curves, and reshape paths. This enables precise control over the intricate details of the artwork. -
Layers and Grouping
Vector graphics tools support the use of layers and grouping to organize and manage complex artwork. Layers allow users to stack and organize objects, making it easier to edit and manage different elements separately. Grouping allows objects to be combined into a single unit, enabling simultaneous transformations and editing of related elements. -
Text Editing
Vector graphics tools include text editing capabilities, allowing users to add and modify text within their artwork. Users can adjust font styles, sizes, alignments, kerning, and apply special effects to text elements. This is particularly useful for creating labels, titles, captions, and other textual elements in the graphic. -
Color and Gradient Editing
Vector graphics tools provide extensive options for editing colors and gradients. Users can change the fill and stroke colors of objects, apply gradients with varying color stops and directions, adjust opacity, and experiment with different blending modes. This enables the creation of visually striking and dynamic artwork. -
Effects and Filters
Vector graphics tools often offer a range of effects and filters to apply to objects. Users can add shadows, glows, blurs, and other stylistic effects to enhance the visual impact of their artwork. Filters such as distortions, textures, and gradients can also be used to create unique and artistic effects.
Ethics of editing vector graphics
Ethical editing of vector graphics involves:
- respecting copyrights of original artwork,
- maintaining truthfulness in research results,
- proper attribution and citation,
- obtaining consent for modifications or edits,
- and upholding contextual integrity with the original meaning of the artwork
to ensure accurate representation and responsible use of visual materials.
Modifying or artificially changing research results using a vector graphics editor is strongly discouraged and considered unethical.
It is crucial to maintain the integrity and credibility of scientific research by presenting accurate and unaltered data. Altering or manipulating research results using vector graphic editing tools can lead to misrepresentation, distortion of findings, and a breach of scientific ethics.
Common file formats:
SVG, AI, EPS
Vector graphics formats offer the advantage of easy editing of artwork components even after saving and reopening the file. Unlike raster graphics formats, which store information as a fixed grid of pixels, vector graphics formats store objects and their properties as mathematical equations. This mathematical representation allows for precise manipulation of individual components such as shapes, lines, and colors, making it effortless to modify & reuse the artwork without losing quality or detail.
The choice of format depends on factors such as compatibility with specific software, intended use, and desired levels of editability and scalability. There are several common file formats used for storing vector graphics:
SVG (Scalable Vector Graphics)
SVG is an XML-based vector graphics format widely supported by various software and web browsers. It is an open standard format that allows for scalable and interactive graphics. SVG files are editable and can be easily resized, making them suitable for web design, logos, and illustrations.
EPS (Encapsulated PostScript)
EPS is a versatile vector graphics format that supports both vector and raster elements. It is commonly used for print and publishing purposes. EPS files can be opened and edited in various graphics software, and they maintain high-quality resolution when resized or printed.
PDF (Portable Document Format)
PDF is a widely used file format that can contain both vector and raster graphics. It is known for its ability to preserve the layout and formatting of documents across different platforms and devices. PDF files can be created from vector graphics software and easily shared for viewing or printing.
DXF (Drawing Exchange Format)
DXF is a file format commonly used in computer-aided design (CAD) software. It enables the exchange of vector-based drawings between different CAD applications. DXF files are editable and can contain 2D or 3D vector elements, making them useful for architectural plans, engineering designs, and manufacturing processes.
AI (Adobe Illustrator)
AI is the proprietary file format used by Adobe Illustrator, a popular vector graphics editor. It supports complex artwork with multiple layers, gradients, and effects. AI files preserve the full editing capabilities of Adobe Illustrator, making them ideal for professional design workflows.
^ These are just a few examples of the common file formats used for vector graphics.
Vector Graphics Tools
Vector graphics tools are software applications designed for creating, editing, and manipulating scalable graphics composed of mathematical equations. These tools provide a versatile and precise environment for designing and modifying vector-based artwork, allowing users to work with illustrations, infographics, logos, diagrams, and more.
Let’s explore some of the essential vector graphic tools that professionals and enthusiasts frequently employ. Depending on your specific requirements and skill level, you can choose the tool that suits your needs and budget.
Here’s a table summarizing the features of selected vector graphics tools:
| tool | features | supported formats | price |
|---|---|---|---|
| Inkscape | open-source, extensibility through community-developed extensions | SVG, EPS, PDF, AI, DXF, and more |
free and open-source |
| Adobe Illustrator | seamless integration with other Adobe Creative Cloud apps, extensive asset library | AI, SVG, EPS, PDF, and more |
subscription-based |
| CorelDRAW | productivity features, built-in templates, advanced color management | AI, CDR, SVG, EPS, PDF, and more |
subscription-based |
| Sketch | UI design focus, extensive library of UI components, collaboration capabilities | Sketch file format (can export to SVG, EPS, PDF, and more) |
subscription-based (for teams) or one-time purchase |
| Affinity Designer | switch between vector and raster editing modes, non-destructive effects | SVG, EPS, PDF, AI, PSD, and more |
one-time purchase |
Each of these vector graphics tools offers unique features and strengths, catering to different user needs and workflows.
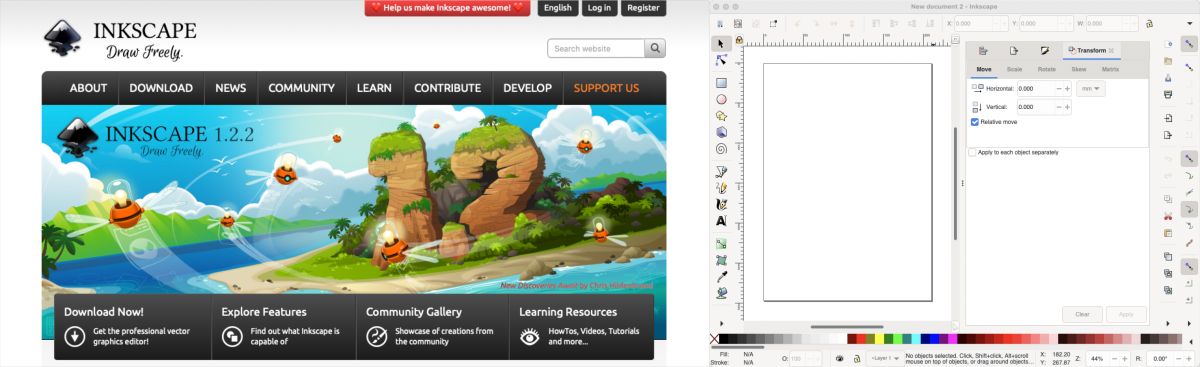
Inkscape
Inkscape ⤴ is a free and open-source vector graphics editor that offers powerful drawing and editing tools. It supports a wide range of vector formats, including SVG, and features advanced capabilities such as node editing, text manipulation, and gradients. Inkscape’s unique feature is its extensibility, allowing users to enhance its functionality through a vast collection of community-developed extensions.
Adobe Illustrator
Adobe Illustrator ⤴ is a professional-grade vector graphics editor known for its comprehensive set of tools and features. It offers precise control over shapes, paths, and typography, along with advanced effects, gradients, and blending modes. Illustrator’s unique features include its seamless integration with other Adobe Creative Cloud applications and its extensive library of pre-designed assets and brushes.
CorelDRAW
CorelDRAW ⤴ is a versatile vector graphics suite that combines vector editing, page layout, and image editing tools into a single application. It provides a range of creative tools, including robust drawing and shaping capabilities, text and typography options, and advanced color management features. CorelDRAW’s unique feature is its emphasis on productivity, offering time-saving features like the ability to apply effects to multiple objects simultaneously and built-in templates for various design projects.
Sketch
Sketch ⤴ is a popular vector graphics tool primarily used for digital design and user interface (UI) design. It provides an intuitive interface, precise vector editing tools, and features optimized for designing interfaces and web assets. Sketch’s unique features include its extensive library of UI components, collaborative design capabilities, and integrations with prototyping and collaboration tools.
Affinity Designer
Affinity Designer ⤴ is a powerful vector graphics tool with a focus on professional-grade design capabilities. It offers a comprehensive set of tools for vector editing, including advanced pen and shape tools, non-destructive effects, and seamless integration with other Affinity apps. Affinity Designer’s unique feature is its ability to switch between vector and raster editing modes within the same document, providing flexibility and convenience for hybrid workflows.
Getting started with Inkscape
Inkscape ⤴ is a powerful vector graphics tool that offers a wide range of features for creating scalable and precise artwork. Its advantages lie in its ability to produce high-quality vector graphics, support for a variety of file formats, and its free and open-source nature, allowing for a vibrant community and continuous development.
Features summary
Cross-platform availability
Inkscape is available for Windows, macOS, and Linux, ensuring broad compatibility across different operating systems.
User-friendly interface
Inkscape provides an intuitive and user-friendly interface, with customizable toolbars, panels, and keyboard shortcuts, allowing users to personalize their workspace for optimal productivity.
Support for many formats
Inkscape supports a wide range of vector and image formats, including SVG (its native format), EPS, PDF, AI, DXF, PNG, JPEG, and more. This allows for seamless import and export of files with other software and platforms.
Plethora of features for image manipulation and editing
-
Editing Tools: Inkscape offers a comprehensive set of editing tools, including selection, drawing, shaping, transforming, aligning, and path editing tools. Users can manipulate objects, apply transformations, adjust colors, and create complex shapes with precision and ease. -
Text Support: Inkscape supports text editing, including options for font selection, text manipulation, text-on-path, and text flow control. Users can create and edit text elements to complement their designs. -
Filters and Effects: Inkscape provides a range of filters and effects to enhance the appearance of vector graphics. Users can apply blur, drop shadow, bevel, emboss, and other effects to create visually appealing designs. -
Live Preview: Inkscape offers live preview for various operations, allowing users to see the changes in real-time as they modify paths, apply effects, adjust gradients, or manipulate objects. -
Non-Destructive Editing: Inkscape supports non-destructive editing, enabling users to make changes to objects without permanently altering the original artwork. This preserves the flexibility and editability of the design.
Scripting and automation
Inkscape supports scripting with Python, allowing users to automate repetitive tasks, create custom extensions, and enhance the functionality of the software.
Community support
Inkscape benefits from an active and dedicated community of users, developers, and contributors. The community provides extensive documentation, tutorials, forums, and user support, making it easier for users to learn, troubleshoot, and share their knowledge.
Tutorial: Basics of INKSCAPE
In this tutorial, we will cover the fundamental concepts and tools in Inkscape, helping you get started on your creative journey.
As you become more familiar with the software, you can now unleash your creativity and explore the endless possibilities of Inkscape to bring your artistic visions to life.
Additionally, there are numerous online tutorials, forums, and resources available to further enhance your graphical skills using Inkscape:
- Inkscape Tutorials (Official Inkscape website)
- Tutorials packaged with Inkscape ⤴ (you can find them also in the
Helpmenu >Tutorials)
- Tutorials packaged with Inkscape ⤴ (you can find them also in the
- Inkscape Forum: https://inkscape.org/forums/
InkscapeForum.com is a dedicated community forum where users can ask questions, seek advice, and share their knowledge and experiences related to Inkscape. It’s a great platform for connecting with other Inkscape enthusiasts and getting help with specific issues or challenges.
Installation and Setup
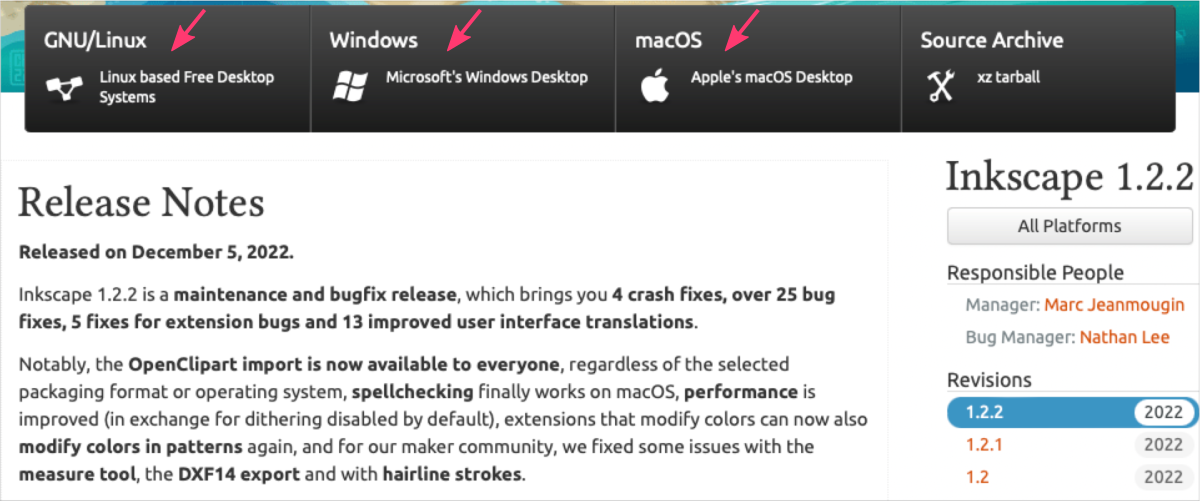
Download INKSCAPE from the official website ⤴ based on your operating system.
- Select the appropriate version for your operating system (Windows, macOS, or Linux)
- Select the correct architecture of your OS (if needed)
- Click on the
Downloadbutton
Run the installer:
- Locate the downloaded Inkscape installer file (usually a .exe file on Windows and .dmg file on MacOS) and
double-clickon it to run the installer. - If prompted, grant necessary permissions to the installer to make changes to your system.
- The installer may present some installation options. Review the options and choose the desired settings, such as the installation location and whether to create shortcuts.
- Follow the prompts and proceed with the installation process.
- Wait for the installer to complete the installation process. This may take a few moments.
Once the installation is finished, you may be presented with an option to launch Inkscape immediately. You can choose to launch it or exit the installer.
Launch INKSCAPE to start the GUI
After installing Inkscape on different operating systems, you can find and launch the software using the following methods:
WINDOWS
1. Start Menu: Click on the Start button located in the lower-left corner of the screen. In the search bar, type “Inkscape” and press Enter. The GIMP application should appear in the search results. Click on it to launch the program.
or
2. Desktop Shortcut: If you selected the option to create a desktop shortcut during the installation process, you can find the Inkscape icon on your desktop. Double-click on the icon to open Inkscape.
macOS
1. Launchpad: Click on the Launchpad icon in the Dock (the rocket ship icon). Use the search bar at the top and type “Inkscape.” As you start typing, the search results will narrow down, and you should see the GIMP icon. Click on it to launch Inkscape.
or
2. Applications Folder: Open a Finder window and navigate to the Applications folder. Scroll through the list of applications until you find Inkscape. Double-click on the Inkscape icon to open the program.
Linux: Ubuntu
1. Dash/Search: Click on the “Show Applications” button (usually located at the bottom left or top left corner of the screen). In the search bar, type “Inkscape” and press Enter. The Inkscape application should appear in the search results. Click on it to launch Inkscape.
or
2. Terminal: Open a terminal window and type “inkscape” (without quotes) and press Enter. Inkscape should start running in the terminal. You can also create a desktop shortcut or add Inkscape to your application launcher for easier access.
When you launch Inkscape for the first time, you may be prompted to configure some initial settings. These settings may include language preferences, default units, and document properties. Adjust these settings according to your preferences.
Congratulations!
You can now begin exploring its features and creating vector graphics with this powerful design tool.
First-time user basics
In this section, we will cover the basic steps to get started with Inkscape, including creating a new document, familiarizing yourself with the interface and layout, understanding the panels, toolbars, and menus, and learning how to navigate the canvas using zooming and panning controls.
Creating a new document
1. Launch Inkscape on your computer
When you launch Inkscape, a new document is automatically created and ready for you to start working on it. This default behavior ensures that you can dive right into your creative process without any additional steps.
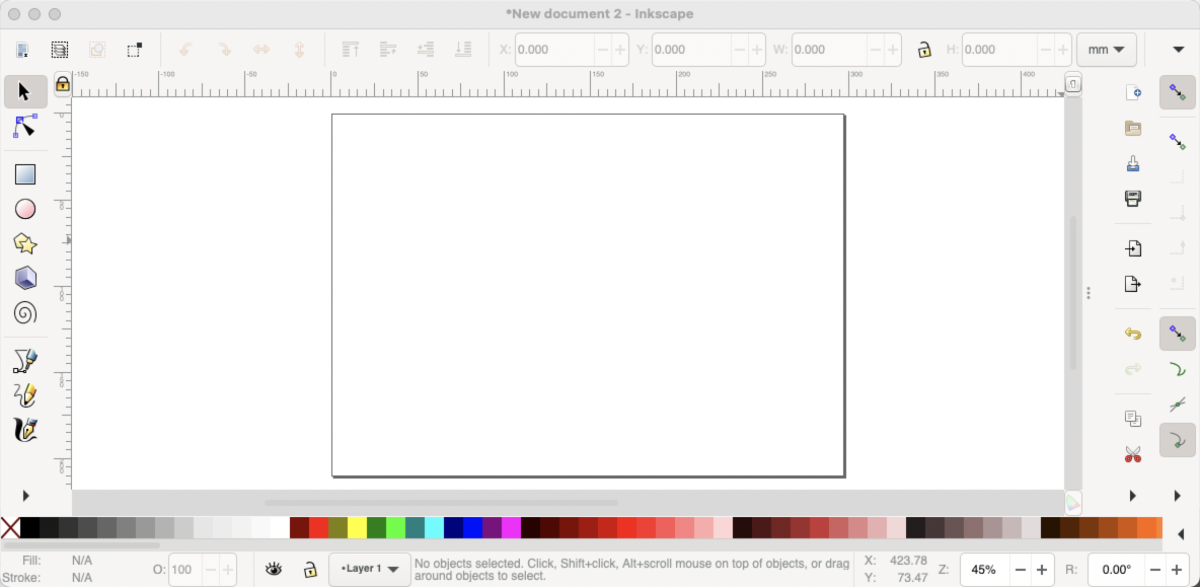
The new document comes with a blank canvas where you can draw, design, and create your vector graphics. From the moment you open Inkscape, you have a fresh workspace to unleash your creativity and bring your ideas to life.
2. Create a New Document
If you have existing artwork in your default Inkscape document and you want to start something new from scratch, you have the option to create a New Inkscape document. Creating a new document allows you to have a clean canvas without affecting or modifying your existing artwork.
- Click on
Filein the menu bar and selectNewor use the keyboard shortcutCtrl+N(Cmd+Non macOS) to create a new document.
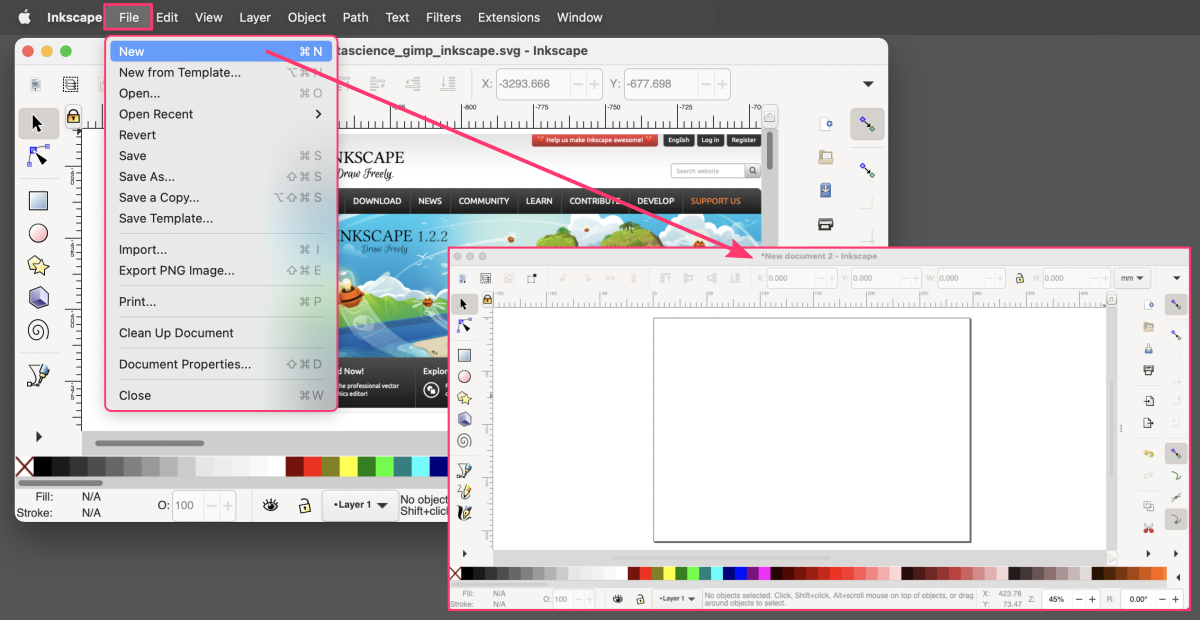
You can easily switch between different documents or work on multiple projects simultaneously. This flexibility enables you to explore new ideas, experiment with different designs, or keep your work organized by separating projects into individual documents.
3. Set the document properties
In Inkscape, you have the flexibility to change document properties at any time to adjust various aspects of your artwork. These properties include the size, orientation, units, and resolution of the document. By modifying these properties, you can tailor the document to meet your specific needs and requirements.
To change the document properties in Inkscape, you can follow these steps:
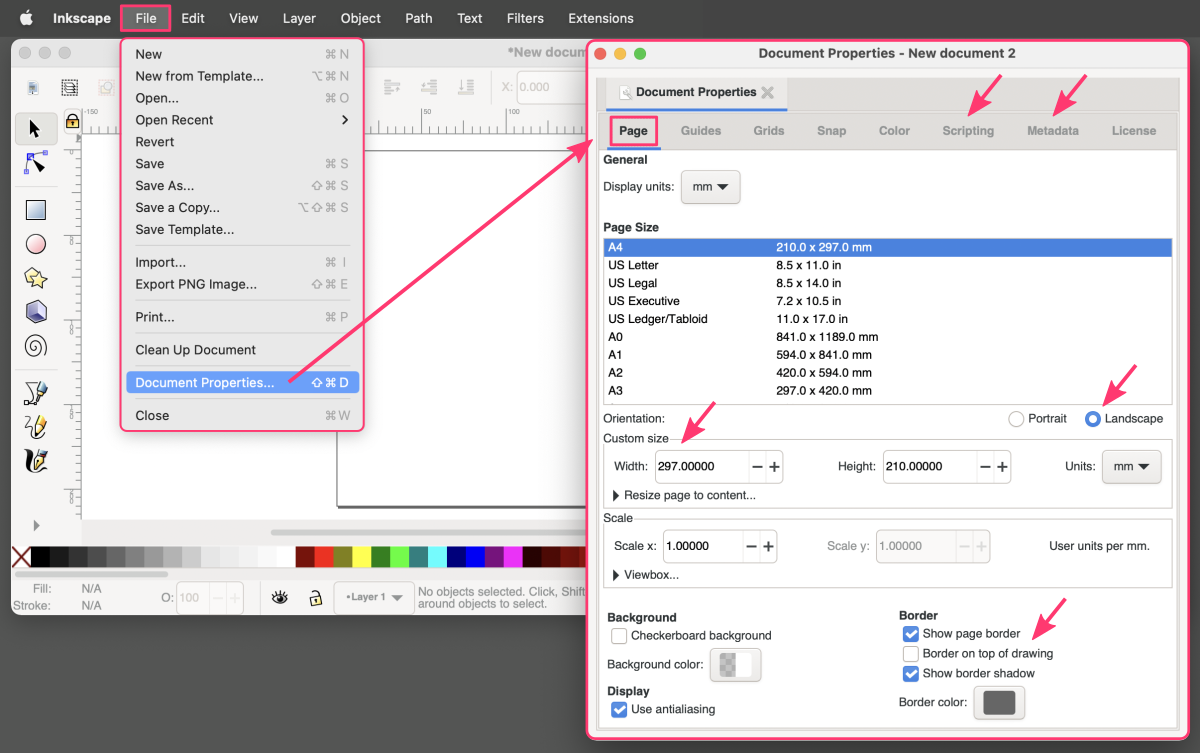
1. Go to the File menu in the menu bar and select Document Properties.
2. The Document Properties dialog box will open, displaying several tabs with different settings.
Page tab
In the Page tab, you can adjust the width and height of the document by entering new values. In the Custom Size section, you can set a custom size for the document by entering your desired dimensions. You can also choose a different measurement unit (e.g., pixels, inches, millimeters) from the dropdown menu. If needed, you can change the document orientation from portrait to landscape or vice versa using the “Orientation” option.
Grids & Guides
The Grids and Guides tabs allow you to configure grid and guide settings for precise alignment and positioning of objects.
Scripting tab
The Scripting tab provides a way to automate tasks and perform advanced operations using scripts in Inkscape. nkscape supports scripting through various languages such as Python, Perl, and Ruby, allowing you to write custom scripts to manipulate objects, apply effects, or perform complex operations.
Within the "Scripting" tab, you can enable or disable scripting support and specify the scripting language you want to use.
Metadata tab
The Metadata tab allows you to add descriptive information and metadata to your Inkscape document. Metadata provides additional context about the document, such as the author, title, description, copyright information, and keywords.
In the "Metadata" tab, you can enter and edit various metadata fields, ensuring that your document is properly identified and documented. By adding metadata, you can organize and categorize your documents, making them more searchable and providing relevant information to others who access your artwork.
"Scripting" and "Metadata," provide advanced features that allow you to extend the functionality of Inkscape through scripting and add important metadata to your documents. While they may not be utilized by all users, they offer powerful capabilities for automation, customization, and documentation purposes.
Interface and Layout
Once you have created a new document, you will see the Inkscape interface. The main window consists of the canvas where you create and edit your artwork. Surrounding the canvas, you will find various panels, toolbars, and menus that provide access to different functions and tools.
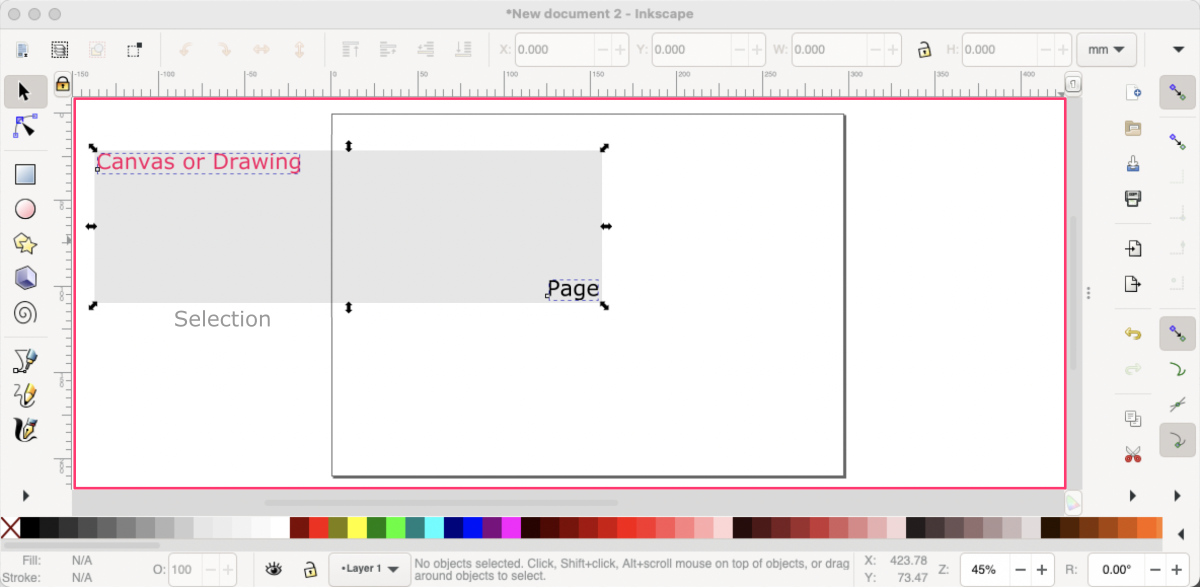
Within the Canvas layout you can distinguish the Page and Drawing sections:
- the Drawing mode represents the entire canvas or document properties, it scales up when you zoom out and gives you more working space (e.g., to store temporary objects)
- the Page mode allows you to create and modify individual objects within the bordered fragment of canvas, its size remain the same and represents the
Document Propertiessettings - the Selection mode focuses on selecting and manipulating objects within the Drawing
Understanding these modes helps you navigate and work effectively in Inkscape, enabling you to create and edit your vector graphics with precision and control.
Different Panels, Toolbars, and Menus
Inkscape’s interface surrounds the canvas with a range of panels, toolbars, and menus, offering a comprehensive array of functions and tools at your fingertips. These elements provide seamless access to a wide range of features, enabling you to efficiently navigate through different tasks and workflows while working on your vector graphics projects.
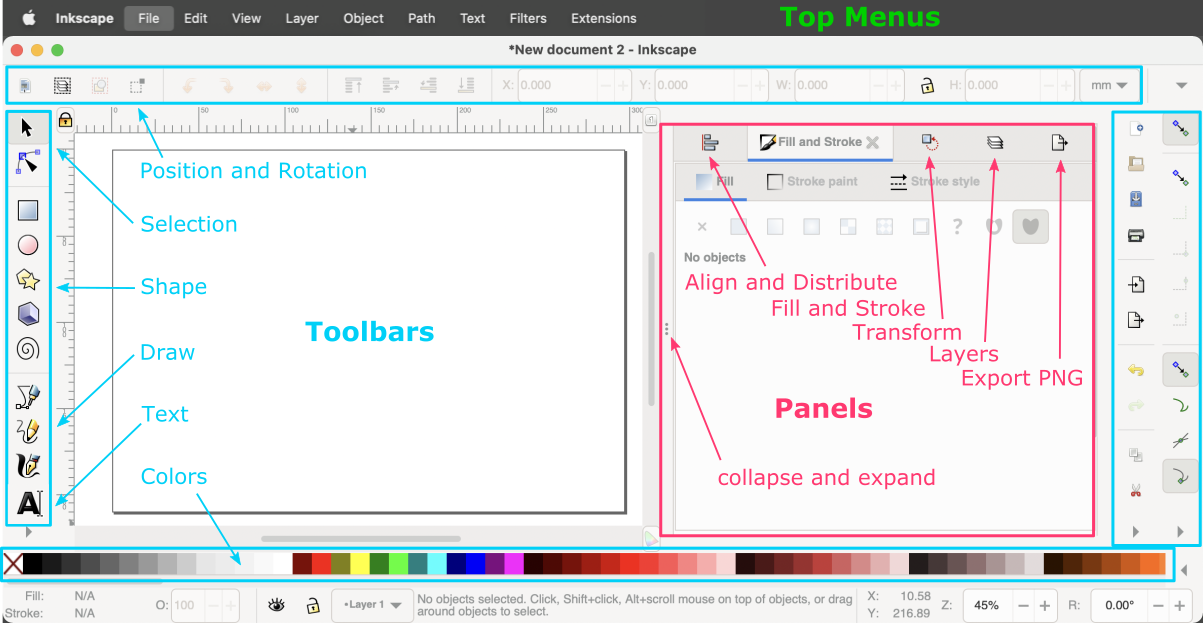
PANELS
Inkscape offers several panels that provide access to tools, settings, and information. Common panels include:
Align and Distributepanel (to align and distribute objects),Fill and Strokepanel (to control object colors and strokes),Transformpanel (to move, scale, rotate, skew, and matrix objects),Layerspanel (to manage layers),- and
Export PNG Imagepanel.
TOOLBARS
Inkscape has several toolbars that contain various drawing and editing tools. These toolbars are located at the top, left, and right sides of the interface.
- Top toolbars:
The top toolbar is located at the top of the Inkscape interface, just below the menu bar, and contains options for working with selections.Select allorToogle selection boxfor multi-object selectionRotationbuttonsDistributeto rise or lower selection in the stackPosition and Sizeof the selectionPadlockto freeze the proportionScalingoptions
- Top toolbars:
The left toolbar is positioned vertically along the left side of the Inkscape interface. It provides quick access to various drawing and editing tools.Selectfor selecting and manipulating objects,Edit pathsof shapes by moving nodes,Shapefor drawing basic shapes,Drawfor drawing straight and freehand lines andTexttoolbar for working with text
- Top toolbars:
The right toolbar is located vertically along the right side of the Inkscape interface. It offers additional tools and options for working with objects, layers, and transformations.- additional tools for managing layers, adjusting the transparency and blending modes of objects, grouping objects, applying filters and effects, working with clones and symbols, editing gradients and patterns, and more.
- Color Toolbar
is a horizontal toolbar located at the bottom of the interface. It provides convenient access to color-related options and controls for working with fills, strokes, gradients, patterns, and more. It allows you to quickly customize and modify the appearance of your vector graphics by choosing and manipulating colors directly from the toolbar.
TOP MENUS
Inkscape provides a menu bar at the top of the interface with various menus, such as File, Edit, View, Layer, Object, Path, Text, Filers, and more. These menus contain additional commands and options for working with your artwork. The top menu bar also includes more advanced options for working with paths, text, filters, extensions, and exporting your artwork in various formats, giving you comprehensive control over your design process.
Take some time to explore the interface, panels, toolbars, and menus to familiarize yourself with the layout of Inkscape. Understanding the different elements will help you navigate the software efficiently and access the tools and functions you need to create your vector artwork.
Navigating & Zooming the Canvas
Practice navigating the canvas using the scrollbars, zoom in and out using the zoom controls, and pan the canvas by holding down the spacebar and dragging the canvas. These basic operations will form the foundation for your work in Inkscape.
Navigating
To navigate the canvas, you can use the scrollbars located at the right and bottom edges of the interface. Click and drag (or scroll over) the scrollbars to move around the canvas.
Zooming In and Out
You can zoom in and out on the canvas using several methods:
-
The easiest way is to use the zoom controls in the bottom-right corner of the interface. Click the plus (+) button to zoom in and the minus (-) button to zoom out.
-
You can also use the
Ctrl+Mouse Wheelshortcut to zoom in and out.
Working with shapes
In this section, we will explore the various shape tools available in Inkscape, learn how to create basic geometric shapes, and discover ways to modify them using the selection and node editing tools.
Creating shapes and objects
Exploring the Shape Tools and Creating Basic Geometric Shapes
Inkscape provides a variety of shape tools located in the left toolbar. These include the Rectangle, Ellipse, Star, Polygon, and Spiral tools.
- Select the desired shape tool and
click and dragon the canvas to create the shape. Holding theCtrlkey while dragging helps maintain proportions.
Modifying Shapes using the Selection and Color Tools
The Selection tool (arrow icon) allows you to select and manipulate individual shapes.
- Click on a shape to select it and use the handles to resize the object.
- Customize the shape’s position by moving the selected object (while left-mouse is clicked-and-holded).
- Click on the selected shape again to change handles to rotation mode and rotate the object.
- Apply selected fill color by using the color palette available in the
Color Toolbarat the bottom.
Editing paths and anchor points
The Node tool (icon just below the Selection) lets you edit the shape’s nodes and control points. Clicking on a node allows you to modify its position, shape, or curvature.
- Experiment with selecting multiple shapes and editing the shape’s path by using the
Nodestool:- to refine the shape’s outline, e.g., to round the corners of the rectangle
- to change the shape’s size
Distributing objects
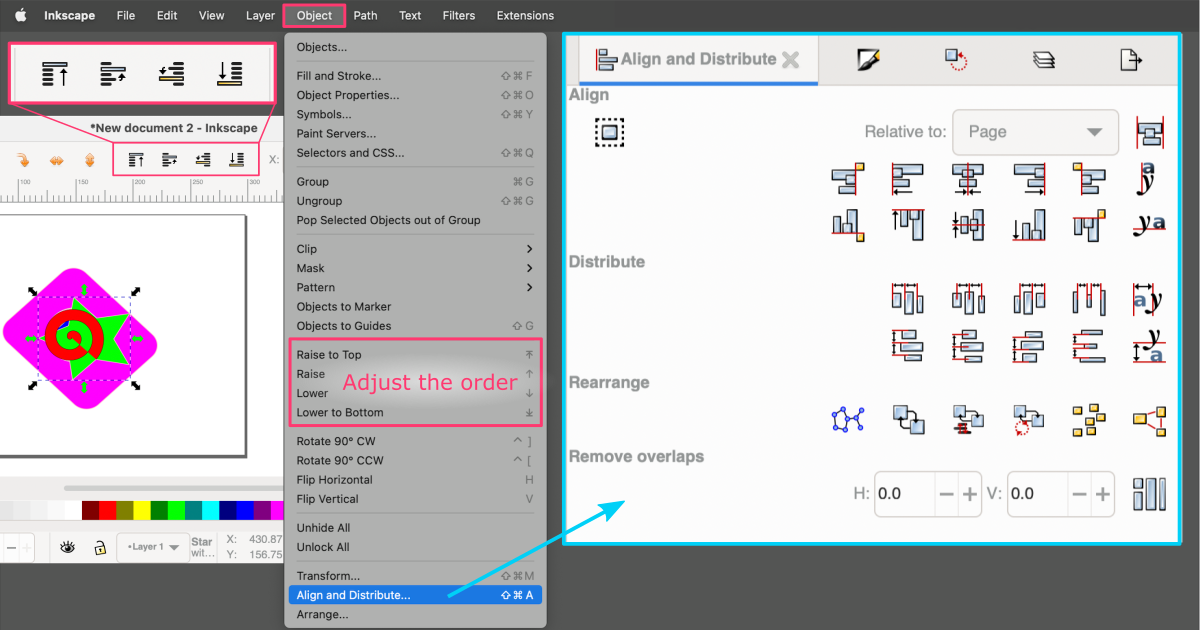
In Inkscape, aligning, distributing, and adjusting the stacking order of objects are essential techniques for precise positioning and organizing your artwork.
In the Align and Distribute panel, you can align objects horizontally or vertically, distribute them evenly, or align them to the page or to the selection.
Adjusting the stacking order through raising and lowering objects allows you to control which objects appear in front or behind others, providing depth and visual hierarchy to your designs.
Aligning Objects:
Aligning objects allows you to position them relative to each other with precision.
- To align objects, select multiple objects by holding
Shiftand clicking on them, then go to Object tab in the top menu bar and chooseAlign and Distribute.- Click the corresponding alignment buttons to align the selected objects based on your chosen settings.
Distributing Objects:
Distributing objects ensures equal spacing between multiple objects.
- With the objects selected, go to Object tab in the top menu bar, choose
Align and Distribute, and navigate to the “Distribute” tsection in the Align and Distribute panel.- Here, you can distribute the objects evenly either horizontally or vertically, or specify a specific spacing value. Click the appropriate distribution button to distribute the selected objects according to the chosen distribution method.
Adjusting the Stacking Order
The stacking order of objects determines which objects appear in front or behind others.
- To adjust the stacking order, select the object you want to move and go to Object tab in the top menu bar, then navigate to
RaiseorLoweroptions. Raise moves the selected object one level higher in the stacking order, while Lower moves it one level lower. - Alternatively, you can
right-clickon an object, hover overStacktoolbar buttons (at the top), and choose options to raise, lower, bring to front, or send to back.
Applying colors and gradients
In Inkscape, there are various coloring options available to customize the appearance of your artwork. Two key features for controlling colors are the Color palette in the bottom toolbar and the Fill and Stroke panel.
Color Palette in the Bottom Toolbar
The Color palette is located in the bottom toolbar of the Inkscape interface. It provides quick access to a set of colors that you can apply to the fill and stroke of objects in your artwork.
- By clicking on a color swatch in the palette, you can instantly apply that color to the selected object(s) or set it as the active color for future use.
Fill and Stroke Panel
The Fill and Stroke panel in Inkscape offers comprehensive control over the coloring properties of objects. It also includes advanced features like blur, opacity, and the ability to apply multiple strokes and fills to an object.
- To access the panel, go to Object tab in the top menu bar, select
Fill and Strokeor pressShift+Ctrl+F.- In the Fill tab, you can choose the fill color, apply gradients or patterns, adjust opacity, and enable or disable the fill altogether.
- In the Stroke tab, you can set the stroke color, modify stroke width, apply different stroke styles, such as dashes, and control stroke opacity.
- The
Stroke Styletab provides additional options to customize the appearance and behavior of the stroke applied to objects, such as stroke width, line style, join (corner style), cap (stroke endings style), and more.
Working with Text
By utilizing the various text tools and options in Inkscape, you can easily add, edit, format, and enhance text within your artwork, allowing for creative typography and effective communication of your design concepts.
Adding Text
- To add text, select the
Texttool from the left toolbar (A icon) or press “T” letter on your keyboard. - Click on the canvas where you want to place the text, and a text cursor will appear.
- Start typing or paste (using
Ctrl + Vshortcut) your desired text, and it will be inserted as a text object.
Editing Text
- To edit existing text, select the text object using the
Selecttool (arrow icon) or by clicking on the text. - You can then modify the text content by typing directly into the text object or using the
Texttool. - Adjust the font, size, alignment, and other formatting options using the options in the top toolbar.
Formatting Text
Inkscape provides several options for formatting text. With the text object selected, you can:
-
Change the font: face, size, and style using the Font Family, Font Size, and Font Style options in the top toolbar.
-
Apply text decoration: bold, italic, underline, or strikethrough styles using the corresponding buttons in the top toolbar.
-
Adjust the text alignment: left, center, right using the alignment buttons in the top toolbar.
-
Change the color of the text by selecting the text object and applying a fill color using the
Fill and Strokepanel (just like on other shapes).
Text Effects
Inkscape offers additional text effects to enhance the appearance of text. With the text object selected, you can:
-
Apply various text effects such as drop shadows, outlines, and blur using the filters in the
Filterstab in the top menu bar. -
Warp and transform the text by selecting the text object and using the
Path > Object to PathorPath > Path Effectoptions. -
Convert the text to a path by selecting the text object and choosing
Path > Object to Path, allowing for more advanced editing and manipulation.
Text on a Path
Inkscape allows you to place text along a path or shape.
- Draw a path or select an existing shape.
- Then, select the
Texttool and click on the path or shape to insert text that flows along it. - Adjust the position and orientation of the text on the path using the
Selecttool and the handles that appear when the text object is selected.
Saving and Exporting
In Inkscape, you have different options for saving and exporting your artwork. Choose the option that best suits your needs based on the desired output format and purpose of your artwork.
Saving
The File > Save option allows you to save your Inkscape document in its native SVG format. Saving your work as an SVG file preserves the vector data, layers, and other editing capabilities.
Use this option when you want to save your work to continue editing it in Inkscape later.
The File > Save As option lets you save your Inkscape document in various file formats, including SVG, PNG, PDF, EPS, and more.
- Choose the desired file format from the dropdown menu, specify the file name and location, and click Save.
Use this option when you want to export your artwork in a specific format for sharing or use in other applications.
Exporting PNG
The File > Export PNG Image option allows you to export your artwork as a raster image in the PNG format.
- Specify the desired image size, resolution, and other options in the Export PNG Image dialog box, and click Export.
This option is useful when you want to share your artwork as a high-quality image or when you need a raster image format for web or print purposes.