
DataScience Workbook / 06. High-Performance Computing (HPC) / 2. Remote Access to HPC Resources / 2.1 Virtual Private Network (VPN) Connection
Introduction
To access the shared computing machine (e.g., cluster on the HPC system), a user needs to connect to it remotely over a network because direct physical usage is typically not possible. The VPN client software is a program that allows a user to connect to a VPN server and establish a secure and private connection to the organization’s internal network, from where HPC resources are available.
What is VPN?
Virtual Private Network (VPN) is a technology that allows users to securely access a private network over the Internet through an encrypted tunnel. VPNs are often used by businesses and research institutions to remotely access their organization’s internal network and protect sensitive data while using public Wi-Fi or other untrusted networks. Some VPN services are also provided by third-party companies for personal use. The user can then connect to the VPN server to encrypt the internet traffic and protect their online privacy. Some VPNs also help users to work around censorship and enter restricted websites and services.
A VPN is typically created by a company or organization to provide secure remote access to their internal network for their employees or authorized users. The VPN server is set up and maintained by the organization, and users are provided with a VPN client software or configuration settings that allow them to connect to the VPN server.
There are several different types of VPNs, including:
- site-to-site VPNs, which connect two networks together, e.g., the corporate office to branch offices
- client-to-site VPNs, which allow individual users to securely access the organization’s network while being outside the corporate office (off-campus).
How VPN works?
When you use a VPN, your internet traffic is routed through a remote server, and your IP address is replaced with the IP address of the VPN server. This creates a secure and private connection that can be used to access resources on a remote network or to browse the internet privately. To establish a VPN connection, the user runs the VPN client software, which initiates the connection with the VPN server.
Here’s how the VPN works:
- The user connects to the VPN server, which acts as an intermediary between the user’s device and the Internet.
- The VPN client software encrypts the user’s Internet traffic and routes it through the VPN server to the destination website or service.
- The destination website or service receives the encrypted traffic from the VPN server and sends its response back through the VPN server to the user’s device.
- The VPN client software on the user’s device decrypts the response and presents the unencrypted data to the user.
VPN client software
VPN client software is a program or application that allows a user to connect to a VPN server and establish a secure and private network connection. The software typically is intalled and runs on the user’s device, such as a computer or mobile device, and encrypts all traffic going to and from the device, creating a secure tunnel through which the user can access the internet or other network resources.
Popular VPN client software includes:
- OpenVPN, https://openvpn.net/ ⤴
- Cisco AnyConnect, anyconnect-secure-mobility-client ⤴
- NordVPN, https://nordvpn.com/ ⤴
- ExpressVPN, https://www.expressvpn.com/ ⤴
Each VPN client software has its own unique features and user interface, but they all work in a similar way. Once you have installed the software, you will need to enter the details provided by your VPN provider to connect to the VPN server.
| Feature | OpenVPN | Cisco AnyConnect | NordVPN | ExpressVPN |
|---|---|---|---|---|
| Open-source | YES | NO | NO | NO |
| Multi-platform support | YES | YES | YES | YES |
| Encryption strength | Up to 256-bit AES | Up to 256-bit AES | Up to 256-bit AES | Up to 256-bit AES |
| VPN type | third-party | client-based | third-party | third-party |
| connection type | external servers | organization’s servers | external servers | external servers |
^Third-party VPN client software are not affiliated with any particular VPN service provider, and users can choose from a range of providers that support their preferred client.
Cisco AnyConnect is a popular solution that is widely used in many businesses and research institutions.
For a practical example of how to install and use this software, see the hands-on tutorial section below.
Hands-on tutorial
When accessing remote HPC system using VPN, you first need to establish a VPN connection between your local machine and the remote network. This is typically done using VPN client software that you install on your local machine. In this example, we will use the Cisco AnyConnect application, which is a popular choice in many research institutions to provide a secure access to their internal network from off-campus locations.
Download VPN client
1. First, download the VPN client software. Here,it is the AnyConnect Secure Mobility Client ⤴.
Select a version that is compatible with your operating system.
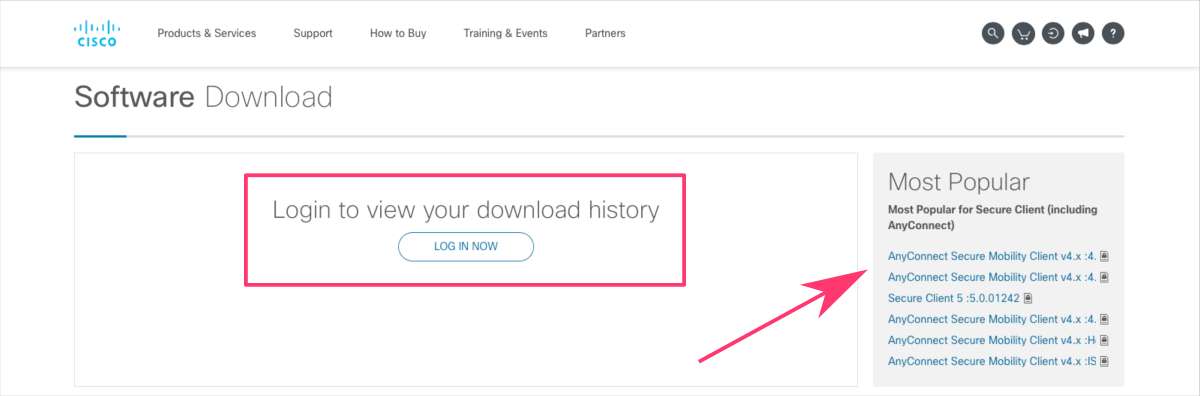
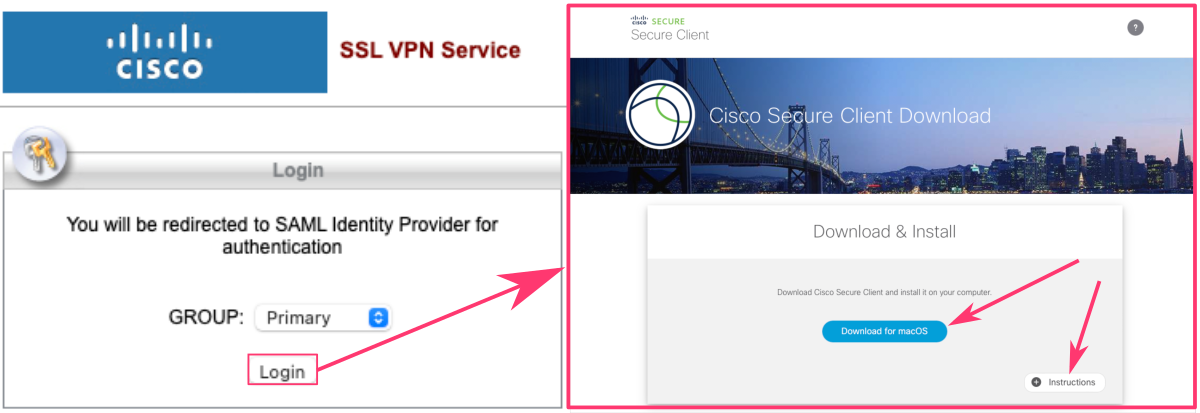
Note that your organization may provide a custom link to download the specific versions of the VPN client software. For example, if you are an employee of Iowa State University, you should download the Cisco Secure Client from http://vpn.iastate.edu/ ⤴
Installation of Cisco AnyConnect
You can use the Instructions button in bottom-right corner of the page to unfold the detailed instructions for the installation:
- Click the Download button to save installation package.
- Locate the downloaded file on your file system (typically in the Downloads folder) and open it (typically by double-click).
- The file will mount a disk image. Open it and launch the file named something like
cisco-secure-client-macos-XXXXXX. - Click Continue button on the “Welcome to the Cisco Secure Client Installer” screen.
- Click Continue button on the software license agreement screen and then click Agree on the slide down dialog.
- Click Install to begin installation.
- Enter your device’s password to approve the installation. It is needed because Cisco Secure Client requires administrative privileges.
- You have successfully installed the Cisco Secure Client and it is now ready for use.

Launch VPN connection
To open the Cisco Secure Client, browse your File System (Application folder on MacOS) and double click.
You can drag the icon to your Dock/Menu Bar to have a Cisco Client shortcut and speed up the use next time.
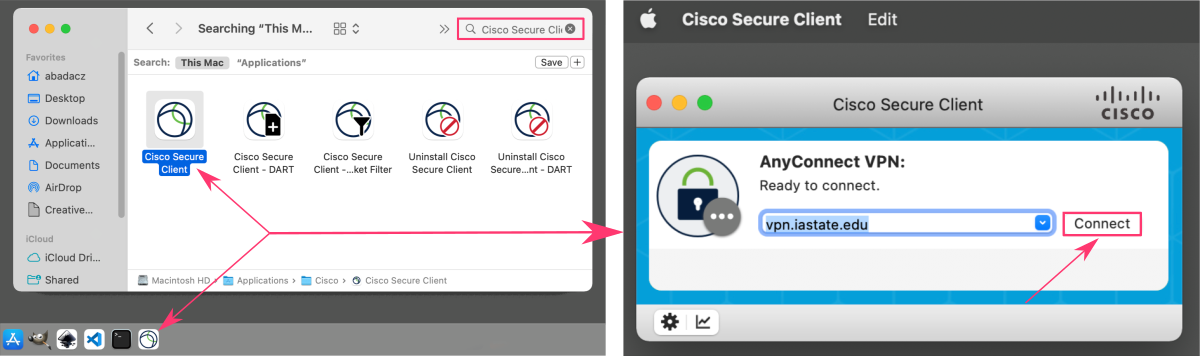
Running the VPN client software initiates your connection with the VPN server. The client (your local machine) and server exchange encryption keys and authenticate each other, and then establish an encrypted tunnel for data transfer.
Once the VPN connection is established, you can access the remote network as if you were directly connected to it (e.g., when you are physically on campus). Then, you can use SSH or other protocols to access the data stored on the remote machines.
It's important to note that you may need to have appropriate permissions and credentials to access the data stored on the remote machine, and you may need to follow specific security policies and procedures to access the data securely.
Quick guide for SSH over VPN
Once the VPN connection is established, you can access the remote network as if you were directly connected to it. So, all you need is to open the terminal window and log in to the HPC resources using an SSH connection.
Accessing data using Secure Shell (SSH) typically involves using a terminal or command-line interface, rather than a graphical user interface (GUI).
Start by opening a terminal window on your local machine.
If you do NOT know what the terminal is, start with this tutorial: Terminal, a text-based interface for command-line operations ⤴.
Then, enter the following command to log into the remote machine:
ssh username@remote-hostname
where username is your username on the remote machine and remote-hostname is the hostname or IP address of the remote machine,
e.g., abadacz@nova.its.iastate.edu
You will be prompted to enter your password for the remote machine, and if the login is successful, you will be logged into the remote resources and have access to its file system.
Learn more about the Secure Shell (SSH) Protocol from the following tutorial in this section:
2.2 Secure Shell Connection (SSH) ⤴.
Also, get the advantage of useful SSH shortcuts and set up password-less access to your remote computing systems with this step-by-step guide:
2.2.1 SSH shortcuts and password-less login ⤴.
Further Reading
- 2.2 Secure Shell Connection (SSH)
- 2.3 Open On Demand (OOD) Connection
-
learn more about Remote Data Access in section 7: Data Acquisition
- 3. Setting up Your Home Directory for Data Analysis
- 4. Software Available on HPC
- 5. Introduction to Job Scheduling
- 6. Introduction to GNU Parallel
- 7. Introduction to Containers