
DataScience Workbook / 04. Development Environment / 2. Python programming environment(s) / 2.3 Python Setup on your computing machine
Introduction
In this section, we will cover the process of setting up Python on a local machine. Python is a popular programming language used for various purposes such as data analysis, machine learning, web development, and more. Setting up Python on your local machine is an essential step for getting started with Python programming, and we will provide a step-by-step guide to help you through the process.
More information from external sources
- Python official website: https://www.python.org ⤴
- Wikipedia: Python (programming language ⤴
- List of Python projects on GitHub ⤴
Python-related sections in this workbook:
- Python Programming Environment(s) ⤴
- Introduction to Python Programming ⤴
- Manipulating Text Files with Python ⤴
- Plotly-Dash: Data Processing & Interactive Plotting with Python ⤴
Sections in this tutorial:
- Get Python on your local machine
- Pick an Integrated Development Environment
- Pick a Python Virtual Environment Manager
- Instal Python Libraries
Tips & Warnings
For installing Python either pick Anaconda or local install via package manager. Try not to mix install methods or you will have conflict errors and may need to uninstall and reinstall python entirely.
Due to incompatabilities between certain python libraries, it is highly recommended to manage python packages in virtual environments (conda , venv, or equivalent), one environment per project.
1. Get Python locally
There are several ways to install Python on a local machine, depending on the operating system and the specific version of Python you want to use. Here are some of the most common options:
A. Downloading the installer from the official Python website
This option allows you to download and install the latest version of Python directly from the official Python website. You can choose between the different versions of Python, including the latest stable version, as well as older versions.
Best for: Windows, macOS, Linux
B. Using a package manager
Many Linux distributions come with Python pre-installed, but if you need a different version or want to install Python on a different operating system, you can use a package manager. For example, on macOS, you can use brew, and on Ubuntu, you can use apt-get.
Best for: Linux, macOS
C. Using an Integrated Development Environment (IDE)
Some integrated development environments (IDEs) and text editors come with Python pre-installed or have built-in support for Python. For example, Anaconda and PyCharm are popular Python IDEs that come with Python pre-installed.
Best for: Windows, macOS, Linux
PROS & CONS
| A. Official Installer | B. Package Manager | C. IDE, e.g., Anaconda |
|---|---|---|
| ✓ Easy to use and install | ✓ Makes installation and upgrading of Python easier | ✓ Comes with pre-installed Python and additional packages and tools |
| ✓ Allows installation of any Python version | ✓ Usually comes with additional packages and tools | ✓ Allows easy management of virtual environments |
| ✓ Works on all operating systems | ✓ Handles dependencies automatically | ✓ Comes with an integrated development environment (IDE) |
| ✗ May require manual configuration for some systems | ✗ May not have the latest version of Python | ✗ May not have the latest version of Python |
| ✗ May not include additional packages and tools | ✗ May require additional configuration to work properly | ✗ May require additional configuration to work properly |
^ Anaconda comes with an IDE that provides easier entry point (recommended for Windows).
^ Local Install is more consistent for intermediate programmers.
Which installation on my Operating System?
| Windows | macOS | Linux |
|---|---|---|
| The official installer is the easiest option for Windows users, as it works on all versions of Windows and requires no additional configuration. | MacOS comes with a pre-installed version of Python, but it may not be the latest version. | The official installer also works on Linux and is a good option for users who want to install a specific version of Python. |
| Users who prefer to use a package manager or an IDE such as Anaconda can do so as well. | Users who want to use the latest version of Python can use the official installer or an IDE such as Anaconda. | Users who prefer a graphical interface (GUI)may find an IDE such as Anaconda easier to use. |
| package manager option unavailable | Users who prefer to use a package manager can use Homebrew. | Linux users may prefer to use a package manager via command line (CLI) such as apt-get or yum to install Python. |
| recommended: Anaconda | recommended: package manager | recommended: package manager |
A. Official Installer
If you prefer a pure python install (only command line and without IDE), install the latest version of Python from their website - https://www.python.org/downloads/ ⤴. The development environment can be selected and installed separately later.
Follow the instructions for your operating system to install Python using an official installer.
WINDOWS (via GUI, recommended)
1. Go to the official Python website at https://www.python.org/downloads/windows/ ⤴.
2. Scroll down to the Stable Releases section and click on the:
3. Run the downloaded executable (`EXE`) file and follow the instructions in the installation wizard.
macOS (via GUI, recommended)
1. Go to the official Python website at https://www.python.org/downloads/macos/ ⤴.
2. Scroll down to the Stable Releases section and click on the "Download macOS 64-bit installer".
3. Run the downloaded `PKG` file and follow the instructions in the installation wizard.
Linux (via CLI, not recommended)
The installation process on Linux can vary depending on the distribution you're using.
1. Open the terminal. 2. Update your package list:
sudo apt-get update
3. Install the required packages for Python:
sudo apt-get install build-essential zlib1g-dev libncurses5-dev libgdbm-dev libnss3-dev libssl-dev libreadline-dev libffi-dev
4. Download the Python source code from the official website at https://www.python.org/downloads/source/ ⤴.
5. Extract the downloaded archive. Replace "x.x.x" with the version number you downloaded.
tar -xf Python-x.x.x.tgz

cd Python-x.x.x
6. Configure the build options. This will build a version of Python with optimizations enabled.
./configure --enable-optimizations
7. Build and install Python. Replace "N" with the number of cores in your CPU to speed up the build process.
make -j N

sudo make install
B. via Package Manager
When you install Python using a package manager, you are getting the core Python programming language, the Python interpreter, and its standard library, but you will still need to separately install an IDE or other tools if you want to develop Python code using a more feature-rich development environment.
Using a package manager from the command line allows you to easily install, update, and remove packages, including Python and its dependencies.
WINDOWS (not available)
macOS (via CLI, recommended)
Homebrew is a popular package manager for MacOS that can be used to install Python.
0. Install Homebrew, if needed:
Install Homebrew by opening a terminal and running the following command:
/bin/bash -c "$(curl -fsSL https://raw.githubusercontent.com/Homebrew/install/HEAD/install.sh)"
1. Once Homebrew is installed, run the following command to update the package list:
brew update
2. To install the latest version of Python available in Homebrew use the following command:
brew install python
If you want to install a specific version of Python, you can use the following command instead:
brew install python@3.9
Replace "3.9" with the version number you want to install.
Linux (via CLI, recommended)
Ubuntu and Debian both use the apt package manager, which can be used to install Python.
Here's how to install Python using apt:
1. Open the terminal and run the following command to update the package list:
sudo apt update
2. Install Python using the following command:
sudo apt install python3
This will install the latest version of Python 3 available in the Ubuntu/Debian repositories. If you want to install a specific version of Python, you can use the following command instead:
sudo apt install python3.9
C. via Anaconda
Anaconda is an open-source distribution of Python that includes the Conda package and environment management system, along with a curated collection of popular Python packages and tools commonly used in data science. It provides a convenient way for users to install and manage Python packages, libraries, and dependencies for data analysis, machine learning, and other scientific computing tasks.
Anaconda is a popular choice for data scientists, researchers, and developers who work with large datasets and complex computations. It provides a streamlined and consistent way to set up and manage Python environments and packages, making it easier to get started with data analysis and scientific computing.
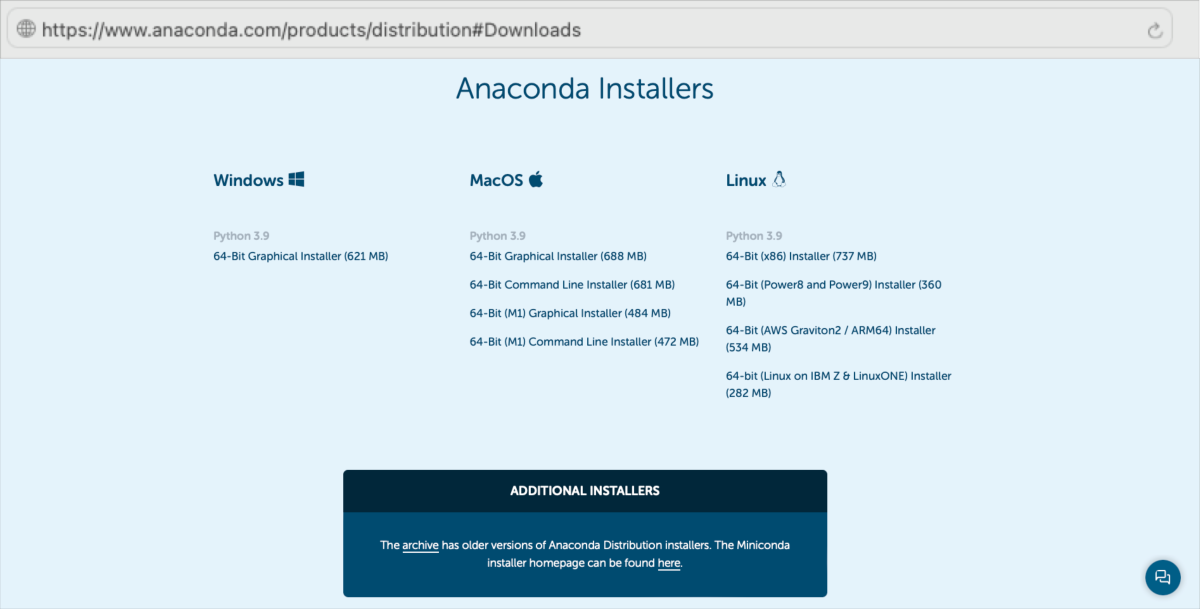
INSTALL ANACONDA https://www.anaconda.com/products/distribution#Downloads ⤴
Windows (recommended)
1. Download the Anaconda installer for Windows from the Anaconda website: https://www.anaconda.com/products/individual#windows ⤴2. Once the installer is downloaded, click on it to start the installation process. Follow the prompts in the installer to choose the installation location, select any additional options or packages you would like to install, and complete the installation.
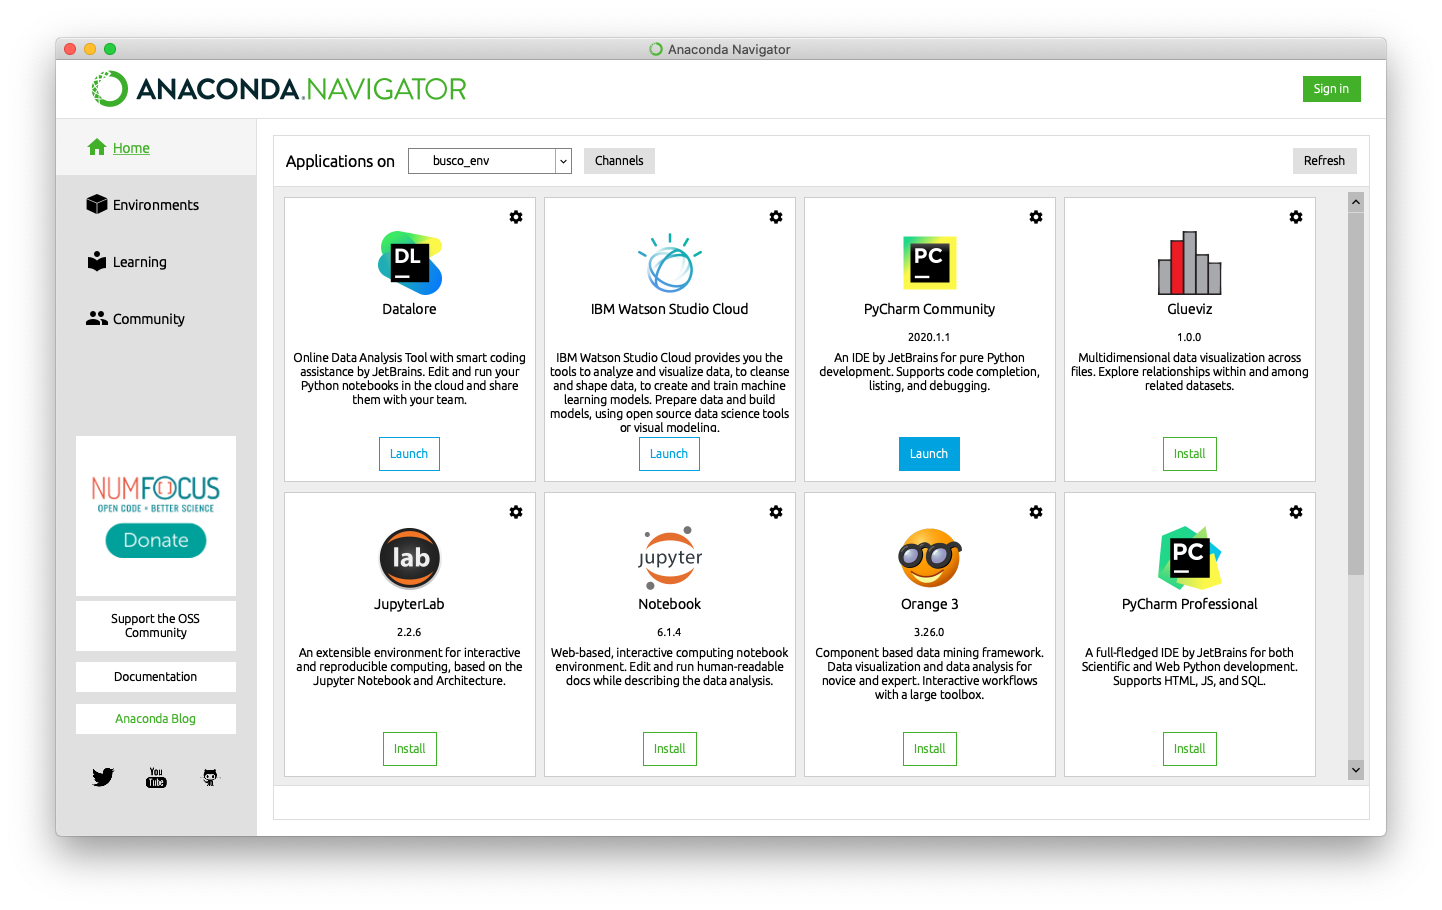
3. After the installation is complete, open the Anaconda Navigator application from the Start menu.
4. From the Anaconda Navigator, you can create a new Python environment by clicking on the "Environments" tab and then clicking the "Create" button. Choose the name and Python version for the environment, and then click "Create" to create the new environment.
5. You can now install any additional packages or libraries you need using the "Packages" tab in the Anaconda Navigator, or by running the
conda install command in a terminal or command prompt.
macOS
1. Download the Anaconda installer for macOS from the Anaconda website: https://www.anaconda.com/products/individual#macos ⤴2. Once the installer is downloaded, open the
.dmg file and run the Anaconda installer application. 3. Follow the prompts in the installer to choose the installation location, select any additional options or packages you would like to install, and complete the installation.
4. After the installation is complete, open the <bAnaconda Navigator</b> application from the Applications folder.
5. From the Anaconda Navigator, you can create a new Python environment by clicking on the "Environments" tab and then clicking the "Create" button. Choose the name and Python version for the environment, and then click "Create" to create the new environment.
6. You can now install any additional packages or libraries you need using the "Packages" tab in the Anaconda Navigator, or by running the
conda install command in a terminal or command prompt.
Linux
1. Download the Anaconda installer for Linux from the Anaconda website: https://www.anaconda.com/products/individual#linux ⤴For example using wget command:
wget https://repo.anaconda.com/archive/Anaconda3-2022.10-Linux-x86_64.sh
2. Open a terminal and navigate to the directory where the Anaconda installer was downloaded.
3. Run the following command to make the installer executable:
chmod +x Anaconda*.sh
4. Run the Anaconda installer by running the following command, replacing {version} with the version number of the Anaconda installer:
./Anaconda{version}.sh
5. Follow the prompts in the installer to choose the installation location, select any additional options or packages you would like to install, and complete the installation.
6. After the installation is complete, open a new terminal window to activate the base environment by running the command:
conda activate base
7. From the terminal, you can create a new Python environment by running the following command, replacing "myenv" with the name you would like to give your environment.
conda create --name myenv python=3.9
8. Activate the new environment by running the command and replacing "myenv" with the name of your environment:
conda activate myenv
9. You can now install any additional packages or libraries you need using the
conda install command.
Anaconda provides a graphical user interface (GUI) called Anaconda Navigator, which makes it easier to manage environments and packages using a point-and-click interface.
2. Select Development Environment
Choosing the right development environment is essential for coding in Python as it can significantly impact the productivity and efficiency of the developer.
An Integrated Development Environment (IDE) is a software tool that provides a comprehensive set of features, including:
code editing, debugging, testing, and deployment.
Here are some of the reasons why choosing the right development environment is important:
| FEATURE | EXPLANATION |
|---|---|
| code editing | A good development environment should provide a code editor that supports syntax highlighting, auto-completion, and code formatting. This can help to write clean, readable, and error-free code. |
| debugging | Debugging is an essential part of the development process. A development environment should have a built-in debugger that allows you to step through the code and identify errors and bugs. |
| testing | A development environment should have tools for unit testing, integration testing, and performance testing. This helps to ensure that the code is working as expected and meets the requirements. |
| version control | Having built-in version control (like Git) in a development environment provides benefits such as tracking changes, enabling collaboration, documenting changes, managing dependencies, and aiding project management. |
| collaboration | A development environment should support collaboration with other developers. This includes features like version control, code review, and collaboration tools. |
Choosing the development environment for Python projects depends on personal preferences, operating systems, and the specific requirements of the project. Some of the best choices include:
-
PyCharm ⤴ is a powerful and popular development environment for Python
Learn more from the hands-on tutorial: PyCharm: IDE for Professional Python Developers ⤴ -
Visual Studio Code (VSC) ⤴ is a lightweight and versatile code editor that can be used for Python development
Learn more from the hands-on tutorial: Visual Studio Code: Multi-language Integrated DE ⤴ - Jupyter Notebook ⤴ is a web-based development environment that is ideal for Python-based data science
Learn more from the hands-on tutorial: Jupyter: Interactive Web-Based Multi-Kernel DE ⤴
-
Repl.it ⤴ is an online development environment that supports multiple programming languages, including Python. Note: It requires to sign up, a free plan includes 0.5 GB of account storage.
- Vim ⤴ is a highly customizable and powerful in-terminal code editor
Learn more from the hands-on tutorial: Command Line Text Files Editors: nano, vim ⤴
All of them can be used in Windows, macOS, and Linux.
Follow a discussion on Python IDE - https://realpython.com/python-ides-code-editors-guide/ ⤴
3. Manage Python environments
Python environments are an important aspect of Python development, as they allow developers to isolate different versions of Python and related sets of Python packages and dependencies. This is particularly important when working on multiple projects, as it can help avoid conflicts and ensure that each project has access to the specific dependencies it requires.
In Python development, an environment refers to a specific instance of a Python interpreter along with its associated installed packages and dependencies.
There are several tools available for managing Python environments, including:
- isolated environments (via environment management):
- Conda ⤴ (recommended) environment manager (by default included in Anaconda)
- virtual environments (via virtualization):
- venv ⤴ environment manager (by default comes with Python 3)
- virtualenv ⤴ environment manager (third-party, compatible with both Python 2 and 3)
- isolated environments (via containerization)
- Docker ⤴ containerization platform
| FEATURE | Conda | venv | Docker |
|---|---|---|---|
| Type of isolation | Environment | Environment | Container |
| Technology | Package & environment management | Virtualization | Containerization |
| Complexity | Medium | Low | High |
| ENV Creation | Simple command-line interface | Built-in with Python (command-line) | Requires building Docker image |
| ENV Management | Yes | No | Yes |
| Package Management | Built-in package management system | pip-based package management |
Built-in package management system (with limitations) |
| Portability | Yes | Yes | Yes |
| Platform independence | Cross-platform (Windows, Linux, macOS) | Cross-platform (Windows, Linux, macOS) | Cross-platform (with limitations) |
| Dependency resolution | Automatic | Manual | Automatic |
| Version control | Built-in | No built-in | Based on Docker images |
Do not mix python environment managers. Pick one and stick with it.
It's generally not a good idea to mix Python environment managers because different environment managers can have different ways of managing packages and dependencies, which can lead to conflicts and inconsistencies in your Python environment.
Conda
Conda is an open-source package management system and environment management system for installing and managing packages and dependencies in Python and other programming languages. It was developed by Anaconda, Inc. and is available as part of the Anaconda distribution, but it can also be installed separately.
Conda allows users to create and manage isolated environments for different projects or workflows, each with its own set of packages and dependencies. This helps to ensure that each project has the specific versions of packages it needs, without conflicting with other projects or the base system.
Install Conda
When you install Anaconda, Conda is installed alongside it as part of the distribution.
However, if you choose to do a “pure Python” installation via package manager or official installer, Conda will not be pre-installed. In this case, you will need to install Conda separately if you want to use it as your package manager for managing Python environments.
The fastest way to obtain conda is to install Miniconda, a mini version of Anaconda that includes only conda and its dependencies. If you prefer to have conda plus over 7,500 open-source packages, install Anaconda. [source: https://conda.io/projects/conda ⤴]
Practical Guides
Follow the up-to-date installation guide for Miniconda from the official documentation provided at https://conda.io/projects/conda/en/latest/user-guide/install/index.html#regular-installation ⤴.
You can also follow a step by step guide for installing Conda Miniforge3 for both ARM and Intel chips on your MacBook Pro in the tutorial Installations on MacBook Pro/Install Conda ⤴.
Once you have installed Conda, you can use it to create and manage Python environments, install packages, and more.
Create & Manage Conda environment
CREATE ENV: You can create a new conda environment like so:
conda create --name my_env
This will create a new environment called “myenv”.
LIST ALL ENVs: You can check the list of all available environments by typing:
conda info -e
ACTIVATE ENV: You can activate the selected environment by running:
conda activate my_env
Once the environment is activated, any packages you install using conda will be installed only in that environment.
INSTALL PACKAGE: To install Python packages, (e.g., Pandas) using conda, you can run the following command in your terminal:
conda install pandas
You can also specify the packages that you want to install all-in-one step during the environment creation process:
conda create --name my_env python=3.9 pandas numpy scipy

conda activate my_env
To install a specific version of a package with Conda, you can use the following command:
conda install numpy=1.2.3
This will install version 1.2.3 of the "numpy" package into your current Conda environment.
It is possible to install packages with pip in a current Conda environment. You first need to activate the environment in your command prompt or terminal. Then, you can use pip to install packages as you normally would.
For example, to install the “numpy” package with pip, you can use the following command:
pip install numpy
or
pip install numpy==1.2.3
This will install the latest or selected (here: 1.2.3) version of the “numpy” package into your current Python environment.
DEACTIVATE ENV: To deactivate a Conda environment, you can use the following command:
conda deactivate
This will deactivate the current active Conda environment and return you to the base environment or your system’s default Python environment.
It's important to note that you should always deactivate your Conda environment before switching to another environment or exiting your terminal or command prompt. This ensures that any changes or updates you have made to the environment are saved and that you don't accidentally install packages to the wrong environment.
Learn more about CONDA commands from the Conda CheatSheet ⤴.
venv
Virtual environments are a useful tool for Python developers to manage dependencies and isolate project environments. venv is the default virtual environment module that comes with Python 3. It allows you to create and manage virtual environments directly from the command line.
Here is a useful resource for learning more about the default virtual environments in Python, https://docs.python.org/3/library/venv.html ⤴ (source: official Python documentation)
When you create a virtual environment with venv, it is associated with the project directory where you created it. Specifically, the virtual environment is created in a subdirectory of your project directory called env, which is where all the environment-specific files are stored. This allows you to easily manage dependencies and packages for each project separately.
Install venv
venv comes installed with Python 3, so you don’t need to install anything extra to use it.
However, if you’re using an older version of Python or if venv is not available for some reason, you can install it with pip:
pip install virtualenv
Create venv environment
CREATE ENV: To create a new virtual environment with venv, navigate to your project directory and run the following command:
python3 -m venv env
This will create a new virtual environment in a directory called “env”. You can replace “env” with any name you like.
LIST ALL ENVs: Unfortunately, venv does not provide a built-in command to list all virtual environments created using it.
If you choose to create the virtual environment in a different location than a root of a project or with a different name than "env", you'll need to remember that location/name and use it to activate the environment.
ACTIVATE ENV: To activate the virtual environment, run the following command:
source env/bin/activate
This will activate the virtual environment and change your prompt to indicate that you are now working inside the environment. You should see something like (env) at the beginning of your prompt.
You need to remember the path of the virtual environment that you created for a given project if you want to activate and use that environment in the future. By default, venv creates the virtual environment in a subdirectory of your project root directory called env, so if you use this default location, you can always navigate to your project directory and activate the environment with the following command:
source env/bin/activate
INSTALL PACKAGE: With the virtual environment activated, you can now install packages using pip, just like you would normally.
For example, to install the “numpy” package, run the following command:
pip install numpy
DEACTIVATE ENV: To deactivate the virtual environment, simply run the following command:
deactivate
Docker
Docker is a containerization platform that allows you to package up an entire application, including its dependencies, into a single container that can be run on any system that has Docker installed.
Docker can be particularly useful when working on projects that have complex dependencies or that need to be run in specific environments.
CREATE A DOCKER CONTAINER
You can create a Docker container for your Python application by creating a Dockerfile that specifies the dependencies you need and how to run your application.
A Dockerfile is a text file that contains a series of instructions for building a Docker image. The Dockerfile specifies the base image to use, any additional software or dependencies to install, and any configuration or setup required for the container.
The Docker engine reads the Dockerfile and creates an image based on the instructions it contains. A Dockerfile typically starts with a FROM instruction, which specifies the base image to use for the container. Other instructions, such as WORKDIR, COPY, RUN, ENV, EXPOSE, and CMD, are used to configure the environment, install dependencies, and define the command to run when the container starts.
By convention, the file is always named Dockerfile (with a capital "D" and no file extension), and it must be placed in the root directory of the "build context". The build context is the set of files and directories used to build the Docker image
You can create a Dockerfile using a text editor like a command-line nano or Visual Studio Code with a graphical user interface. For example, here’s a Dockerfile template:
# Use a base image (in this case, Python 3.9)
FROM python:3.9-slim-buster

# Set the working directory
WORKDIR /app

# Copy the requirements file into the container
COPY requirements.txt .

# Install any required dependencies
RUN pip install --no-cache-dir -r requirements.txt

# Copy the rest of the application code into the container
COPY . .

# Set any environment variables
ENV MY_VAR=my_value

# Expose a port for the container to listen on
EXPOSE 8000

# Define a command to run when the container starts
CMD ["python", "app.py"]
This Dockerfile starts with a base image of Python 3.9, sets the working directory to /app, copies the requirements.txt file into the container, installs the packages listed in requirements.txt, copies the rest of the application code into the container, and runs app.py using the python command.
Once you’ve created the Dockerfile, you can build the container using the docker build command, like so:
docker build -t myapp .
This will create a Docker image called myapp that you can then run using the docker run command.
If you want to use a different name for the Dockerfile, you can specify the filename using the -f or --file option when you run the docker build command.
For example, if your Dockerfile is named MyDockerfile, you can use the following command to build the image:
docker build -t myimage:latest -f MyDockerfile .
This command specifies that the Dockerfile is named "MyDockerfile" and is located in the current directory (.), and it sets the name of the resulting image to "myimage" with the latest tag.
Learn more about Docker containers and Docker graphical user interface (GUI) from the practical tutorial Docker basics ⤴ available in the Introduction to Containers ⤴ section of this workbook.
Manage Project Dependencies
Managing dependencies is an important part of working with Python projects, and each of the tools (Conda, venv, and Docker) has its own approach to managing dependencies.
It is highly recommended to create a requirements file that is a common way to manage dependencies for Python projects, regardless of the tool you use. The file should list all of the packages required for the project, along with their version numbers, so that others can easily install the same dependencies on another machine.
The requirements file can be created: with
- the
conda env exportcommand for conda environments, - the
pip freezecommand for venv environments, - or by manually creating a
requirements.txtfile for Docker environments.
CONDA
When working with conda, you can create a YAML file that lists all of the packages in your environment, including the version numbers. This file can then be used to recreate the environment on another machine or to share with others who need to use the same dependencies.
To create the YAML file, activate the environment you want to export and run the following command:
conda env export > environment.yml
This will create a file named “environment.yml” in the current directory that contains the environment’s name, a list of channels used to install packages, and a list of packages with their versions.
VENV
When working with venv, you can create a requirements.txt file that lists all of the packages installed in the virtual environment, including their version numbers.
To create the file, activate the environment you want to export and run the following command:
pip freeze > requirements.txt
This will create a file named “requirements.txt” in the current directory that contains a list of packages with their versions.
DOCKER
When working with Docker, you can include a requirements.txt file in your project directory and copy it to the Docker container during the build process. To do this, include the following lines in your Dockerfile:
COPY requirements.txt .

RUN pip install -r requirements.txt
This will copy the “requirements.txt” file from the project directory to the Docker build context. Then, it will install all of the packages listed in the “requirements.txt” file in the Docker container.
An example "requirements.txt" file for a Docker environment might look something like this:
flask==2.1.0

pandas==1.3.4

numpy==1.21.3

matplotlib==3.4.3
In this example, the file lists four Python packages (Flask, Pandas, NumPy, and Matplotlib) along with their version numbers. These are just example packages, but you would list the packages that your project requires in the file.
4. Instal Python Libraries
Python pre-defined functions are made available as libraries (also referred to as packages) which need to be installed from somewhere. Python libraries can be indexed on CRAN, bioconductor and GitHub. What’s the difference between installing from these locations?
1. PyPI (Python Package Index)
This is the default package repository for Python packages. You can use the pip package manager to install packages from PyPI.
For example, you can install the requests package by running:
pip install requests
2. Conda
Conda is a package manager that is commonly used for scientific computing in Python. You can use the conda command to install packages from the Anaconda distribution or the default Conda package repository. For example, you can install the numpy package by running:
conda install numpy
With conda you can also install packages from a specific channels (repository of packages) other than the defaults. To use the conda install -c command, you need to specify the channel name and the package name. For example, you can install the biopython package from the bioconda channel by running:
conda install -c bioconda biopython
The popular Conda channels for Python packages include:
- Anaconda ⤴
conda install -c anaconda <package> - bioconda ⤴
conda install -c bioconda <package> - Conda Forge ⤴
conda install -c conda-forge <package> - pytorch ⤴
conda install -c pytorch <package> - NVIDIA ⤴
conda install -c nvidia <package> - Intel ⤴
conda install -c intel <package>
3. GitHub python libraries
Many Python packages are available on GitHub, which is a platform for code hosting and collaboration. To install a Python package from GitHub, you can use the pip or conda package managers.
Here are the general steps:
- Clone the GitHub repository to your local machine using
git clone.git clone https://github.com/username/repository.git - Navigate to the cloned repository’s directory.
cd repository - Build the package:
python setup.py sdistThen follow by installing with
piporconda.
INSTALL USING PIP:
pip install .
INSTALL USING CONDA:
conda build .
conda install --use-local <package>
Note that the package name may be different from the repository name. You can check the "setup.py" file to see the package name.
Further Reading
- 2.3.1 Shell & IDLE: create Python code in a terminal or simple IDE
- 2.3.2 Text editors: create Python code in terminal text files
- 2.3.3 Jupyter Lab: create an interactive Python notebook
- 3. R programming environment(s)