
DataScience Workbook / 04. Development Environment / 1. Integrated & Interactive Development Environment (IDE) / 1.2 Jupyter: Interactive Web-Based Multi-Kernel DE / 1.2.1 Getting Started with JupyterLab on a local machine
Introduction
A digital notebook is a transformative tool in contemporary research, revolutionizing how data is analyzed, visualized, and shared. It offers an all-in-one document format that seamlessly combines executable code with rich text elements like project objectives, documentation, comments, and result interpretations. It supports multiple programming languages and file formats. The built-in capability to incorporate graphical visualizations, including interactive plots and images, further enhances its utility in diverse research scenarios.
JupyterLab elevates the concept of a development environment to an Interactive DE accessible anytime, anywhere in the form of a web application hosted directly in your preferred web browser. It’s versatile, offering various modes of access – offline, online in the cloud, and on HPC systems through Open On Demand service. These features, combined with its user-friendly graphical interface, create a comfortable daily working environment that significantly facilitates sharing and real-time collaboration.
Start JupyterLab via Terminal
If you don’t already have JupyterLab installed or you wish to use the SCINet OOD service, follow the instructions in the tutorial: Jupyter: Web-Based Programming Interface. In this tutorial, you will learn about the practical aspects of using the Jupyter app, including the options available and various tips & tricks.
Once installed locally, you can start a web-based interface of jupyter lab from the command line by typing:
jupyter lab
That will start a server on localhost and automatically open the Jupyter interface in your default browser. It will work on URL: http://localhost:8889/lab.
JupyterLab GUI
The JupyterLab interface is built up of two main panels: a file system browser on the left-hand side of the GUI window, and developer space on the right-hand side. By default, on start, you will see the Launcher mode in the developer’s panel. There you will find several icons with shortcuts that open a new instance of one of several most popular applications, such as a multifunctional notebook, a console in the programming language of your choice, a terminal emulator, a raw text file, a rich text file (markdown), or a script file. Clicking on the icon converts the launcher to the selected app. Many applications can be opened at the same time, and each of them will be added in a separate tab in the same browser window.

- Keep multiple apps open
In the top menu bar select File → New Launcher to add a new tab with shortcuts for the apps. You can also select a particular type of application directly from the menu by following the options File → New → {Console, Notebook, Terminal, Text File, Markdown File, Python File}. For Console, you can further customize the kernel by selecting options available in your environment (see the animated image above). Selecting Notebook will open an interactive notebook in a new tab in your Jupyter web-based GUI where you can execute your code cells, create documentation in markdown cells, and visualize graphically your results.
Note that the terminal window in which the local server was started must remain active (can be minimized) to make the GUI in the web browser work.
A quick shortcut to adding a new tab with Launcher is that big blue button with the plus sign on the top left in the GUI.

- Rename a file
When a new file is created, it is automatically named untitled with a consecutive integer and the format appropriate to the file type, e.g., untitled.md, the next one untitled1.md, and so on.
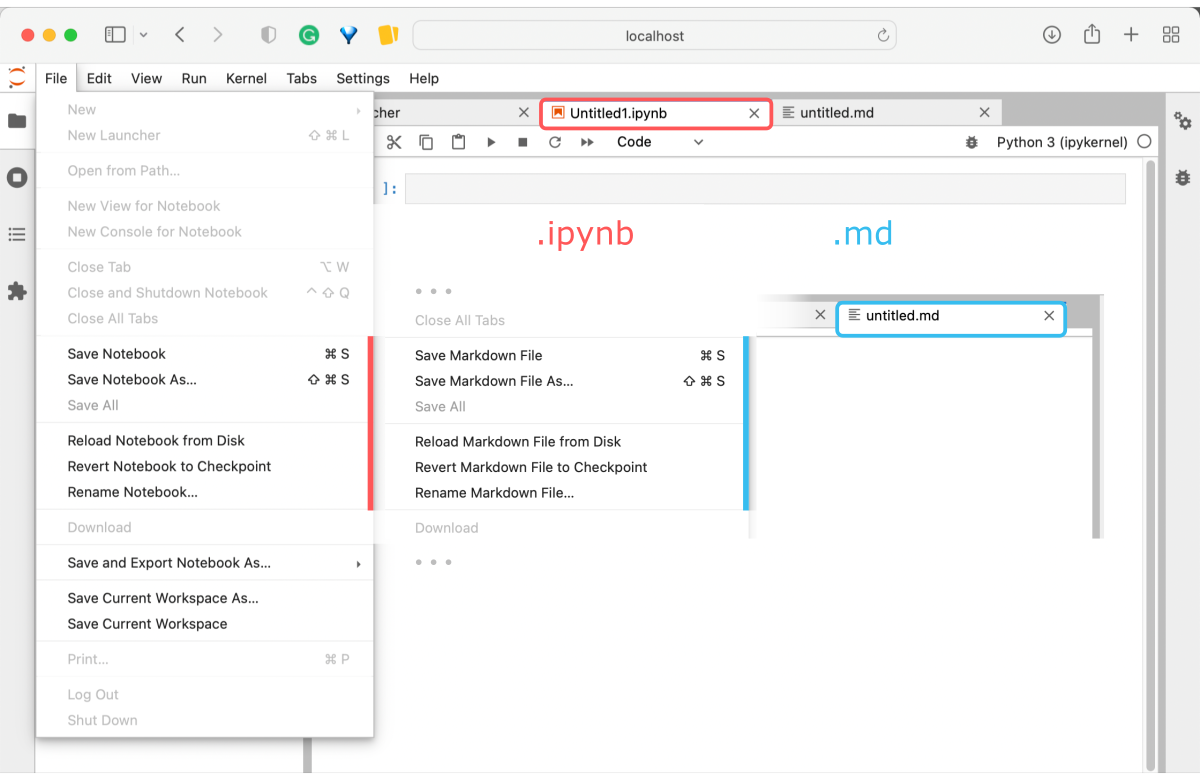
RENAMING OPTIONS
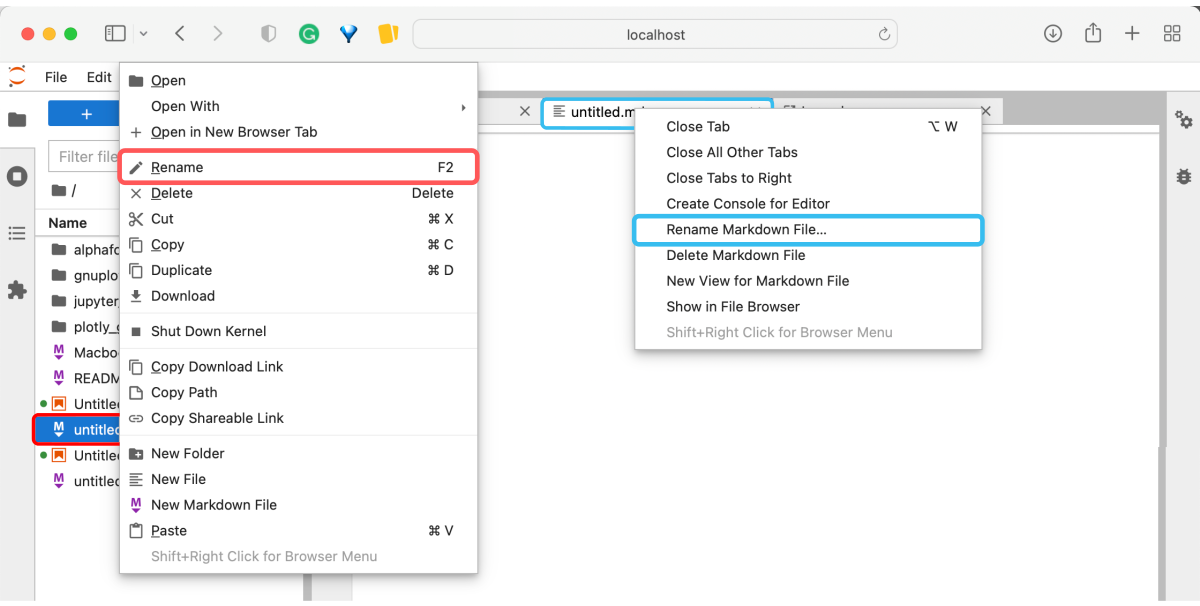
A. You can rename any file visible in the file system preview on the left. All you have to do is to highlight the desired file with one click on the left mouse button and then use the F2 key on your keyboard (marked in red in the picture).
B. Also, in the file system browser, right-click once with a mouse and then select Rename options from the menu that appears (marked in red in the picture).
C. If the file is open in one of the tabs, right-click on the filename and then select from the menu that appears the option Rename {type} File... (marked in blue in the picture).
- Open a file
Browse file system to enter your workdir. By default, JupterLab will open a file system browser on the location where it was started in the terminal.
-
You can hide the file browser by clicking on the folder icon in the vertical menu on the left. That will make the workspace for the developer wider.
-
By double-clicking on folders, you will go deep into the file structure until you find your working directory. Notice that the path you are currently on is displayed above the list of files. With a single click on the folder name in that path, you can move up the file hierarchy.
-
Using the folder icon with a plus (just below the top menu bar), you can create a new folder in the current location and give it a customized name.
-
Using the next icon to the right, you can load/copy a file from any location in the file system.
-
It is also possible to delete files and folders from directly within the JupyterLab interface. Just right-click on the selected object and select
Deletefrom the list that appears. Remember that these files will be permanently deleted from the file system and will never be accessible again even from the terminal. -
Open a file selected from the file system by double-clicking on it. A new tab in the developers panel will appear where you will be able to further edit your file.
- Save the progress
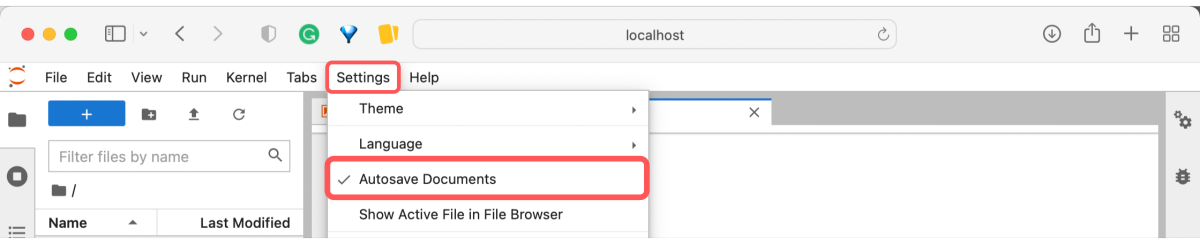
JupyterLab has a built-in auto-save option. Just be sure you checked the box in the settings in the top menu bar Settings → Autosave Documents. You will appreciate that canny move when the application closes unexpectedly one day, but your very important files will be saved (!)
You can also save changes to a file at any time by selecting from the top menu bar:
A. File → Save {type} File, if the file already exists
B. File → Save {type} File As, if you want to overwrite the file with a new name
C. File → Save and Export Notebook As, if you want to convert the current content into a Notebook (.ipynb file type) and export it
^ Note that the available saving options may differ slightly for different file formats.
- Terminate JupyterLab
To terminate the Jupyter interface, first, save the changes with File → Save File, then close the tab in the browser ⤬, to finally terminate the server with CTRL+C in the terminal.

Jupyter Apps
Jupyter is much more than just another text editor for code development. It is a highly flexible, easily accessible, and portable integrated programming environment. Launched via OOD service, it overcomes the limitations of the terminal working on a remote machine by supporting interactive visualization of the analytical output. In this section, you will find an introduction to several handy applications built into the Jypyter interface.
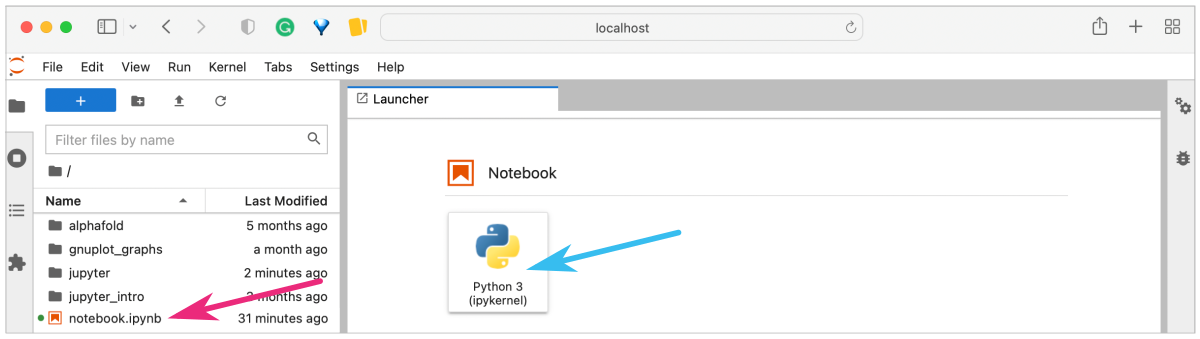
Notebook
Notebook is a multifunctional type of file in .ipynb format. It allows the co-presence of cells with executable source code and rendered text (e.g., documentation, comments, procedure description, instructions) in a single document. In addition, it is able to render graphical output as the result of the executed code when using graphing library, such as plotly or matplotlib.
You can create a new file using a shortcut in the Launcher view (blue arrow in the picture) or open an existing one by double-clicking it in the file browser (magenta arrow in the picture).
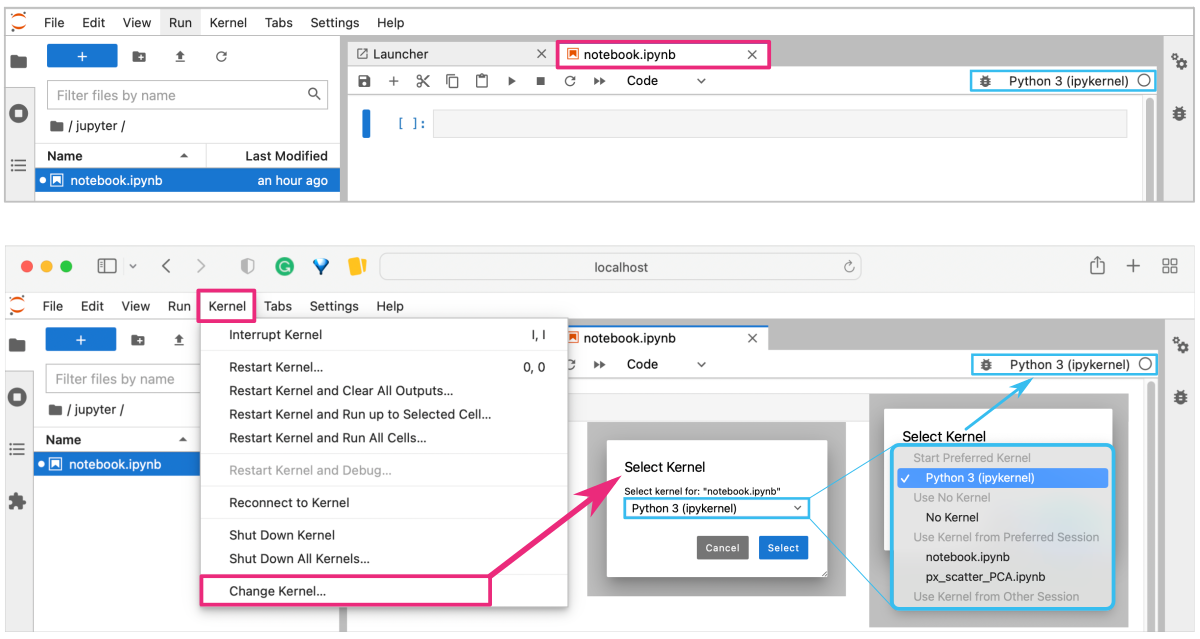
On the launching icon you can see with which kernel the new notebook will be opened by default. It depends on the modules installed in the environment in which you run jupyter. For example, if python3 is available in your environment (e.g., conda env), it will be in the Start Preferred Kernel list. You can also choose No Kernel option or Use Kernel from Preferred Session which will match the kernel to be compatible with the other notebook file. The selected kernel determines what programming language and which particular version will be interpreted when executing code cells. Note that the kernel is cashed for a given .ipynb file, and it’s name is displayed in the upper right corner of the jupyter tab.
Let’s check how the Notebook works.
There are several keyboard shortcuts that make it easier to navigate between cells on the notebook. For a quick overview, see the table below.
| shortcut | on macOS | operation |
|---|---|---|
| ENTER | RETURN | new line in the cell |
| BACKSPACE | DELETE | remove character or new line in the cell |
| CTRL + ENTER | CTRL + RETURN | execute cell in place |
| ALT + ENTER | OPTION + RETURN | execute cell and create new one |
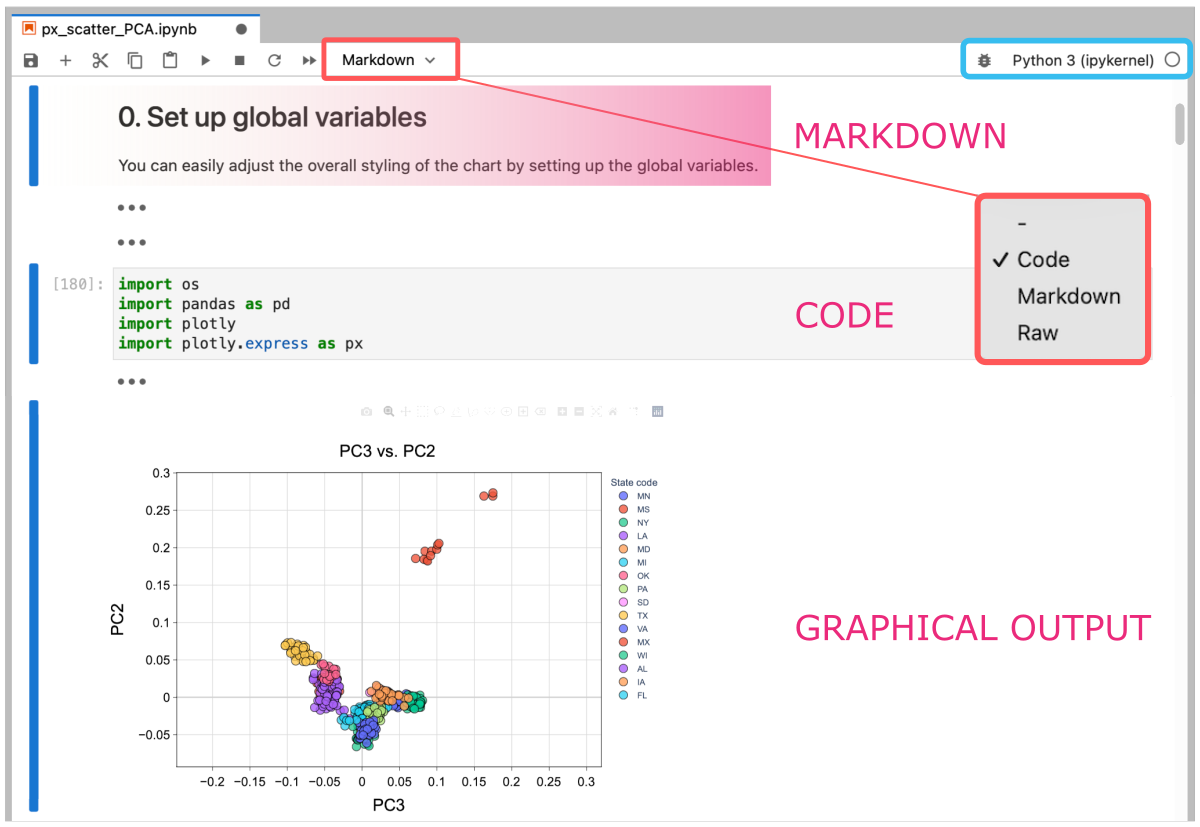
- CELL TYPES
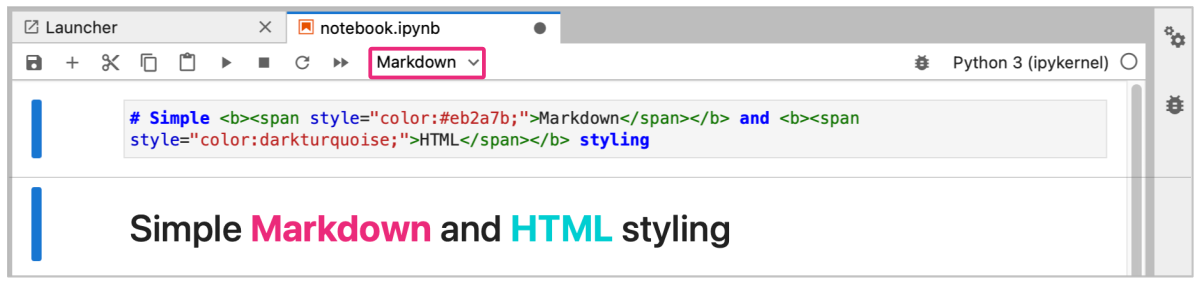
- MARKDOWN
- Click on the selected cell. From the top menu, select
Markdownoption, and then enter text into the cell. - To render the contents of a MARKDOWN cell, you need to execute the cell by pressing
CTRL + ENTER. If you useALT + ENTER, it will additionally create the next empty cell. - You can customize the text style as you like using markdown or HTML syntax.
To learn more about Markdown, follow the Introduction to Markdown tutorial, available in this workbook.
To learn more about HTML, try an HTML Styles tutorial provided by w3schools.com.
# Simple <b><span style="color:#eb2a7b;">Markdown</span></b> and <b><span style="color:darkturquoise;">HTML</span></b> styling
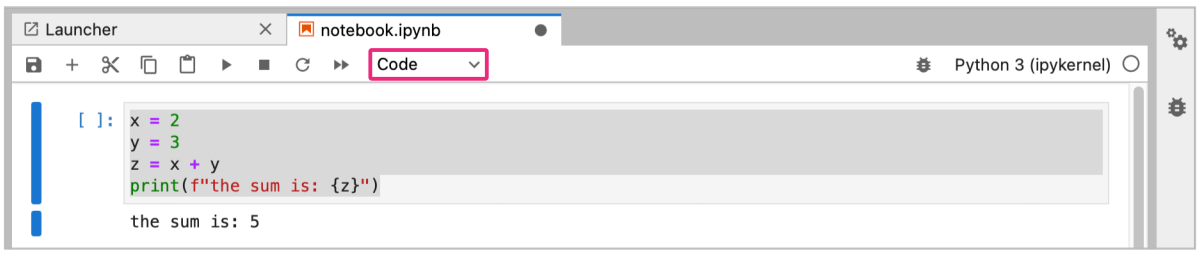
- CODE
- Click on the selected cell. From the top menu, select
Codeoption, and then enter vsource code into the cell. Depending on your preferred programming language (i.e., the kernel of your choice) in the code type cell, you can define variables, apply available arithmetic operators, and call functions from inserted modules and libraries. - To render the contents of a CODE cell, you need to execute the cell by pressing
CTRL + ENTER. If you useALT + ENTER, it will additionally create the next empty cell.
x = 2
y = 3
z = x + y
print(f"the sum is: {z}")
- DEBUG MODE
On the right side in the top menu of the notebook is the bug icon that enables debugger mode. Using the options from the horizontal menu on the right, you can set breakpoints in your code to check its correctness and performance.
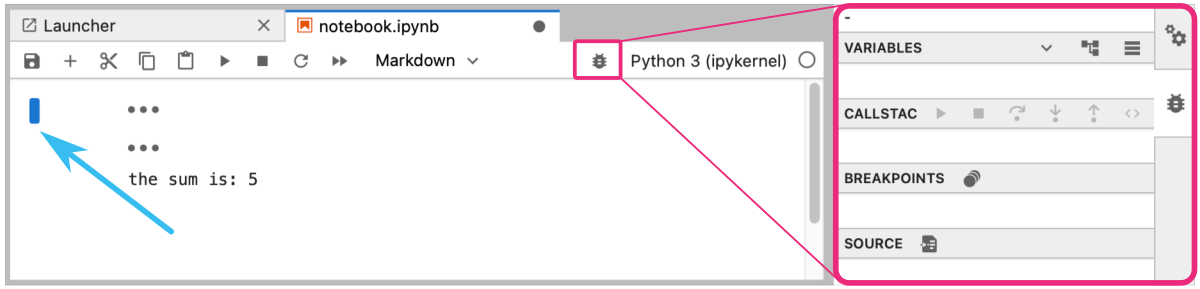
By clicking on the blue vertical bar on the left-hand side of each cell, you can hide its contents for a clearer view when needed.