
DataScience Workbook / 06. High-Performance Computing (HPC) / 1. Introduction to HPC infrastructure / 1.2 SCINet Network / 1.2.1 Atlas Computing Cluster
Introduction
Atlas computing cluster
Atlas is a computing cluster located in Starkville (MS), being part of SCINet HPC System, funded by USDA-ARS. The SCINet initiative’s mission is to grow USDA’s research capacity by providing scientists with high-performance computing and professional training support.
Explore the resources to learn more:
- SCINet website: https://scinet.usda.gov ⤴
- USDA-ARS website: https://www.ars.usda.gov/ ⤴
- Atlas documentation by Mississippi State University: https://www.hpc.msstate.edu/computing/atlas/ ⤴
- Introduction to SCINet HPC in this workbook: What is SCINet? ⤴
Atlas access points
Atlas login node: @atlas-login.hpc.msstate.edu
Atlas transfer node: @atlas-dtn.hpc.msstate.edu
Atlas Open OnDemand: https://atlas-ood.hpc.msstate.edu ⤴
*SCINet account is required to get access
To obtain a SCINet account, a SCINet Account Request must be submitted. To learn more, visit the official Sign up for a SCINet account ⤴ guide or use links provided below:
Atlas documentation by HPC² at MSU
Atlas computing cluster User Guide ⤴ provided by HPC² at Mississippi State University ⤴
In the one-page documentation you will find the sections listed below.
To navigate to the selected topic, press CTRL + F on your keyboard (on macOS use COMMAND + F), and copy-paste the name of the section.
- Node Specifications
- Accessing Atlas
- File Transfers
- Internet Connectivity
- Modules
- Quota
- Project Space
- Local Scratch Space
- Arbiter
- Slurm
- Available Atlas QOS’s
- Available Atlas Partitions
- Nodesharing
- Job Dependencies and Pipelines
- Atlas Job Script Generator
- Open OnDemand access
- Virtual Desktops
- RStudio Server and Jupyter Notebooks
Getting started with Atlas
If you already have SCINet account and Multi-Factor Authentication (MFA), skip to step 3 or 4.
Note, your SCINet credentials are the same for all components of the SCINet resources, including HPC Systems.
1. SCINet Account Request
SCINet account is required to get access to Atlas cluster!
To obtain a SCINet account, a SCINet Account Request must be submitted.
To learn more, visit the official Sign up for a SCINet account ⤴ guide.
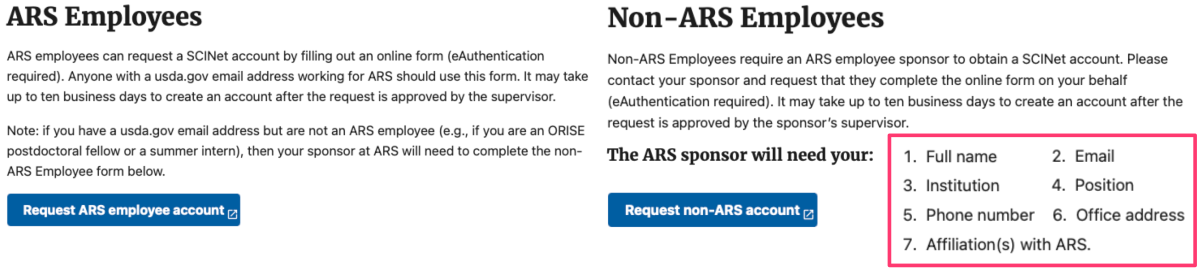
Use links provided below to request account for:
• ARS-affiliated users: SCINet Account Request ⤴
• non-ARS users: Non-ARS SCINet Account Request ⤴
Once your request is approved you should get the “Welcome to SCINet” email with further instructions.
2. Get Multi-Factor Authentication (MFA)
Any logins to SCINet need to use Multi-Factor Authentication (MFA)!
This include both SSH connection in the terminal and Open OnDemand access in the web browser.
Multi-Factor Authentication (MFA) is a security system that requires more than one method of authentication from independent categories of credentials to verify the user's identity. This is done to increase the security of the authentication process and make it more difficult for an attacker to gain access to a user's systems or data.
|
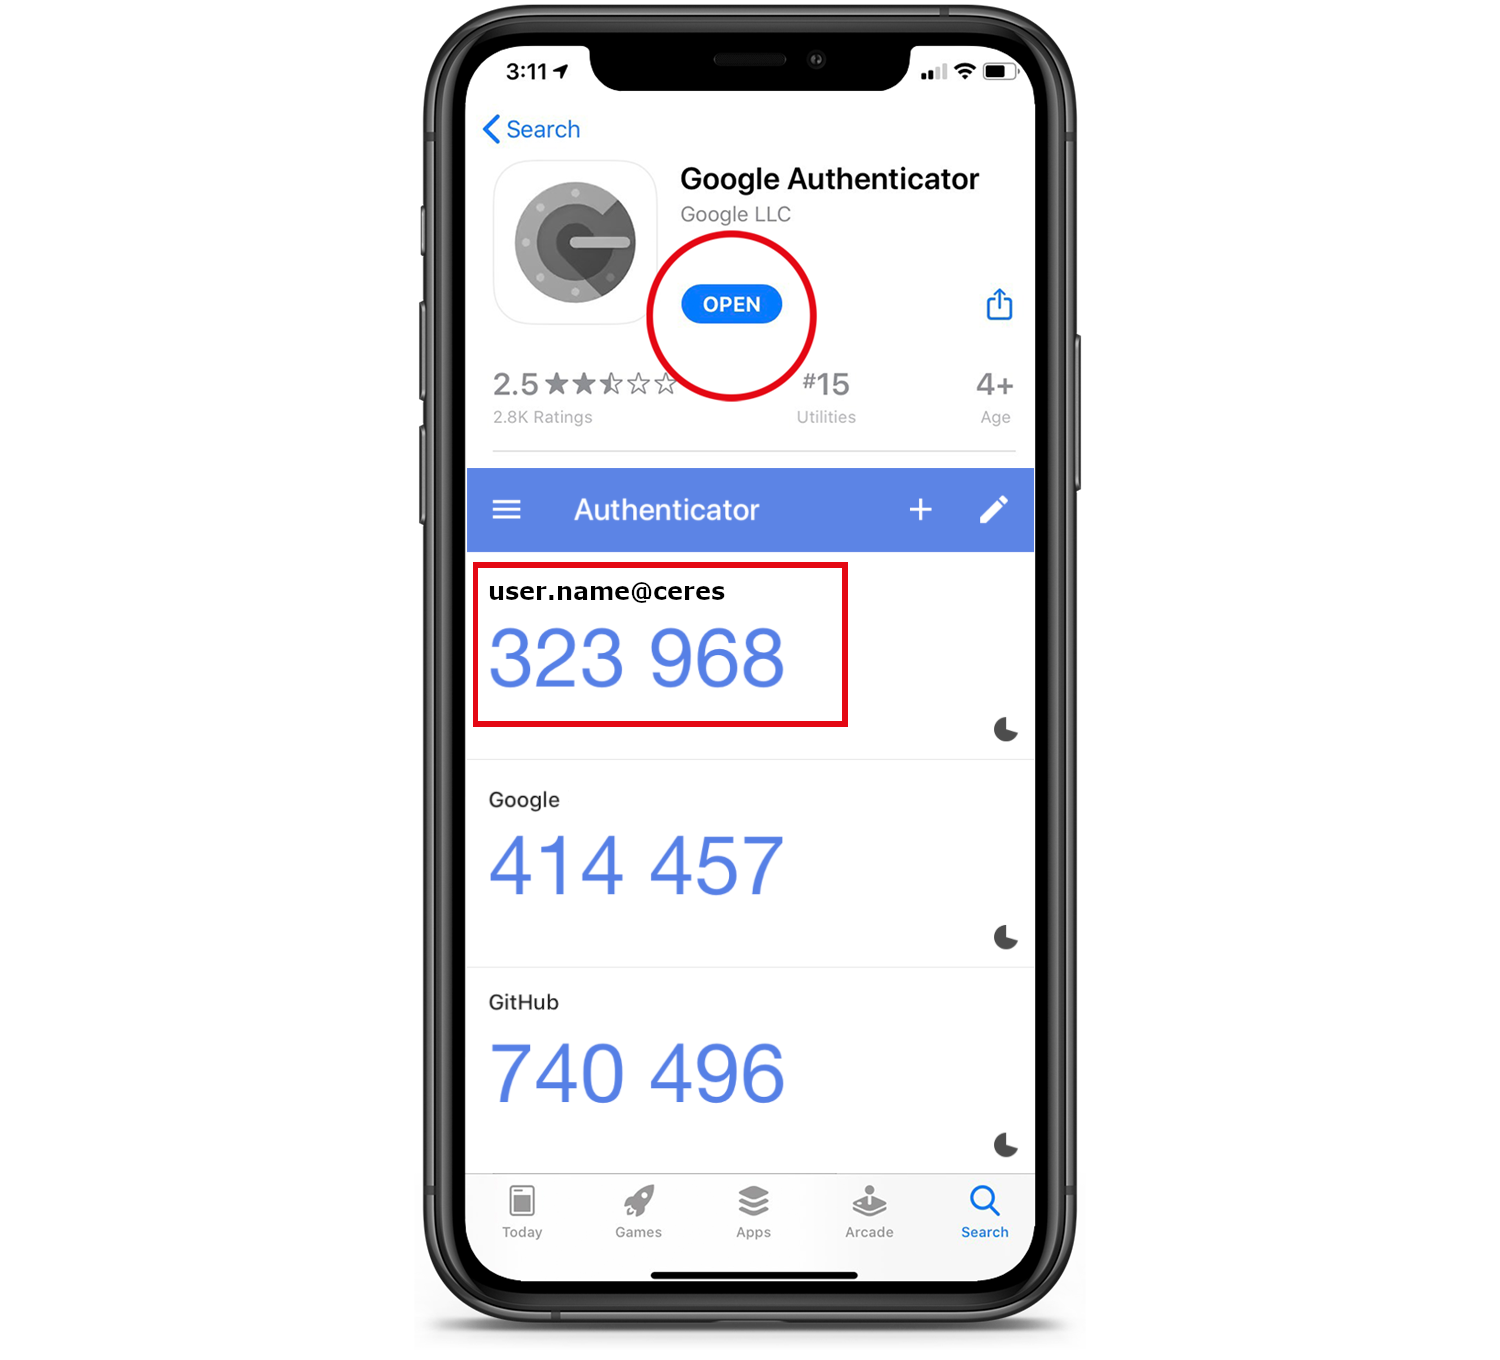
To set up multi-factor authentication for accessing SCINet resources in the most cost-effective way, you can use Google Authenticator. Before logging on to the cluster, you will need to configure your smart device to generate Google Authenticator codes. To do this, simply follow the instructions provided in the SCINet step-by-step guide: Technically, you will get an app on your device. It will generate unique 6-digit codes every 60 seconds. You need to use the code that is current at the time of logging in or transferring data. |
 |
Reset your GA account
You may need to reset your Google Authenticator account when switching or reinstalling your mobile devices that have GA application installed.
Follow the guide at GA account reset ⤴.
3. Terminal access
Terminal access to Atlas using SSH protocol
Terminal access to a high-performance computing (HPC) system using the ssh (Secure Shell) protocol allows users to access the HPC system remotely from a command line interface. To access an HPC system using ssh, users need to have:
-
an ssh client installed on their local computer
(on Linux and macOS, the OpenSSH client package is usually pre-installed; for Windows follow the Microsoft’s guide Install OpenSSH for Windows ⤴) -
and the login credentials (login & password) for an account on the HPC system
(you will get the initial SCINet credentials in the “Welcome to SCINet” email, see section 1. SCINet Account Request ⤴)
To get familiar with SSH connection, explore the hands-on tutorials in this workbook:
• Benefits of using SHH
Using ssh to access an HPC system has a number of benefits:
- It allows users to access the HPC system from anywhere with an internet connection.
- It provides a secure connection, as all data transmitted between the user’s local computer and the HPC system is encrypted.
- It allows users to automate tasks and run scripts on the HPC system using the command line.
- It allows users to access the HPC system from a wide range of devices, including laptops, desktops, and even smartphones.
Overall, ssh is a convenient and secure way to access HPC systems remotely and perform a wide range of tasks using the command line.
Command line login
Open terminal window.
If you are a beginner at Linux, it may be beneficial for you to start with the tutorials provided in section 02. Introduction to Command Line ⤴:
- Terminal: a text-based interface for command-line operations ⤴
- Introduction to UNIX Shell: shell variables, HOME dir, .bashrc ⤴
To connect to the HPC system, enter the ssh command in the terminal on your local computer that looks like this ssh username@hostname, where:
usernameis your SCINet account, typicallyname.surnamehostnamefor Atlas login node isatlas-login.hpc.msstate.edu
Type in the terminal on your local machine:
ssh user.name@atlas-login.hpc.msstate.edu
After typing ssh command, enter the 6-digit verification code generated by the Google Authenticator app when prompted for the Verification Code.
Note that when you type the code or the password, nothing will be shown on the screen.
If system accepts the code it will prompt you for Current Password. When logging in for the first time, enter the temporary password from the welcome email.
Changing your Password is a mandatory Prompt when first Connecting! So, you will be prompted again to provide a New password and Retype new password.
• Password Requirements
see [ Password Requirements ⤴ ]
For the next password update the ssh connection to Atlas will be straightforward.
If you need a more detailed guide for a specific operating system, follow the step-by-step instructions provided by SCINet support team:
- Using ssh to Connect From Windows 10 ⤴
- Using ssh to Connect From Older Windows Versions ⤴
- Using ssh to Connect From Mac and Linux ⤴
If you are still facing the problem, please email the Virtual Research Support Core at scinet_vrsc@usda.gov .
Command line data transfer
Globus Online is the recommended method for transferring data to and from the SCINet clusters. It provides faster data transfer speeds compared to scp, has a graphical interface, and does not require a GA verification code for every file transfer.
Before you transfer data on Atlas, familiarize yourself with Best Practices ⤴.
Use Command line data transfer [scp, rsync] ONLY for small data transfers. [see SCINet guide ⤴ or ready-made code snippets below]
Remember to use Atlas transfer node: @atlas-dtn.hpc.msstate.edu
• Copy a file to Atlas
Open a new tab in your terminal window using CTRL + T (COMMAND + T on macOS). By default, the new shell will be hosted on your local machine. Then, to transfer data to Atlas, copy-paste the provided command, updating the local_path, your SCINetID, <remote_atlas_path>, and the name of the transfered file (here: file.txt).
scp local_path/file.txt SCINetID@atlas-dtn.hpc.msstate.edu:remote_atlas_path/file.txt
e.g., to copy my .bashrc file located in the root directory on my local machine to /project/90daydata storage space on Atlas, I’ll use:
scp ~/.bashrc alex.badacz@atlas-dtn.hpc.msstate.edu:/project/90daydata/.bashrc
• Copy a directory to Atlas
Typically, you could use scp -r command to transfer individual or nested directories. However, when copying data to /project location on SCINet clusters the setgid bit on directories at destination is not inherited. That is why it is better to use rsync command for bulk transfers. It synchronizes the changes in files and directories from one location to another (e.g., from your local machine to remote cluster).
The following command will recursively transfer all new and updated files in the directory path/to_your/local_directory on the local machine into directory /project/<project_name>/<dir_name> on Atlas:
rsync -avz --no-p --no-g <path/to_your/local_directory> <SCINetID>@atlas-dtn.hpc.msstate.edu:/project/<project_name>
Command line job submission
On a high-performance computing (HPC) system, jobs can be run in either interactive or batch mode. To get a step-by-step introduction to command line job submission on Atlas, follow the Running Application Jobs on Compute Nodes ⤴ guide.
• Interactive Mode [salloc]
In interactive mode, a user get in to the specific computing node on HPC system and run a job from the command line. The job begins executing immediately and the user can interact with the job in real time, using the command line to control and monitor the job. Interactive mode is useful for testing and debugging code, or for running small jobs that do not require a lot of computing resources.
To start an interactive session on Atlas cluster (once logged in), type:
salloc
To learn more about computing in the Interactive Mode, explore the SCINet guide ⤴.
• Batch Mode [sbatch]
In batch mode, a user submits a job to the HPC system using a special submission script, but does not interact with the job directly. The job is added to a queue and is executed by the HPC system when resources become available. Batch mode is useful for running large or long-running jobs that may take a significant amount of time to complete. It allows users to submit a job and then disconnect from the HPC system, freeing up their terminal for other tasks.
To add a job to a queue, create a submit_job.sh script:
touch submit_job.sh
and copy-paste the template script provided below:
The content of submit_job.sh:
#!/bin/bash
#SBATCH --job-name="your_job"      #name of this job
#SBATCH -p atlas                   #name of the partition (queue) you are submitting to
#SBATCH -N 1                       #number of nodes in this job
#SBATCH -n 40                      #number of logical cores
#SBATCH -t 01:00:00                #time allocated for this job hours:mins:seconds
#SBATCH --mail-user=emailAddress   #enter your email address to receive emails
#SBATCH --mail-type=BEGIN,END,FAIL #will receive an email when job starts, ends or fails
#SBATCH -o "stdout.%j.%N"          # standard output, %j adds job number to output file name and %N adds the node name
#SBATCH -e "stderr.%j.%N"          #optional, prints standard error


# [EDIT THE CODE BELOW] Load modules, insert code, and run programs
#module load <module_name>         # optional, uncomment the line and load preinstalled software/libraries/packages

echo 'Hello, world!'               # REQUIRED <your code>, provide commands to be executed
Then, submit a script using sbatch command:
sbatch submit_job.sh
4. Web-browser access
Web-browser access to a high-performance computing (HPC) system allows users to access and interact with the HPC system using a web browser. This can be useful for users who do not have an ssh client installed on their local computer, or who prefer to use a graphical user interface (GUI) rather than the command line.
To provide web-browser access to an HPC system, a server with a web interface must be installed on the HPC system. This server can be accessed from any web browser by visiting a specific URL. Once the user logs in to the web interface, they will be able to access a variety of tools and services, such as:
Open OnDemand login
One example of a service that provides web-browser access to HPC systems is Open OnDemand ⤴. Open OnDemand (OOM) is an open-source project that provides a web interface for interacting with HPC systems. It includes a wide range of tools and services, and is designed to be easy to use and can be accessed from any web browser.
Atlas web-browser access - log in to Atlas using OOD service
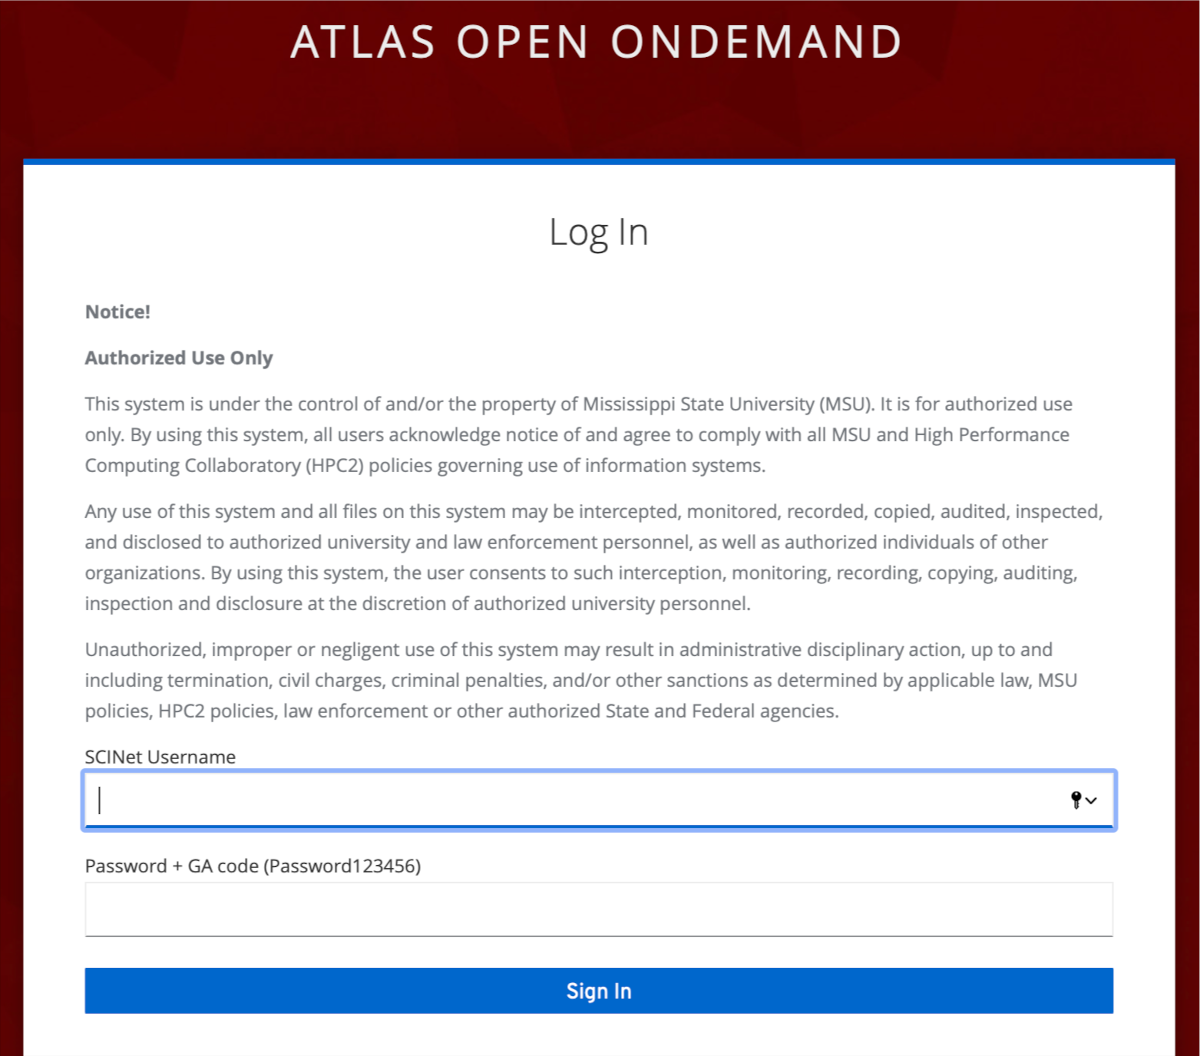
Open your favorite web-browser (e.g., Chrome, Firefox, Safari) and visit the URL: https://atlas-ood.hpc.msstate.edu/
or simply click-on the link Atlas Open OnDemand ⤴.
Then, follow the instructions provided by HPC² at Mississippi State University ⤴:
In order to log in, users must use their SciNet credentials. The 6-digit Google Authenticator code must be entered in the same field as the password, with no spaces or other characters in-between the password and Google Authenticator code.
Your SciNet credentials includes:
- username, usually in the form
name.surname - password, the same password as used for ssh connection to Atlas
- Authenticator code, if you don’t use it yet, find out more in section 2. Get Multi-Factor Authentication (MFA) ⤴
When sucessfully logged in, you will see the “Message of the Day” in the Atlas OnDemand welcome interface.
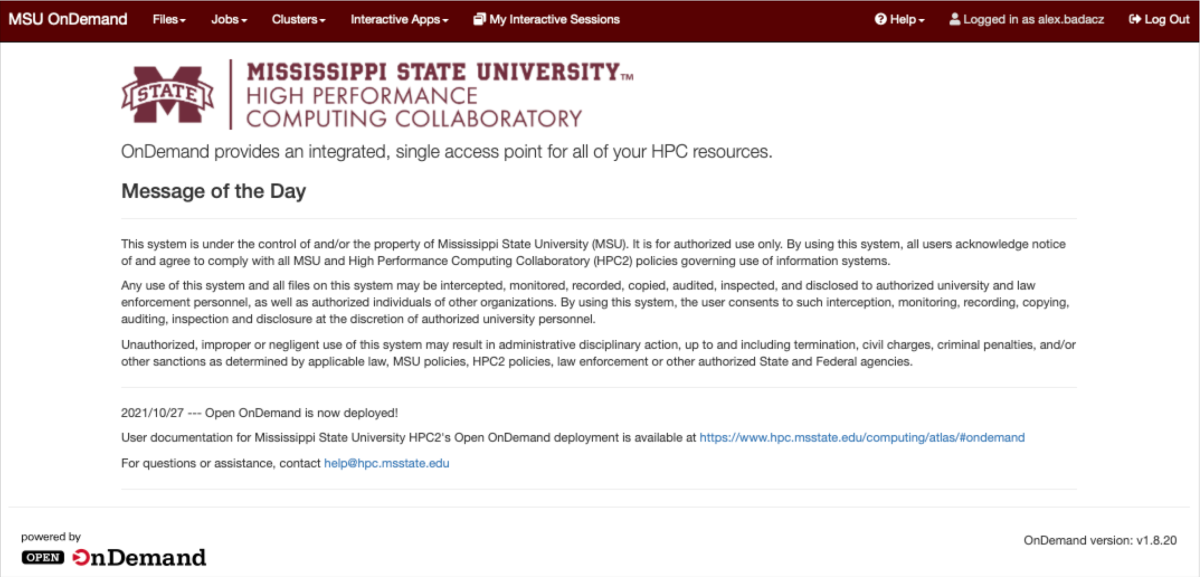
Using the options in the top menu bar, you can:
- [Files:] Open a File browser for home or project directories
- [Jobs:] Preview a list of active jobs or create and submit a new job (using GUI options)
- [Clusters:] Open the shell in the command line interface (terminal)
- [Interactive Apps:] Launch software that require graphical interface, such as Desktop, ENVI, JupyterLab, or RStudio.
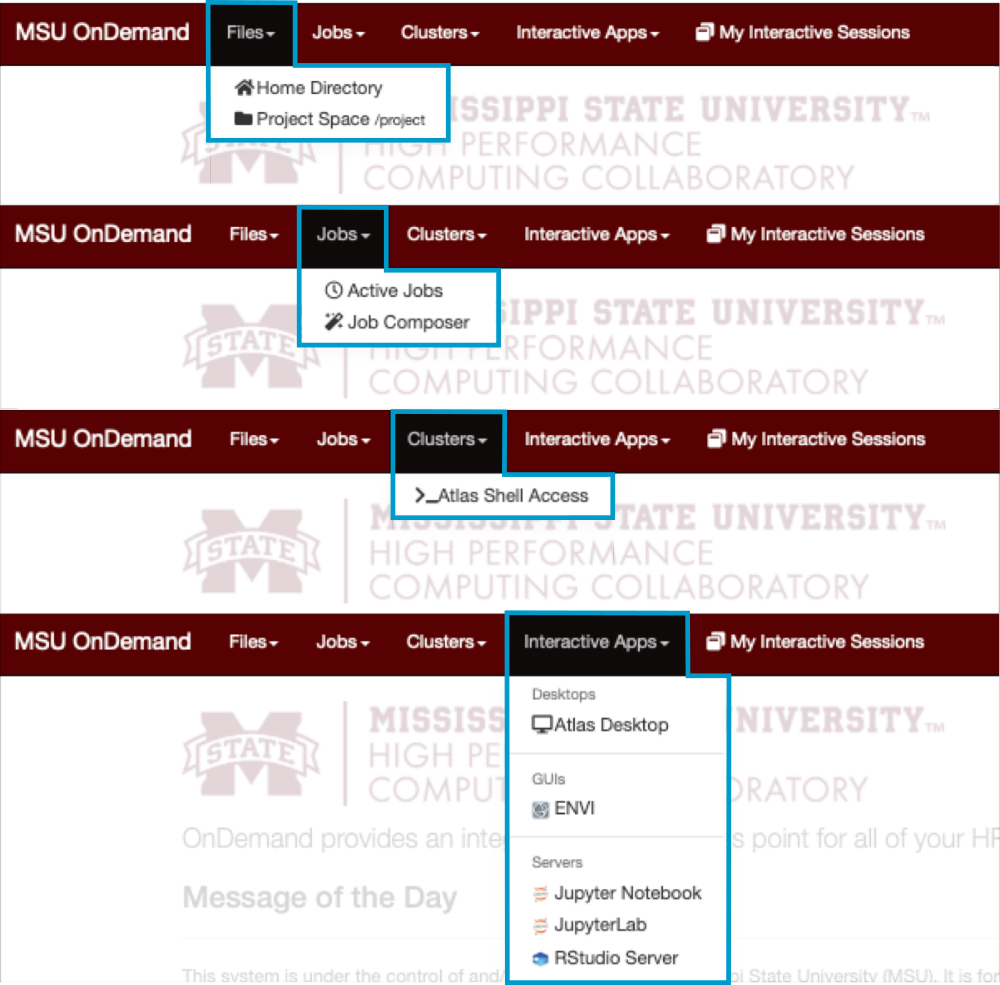
Note that each application when clicked will open in a separate browser tab, and all your active applications are listed in the last tab “My Interactive Sessions”.
Data transfer using Globus
Globus Online is the recommended method for transferring data to and from the SCINet clusters. It provides faster data transfer speeds compared to scp, has a graphical interface, and does not require a GA verification code for every file transfer.
Before you transfer data on Atlas, familiarize yourself with Best Practices ⤴.
Follow the step-by-step Globus Data Transfer ⤴ guide provided by SCINet support team or learn by watching the instructional video.
Explore SCINet user guides
- Atlas login node: @atlas-login.hpc.msstate.edu
- Using Linux Command Line Interface ⤴
- Using web-based Open OnDemand Interface ⤴
- Access Atlas OpenOnDemand at https://atlas-ood.hpc.msstate.edu
- Explore OOD guides ⤴
Software on Atlas:
- learn more from the universal Software guides ⤴ section: